Banana Dream Pie
The Ultimate Cream Pie - an American treasure!
It must have started as a dream as how can something so heavenly have been conceived on earth! A divinely tasting creamy custard piled with clouds of sweet angelic cream! I know we thought our mother an angel when she prepared it, this family favorite dessert, that had us all singing angelic hymns of thanksgiving. Okay, so let’s bring this creation down to a realistic earthly possibility. Who wants to wait for the eternity of realms of glory to enjoy this pie!
Reality: - yes, this dessert is within your mortal reach! After all, the base is simply a pastry crust, and even if you, like my mother, had doubts about being able to execute a flaky, yet sturdy result, it is very possible. It just takes (1) a bit of borrowed confidence, by way of instruction from people who have made crusts successfully before, (2) application, in the way of practice makes it if not perfect, better and (3) the realization that you have succeeded! And if still not successful, there are adequate pre-prepared crusts. (My mother turned to a great aunt when she needed a pastry crust, who had achieved near perfection in pie making, her crusts made with lard. Or when that aunt was busy preparing pies for the local drugstore food counter, there was a boxed, pie crust mix, at that time, that just sufficed.
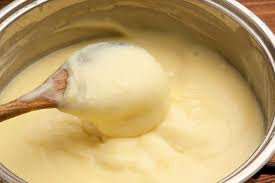
The custard is a classic French pastry cream, which is fast and easy but does require careful nurturing and care as you stir constantly while it cooks and thickens.
Next, the bananas require only a simple slicing technique learned by most in childhood.
Finally, the clouds of glory? Whipped fresh cream is a must - no substitutes if you want this pie to be truly glorious! The technique of whipping fresh cream is certainly within your reach if not already within your grasp.
So, there is nothing to hold you back. Give this pie a try and your family will be singing hymns of thanksgiving! (You may even want to serve it for that holiday. It is never missing from our “pie fest” of 8 - 10 varieties of pies that cover our dessert table on that day!)
banana dream pie
Prepare a 9 - 10 inch piecrust. (See recipe below)
Prepare Pastry Cream (Custard/Filling):
1 cup sugar
1/2 cup flour
1/2 teaspoon salt
3 1/2 cups milk or half & half
4 eggs
3 tablespoons butter
2 teaspoons vanilla extract
-In a medium saucepan, combine flour, salt and sugar. Gradually stir in milk. Cook and stir frequently over medium heat till thickened and bubbly. Reduce heat, and cook and stir 2 minutes more. Remove from heat.
-Separate egg yolks from whites; discard whites or save for another purpose. Beat egg yolks slightly. Gradually whisk 1/2 cup of the hot mixture into yolks. Return egg mixture to saucepan, bring to a gentle boil. Cook and stir 2 minutes more
-Remove from heat. Stir in butter and vanilla. Allow to cool 15 - 20 minutes, stirring occasionally.
-Whip 1 1/2 cups of cream until thick, adding 3 tablespoons sugar and vanilla extract once soft peaks have formed.
-Cut 2 - 3 perfectly ripe banans into slices and place over cooled crust and up the sides so that they completely cover crust. (Or if you prefer, fill with cooled pastry cream and then cover the surface of the pastry cream with the sliced bananas.) Spoon in the cooled filling, smoothing the top. Spread whipped cream over filling, being careful to cover any exposed banana. Place a few dried banana slices in the center of the pie and sprinkle with gold sugar, if desired. Chill at least 2 hours before serving. Makes 8 servings.
AUNT NELL’S PIE CRUST:
1 1/4 cup flour
3/4 teaspoon salt
1/2 cup butter, shortening or lard (or combo of)
5 tablespoons ice water (approx.)
-Cut in fat with fork or pastry blender until mixture resembles small peas or breadcrumbs. Sprinkle with 1/2 cup ice cold water. Gently toss mixture, then push and mold together into a shaggy ball, handling as little as possible. (Do not need or over mix - press together)
-Press into disc shape and cover with plastic wrap. Chill for 30 minutes.
-Place dough on well-floured counter or wax paper or pastry pad. Lightly flour top of dough and rolling pin and beginning in the center lightly roll dough out into a circular shape about 13 inches in diameter. Lay your 10-inch pie plate on top of the rolled-out dough and make sure it extends 1 1/2 to 2 inches beyond the edge of the pie plate. Flip the dough into the pie plate and press into the bottom corners and up the sides of the plate. Press any cracks together or repair cracks and holes with extra pieces of dough. Pierce the bottom and the sides of the crust at frequent intervals with a fork.
-Turn the top edges under and press gently then crimp the edges of the dough in desired fashion. Place the formed crust into the fridge for another 30 minutes. Preheat oven to 375 degrees. Bake pie crust for about 20 minutes, until golden. Remove from oven and cool completely. Fill with desired filling.
Stir pastry cream constantly while cooking until smooth and thickened.
Layer banana slices on top of cooled crust.
Smooth vanilla pastry cream (custard) over banana slices.
Who could resist such a heavenly creation?
A favorite American pie if not a favorite American dessert!
PERSNICKETY NOTES:
**The pastry cream can interact with the metal used in some saucepans - aluminum an example, to turn an unsightly shade of green. So to be certain the cream stays a pale yellow, pour the thickened cream out of the saucepan into a non-reactive glass or plastic bowl to allow to cool.
**Be patient with yourself when preparing pie crusts. There are numerous helpful tips in preparing crusts to help you succeed. Here are a couple of my favorites.
-Be sure to break the fat down into the flour until it resembles coarse crumbs. What does that mean? Resembling coarse sand or cornmeal is a good guide, though there are those crust makers, who suggest not breaking the fat down to that point, but keeping it coarser, in order to create a flakier crust. I enjoy the process of lifting and rubbing the mixture between my fingers to achieve the desired result.
-Once the water is added, handle the dough as little as possible, gently tossing then pressing the mixture together to form a rough ball shape. Wrap and chill the pastry well at that point.
-My favorite technique for rolling out the pastry, is to place a piece of wax paper or parchment paper on the counter, flour it well then place another sheet of wax paper on top, then roll out gently with the rolling pin. When you have achieved a uniform thickness of about 1/4 inch, pull off the top layer of wax paper, place your hand under the bottom layer of wax paper and gently flip it into the pie plate you are using, then peel back the wax paper from the pastry crust.
-To crimp the edge of the pie crust, everyone has their own technique. I don’t think I could even explain in writing how I do mine. It has become automatic and you as well will develop your own technique. But for a first foray into the world of crimping, watch this helpful video - https://www.youtube.com/watch?v=sJRY1vdCMkQ
-To “blind bake” the pie crust (in other words, crust that is baked before it is filled as in this recipe) pierce the crust at frequent intervals with fork tines and chill for 30 minutes before baking. This helps prevent the crust from shrinking. Or you can line the unbaked crust with parchment paper and fill with “baking beans” or “pie weights”, made for this purpose or with dried beans of any kind. Then bake for the first 10 minutes of the baking time with the beans inside. Carefully remove beans and continue baking until the crust is golden.


