

French Puff Pastry Tart/ Pithivier

Beautiful, buttery puff pastry encases sweet as well as savory fillings in the elegant French classic, Pithivier. Try making your own puff pastry for a sense of accomplishment!
French Pithivier
Savory Beef, Onion, Gruyere Filling:
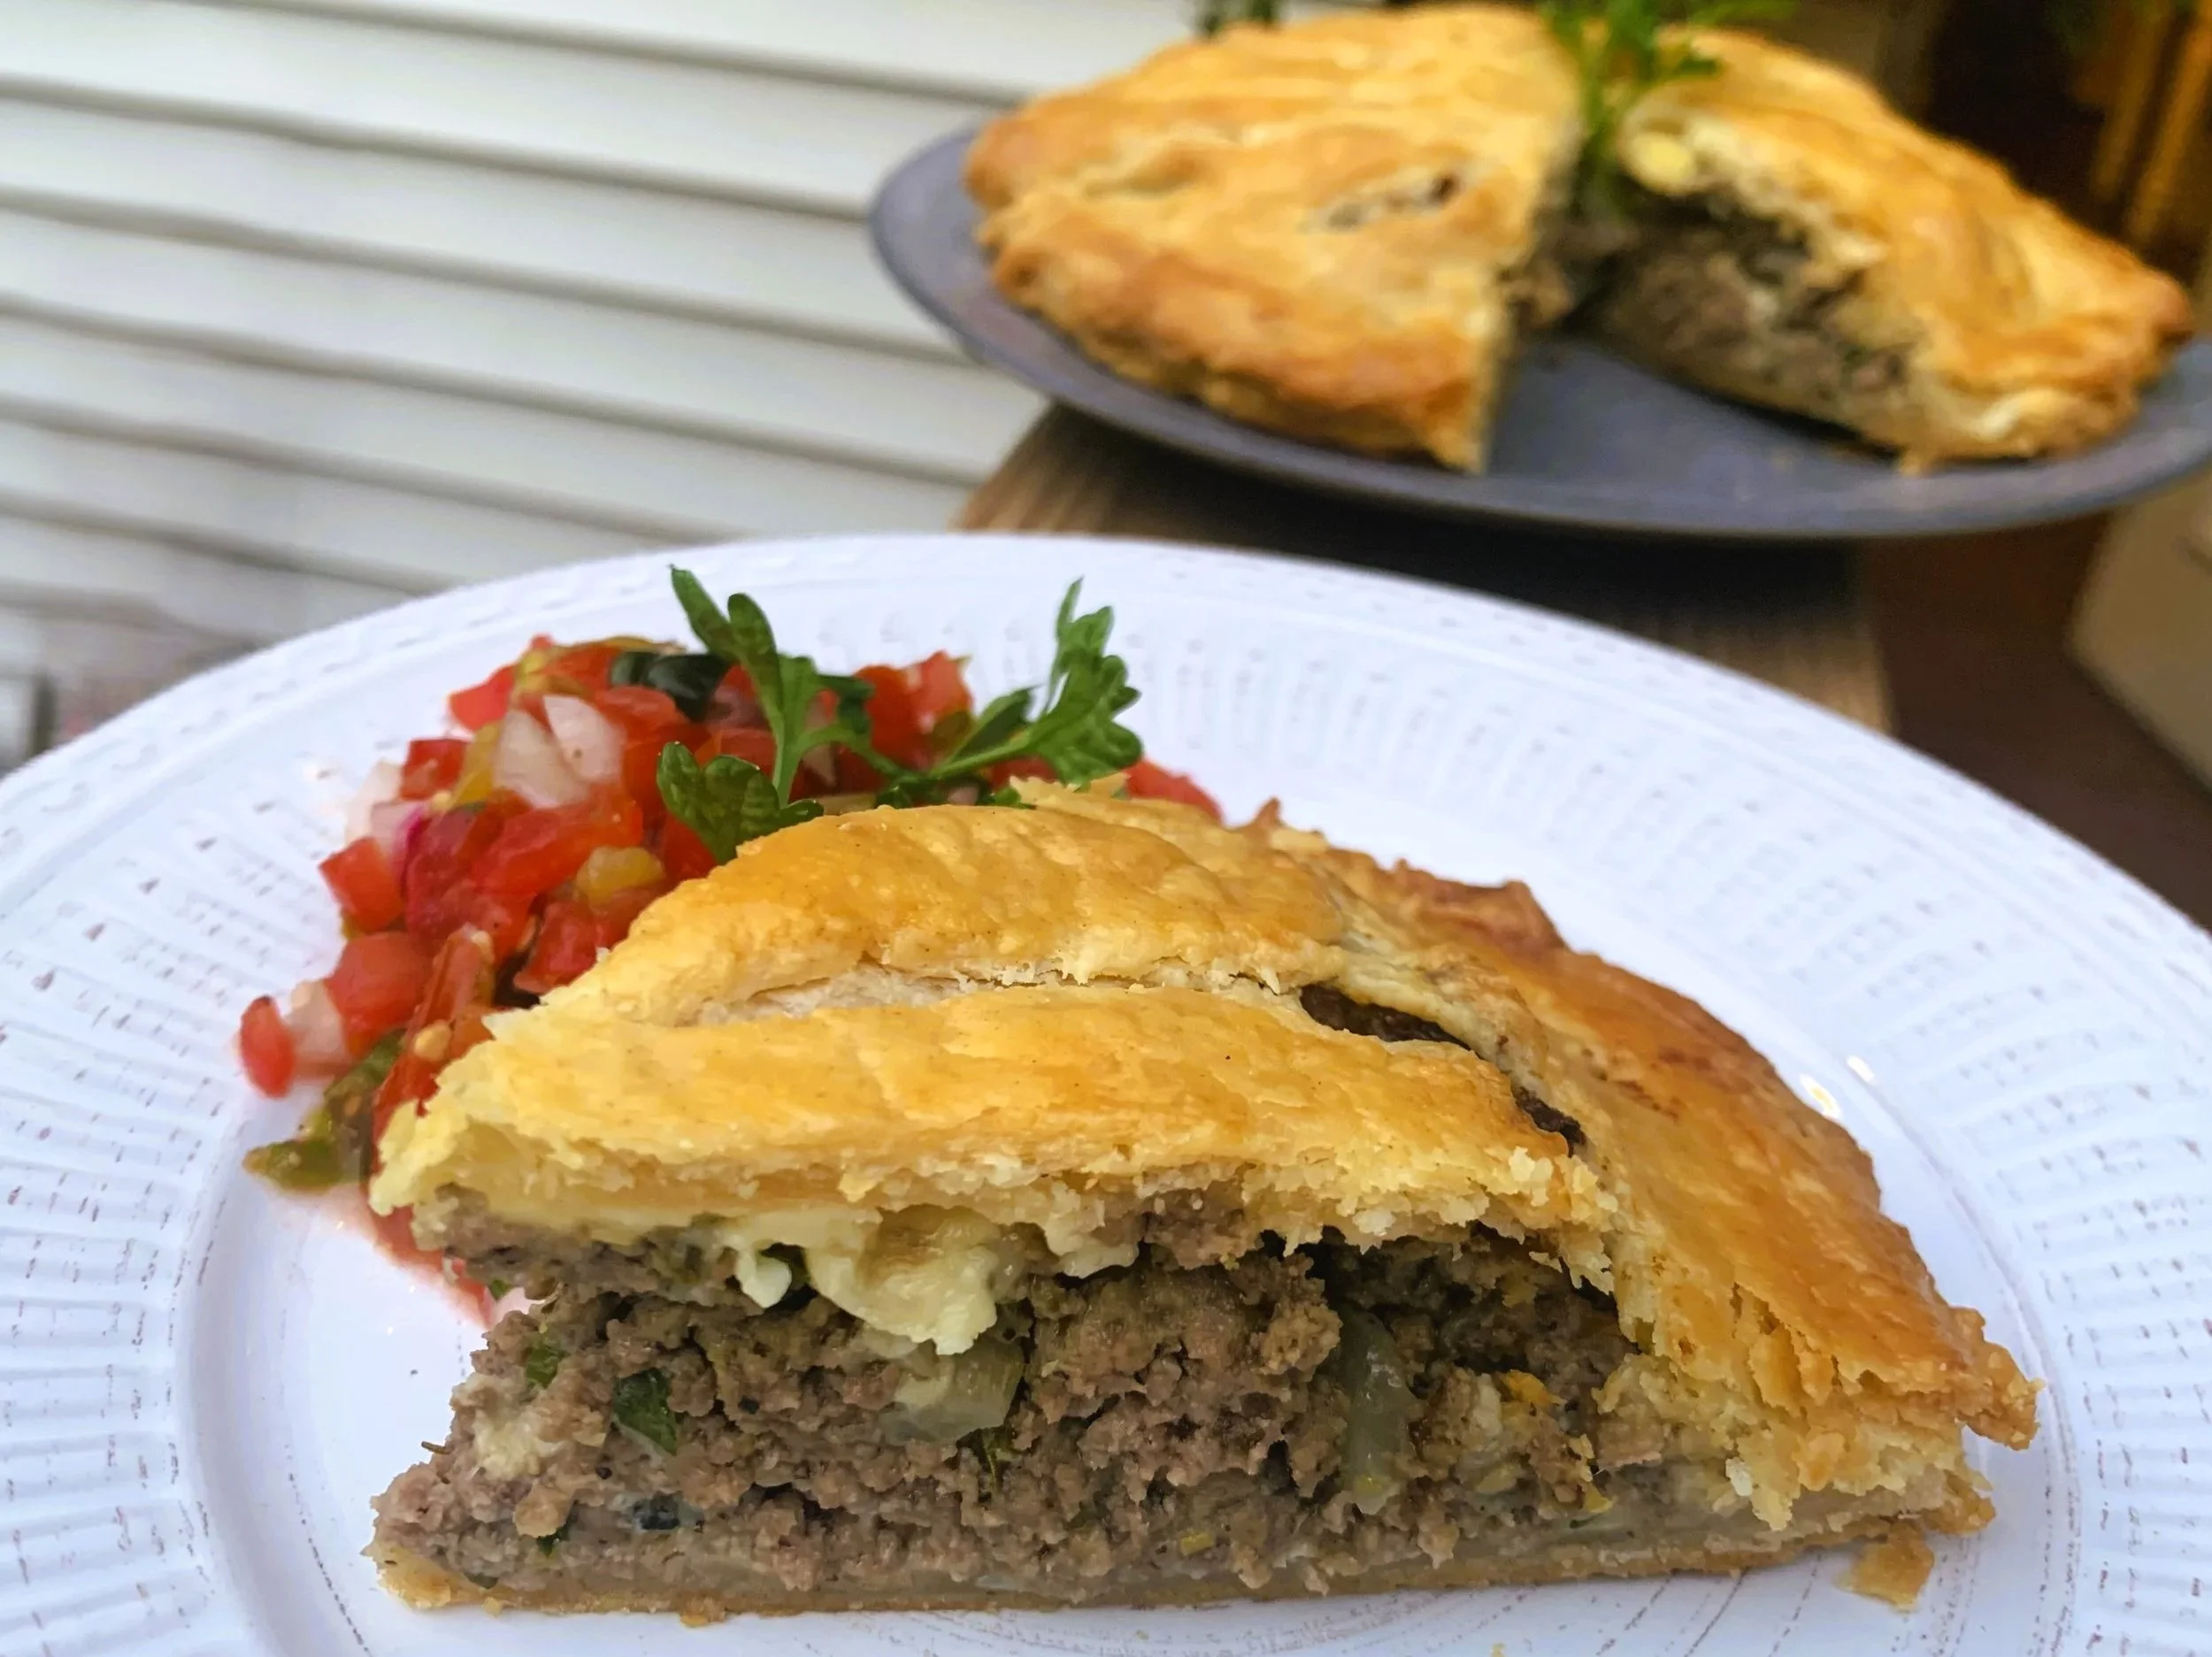
A savory version Pithivier, filled with beef, onions, red peppers, Gruyere cheese and finally, caramelized onions. The Herbs de Provence and touch of lemon in the filling whisper, “Bravo”!
Savory Beef, Onion, Gruyere Filling:
2 frozen puff pastry sheets or 1 recipe homemade rough puff pastry
BEEF, ONION FILLING:
12 ounces ground beef
2 large shallots, finely chopped
2 cloves garlic, peeled & minced
1 large onion, peeled and slivered
1 medium red bell pepper, medium diced
8 ounces fresh mushroom, sliced
1 tablespoon dried Herbs de Provence
2 teaspoons lemon zest
1 teaspoon each, salt and freshly ground pepper, or to taste
2 eggs, slightly beaten
2 tablespoons olive oil
2 tablespoons finely minced fresh parsley, or 1 tablespoon dried
8 ounces grated Gruyere or Parmesan cheese
vegetable oil for frying
-In a skillet, heat olive oil and add shallot and red pepper then fry about 5 minutes until softened. Add garlic and continue cooking for another minute. Add the beef and brown, breaking the meat apart as it is cooking. Set aside once the meat is browned.
-In a separate medium skillet, melt 2 tablespoons butter, add the mushrooms then cook over medium-high heat for about 5 minutes to soften. Remove from the pan and add to the beef mixture.
-Heat another tablespoon of oil to the same skillet, then add the slivered onion. Caramelize over medium heat, stirring occasionally, until onions are browned and silky (about 20 minutes). Set aside.
-To the meat mixture, stir in the Provencal herbs, lemon zest, salt and pepper and taste for seasoning. Cool mixture then mix in minced parsley and 1 egg to bind it together. Set filling aside or chill until ready to use.
To Assemble the Pithivier
-Remove pastry sheets from the wrappers and set them on the counter for about 5 minutes. Unfold each pastry sheet and open to the shape of a tent and allow them to continue to thaw another 5 - 10 minutes.
-Lightly flour your work surface and roll one sheet at a time out into a square, approximately 11 x 11 inches. Using a 10 inch round plate as a guide, lay it on top of each square, then trace the circle around the plate, cutting into the puff pastry. Pull away the excess edges. (If using home made puff pastry, roll out into a rectangle about 20 inches long by 10 inches wide. Pastry will be very thin. Trace and cut 2 circles side by side into the dough. Remove excess pastry.)
-Brush edges of each circle with egg wash made of one beaten egg mixed with 2 tablespoons milk or water.
-There are 2 methods explained below for baking the pithivier:
#1 - With soft butter, grease the bottom and sides of a 10 inch spring form pan. Lay one circle of pastry inside and on the bottom of the ringed pan.
#2 - Line a baking sheet with parchment paper, then place one round in the center of the sheet.
*For the savory tart (meat/onion), continue following the directions below to complete the assembly of the Pithivier.
-Mound the beef mixture onto the center of the pastry and with a spatula or spoon, press the mixture flat and out to within 1 inch of the edges. Sprinkle the cheese on top, spreading it evenly over the meat mixture, then top with caramelized onions, spreading them as evenly as possible.
-Place the 2nd round gently on top of the filling and cheese and push lightly to bring the edges of the top round down around the sides of the filling until the edges of the dough of the top round and the second round meet. (If using the spring form pan, this isn’t necessary. Just use a knife around the edges to push the edges of the top round down toward the bottom of the pan. The 2 rounds will not meet.) For the pastry prepared on the the baking sheet, pinch the edges together to seal the top pastry dough to the bottom. Then crimp the edges firmly in a decorative manner to seal the edges as much as possible.
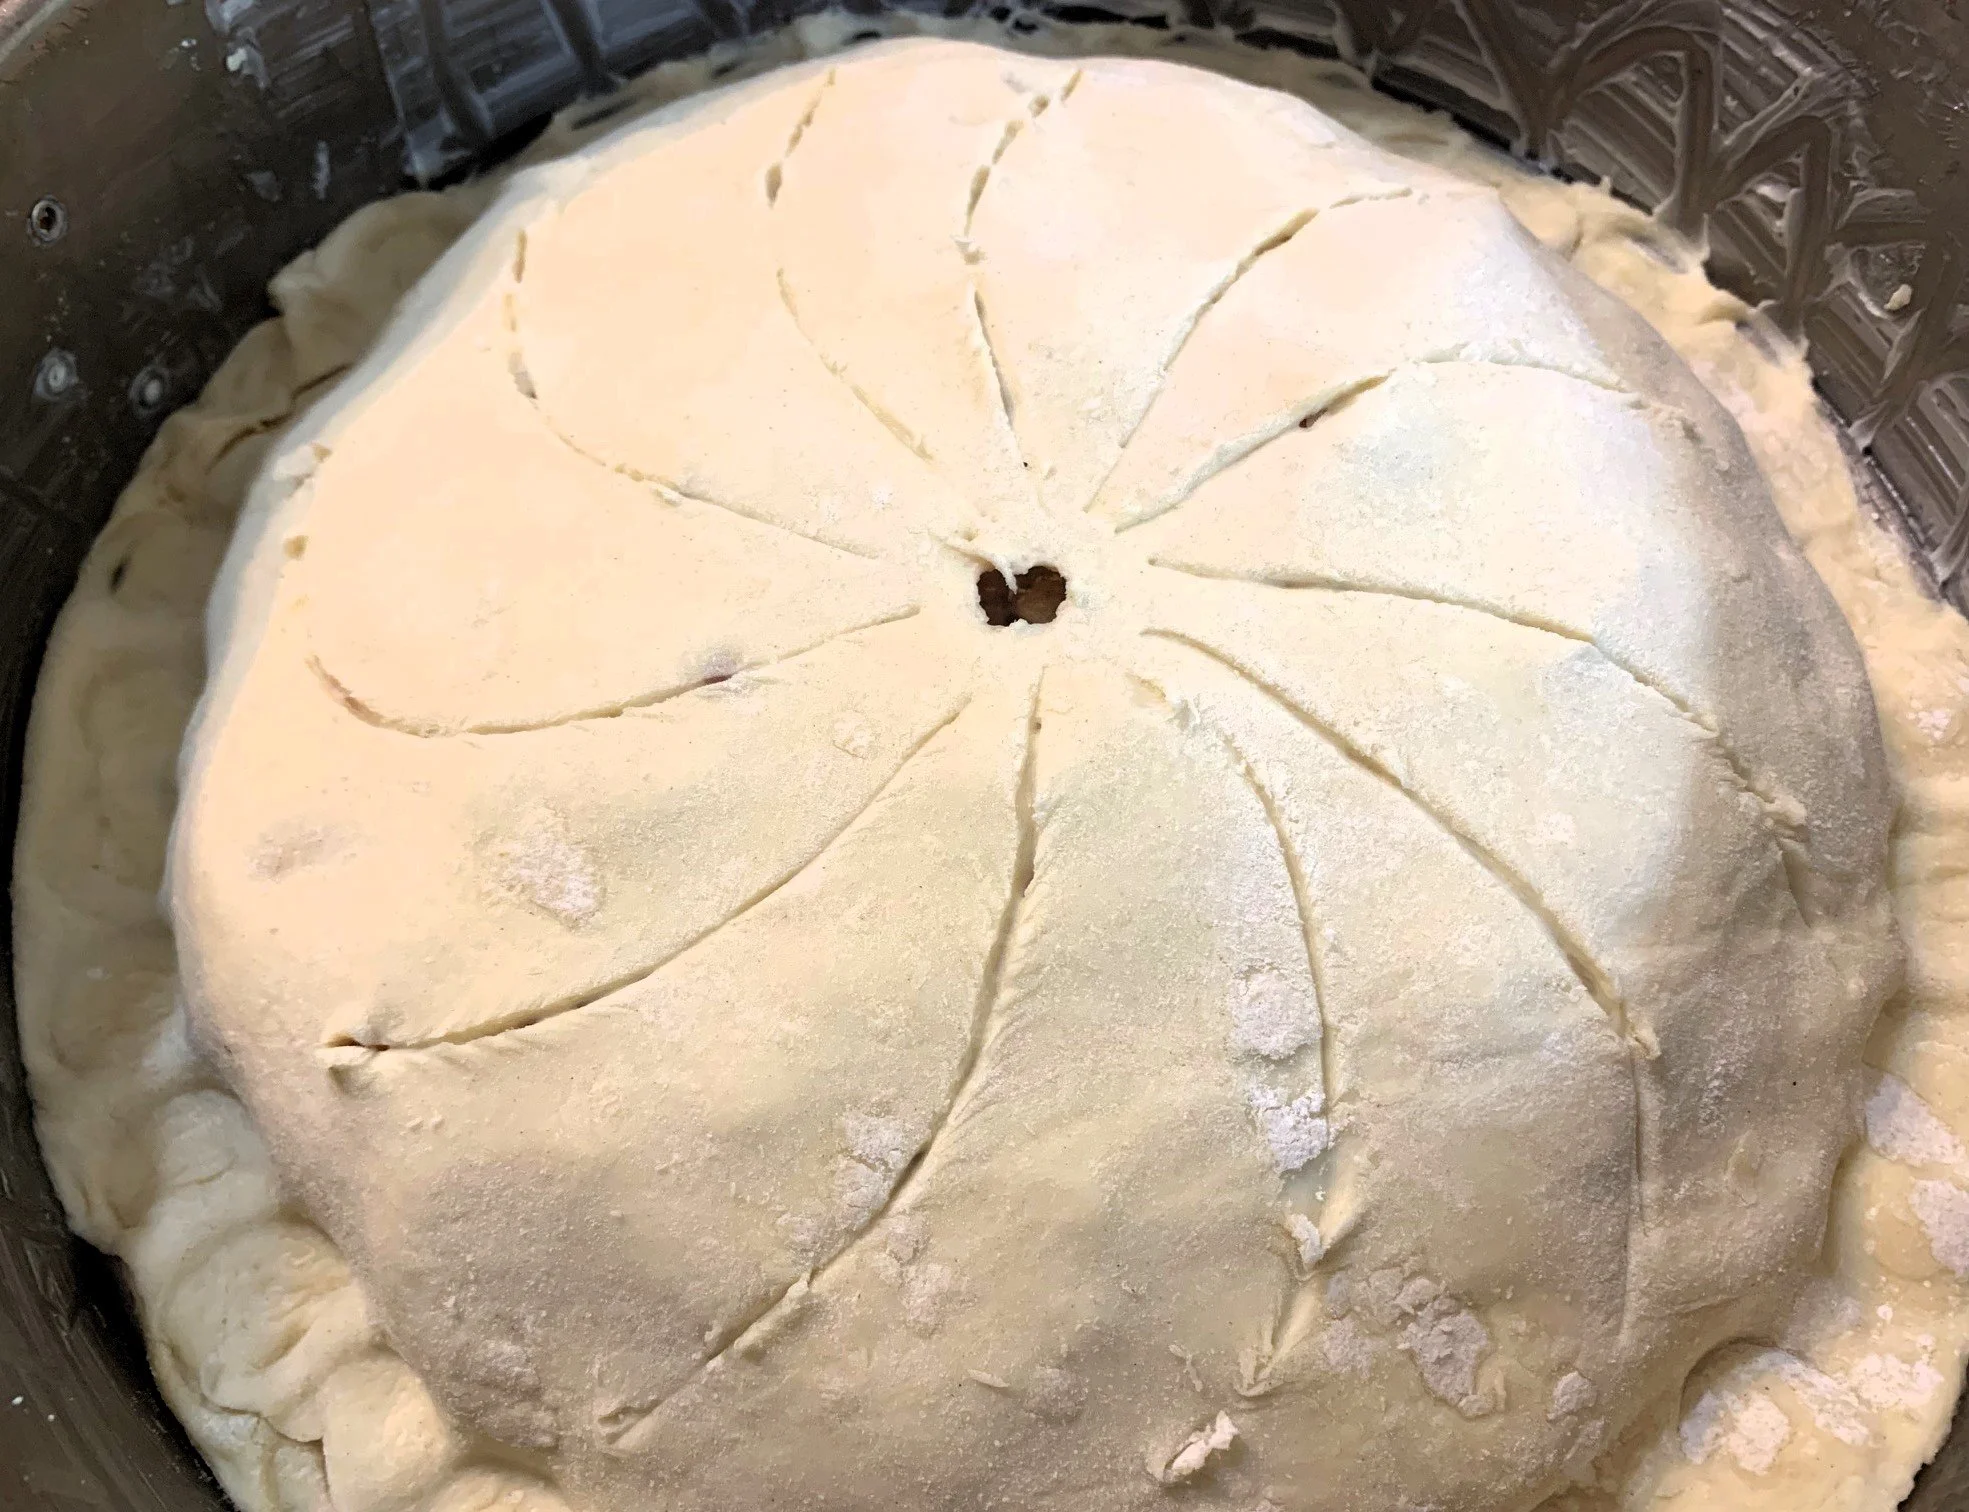
-With a sharp paring knife, make a small vent hole in the very center of the top, then trace decorative lines swirling from the center vent hole down to the edges of the top, as illustrated below. Brush the surface of the Pithivier with more of the egg mixture, using a pastry brush to cover all of the exposed dough.
-Bake in a preheated 375 degree oven until puffy and golden, 30 - 35 minutes. Serve warm or at room temperature with the Persillade dip (recipe below) for the savory meet and cheese version.
-Allow Pithivier to cool for about 15 minutes before serving. Cut into pie shaped wedges to serve. Serves 8 - 10
PERSILLADE DIP:
4 tablespoon olive oil
3/4 to 1 cup fresh flat-leaf parsley, finely chopped
1/2 ounce fresh tarragon leaves finely chopped (or dried)
1/2 shallot, peeled and finely chopped
1/2 ounce fresh dill, finely chopped (or chives)
1 garlic clove, finely chopped
salt and pepper to taste
-Mix above ingredients and allow to sit at room temperature for at least 1 hour. Season to taste with salt and pepper. Store in the fridge. Serve as dip either cold or at room temperature.
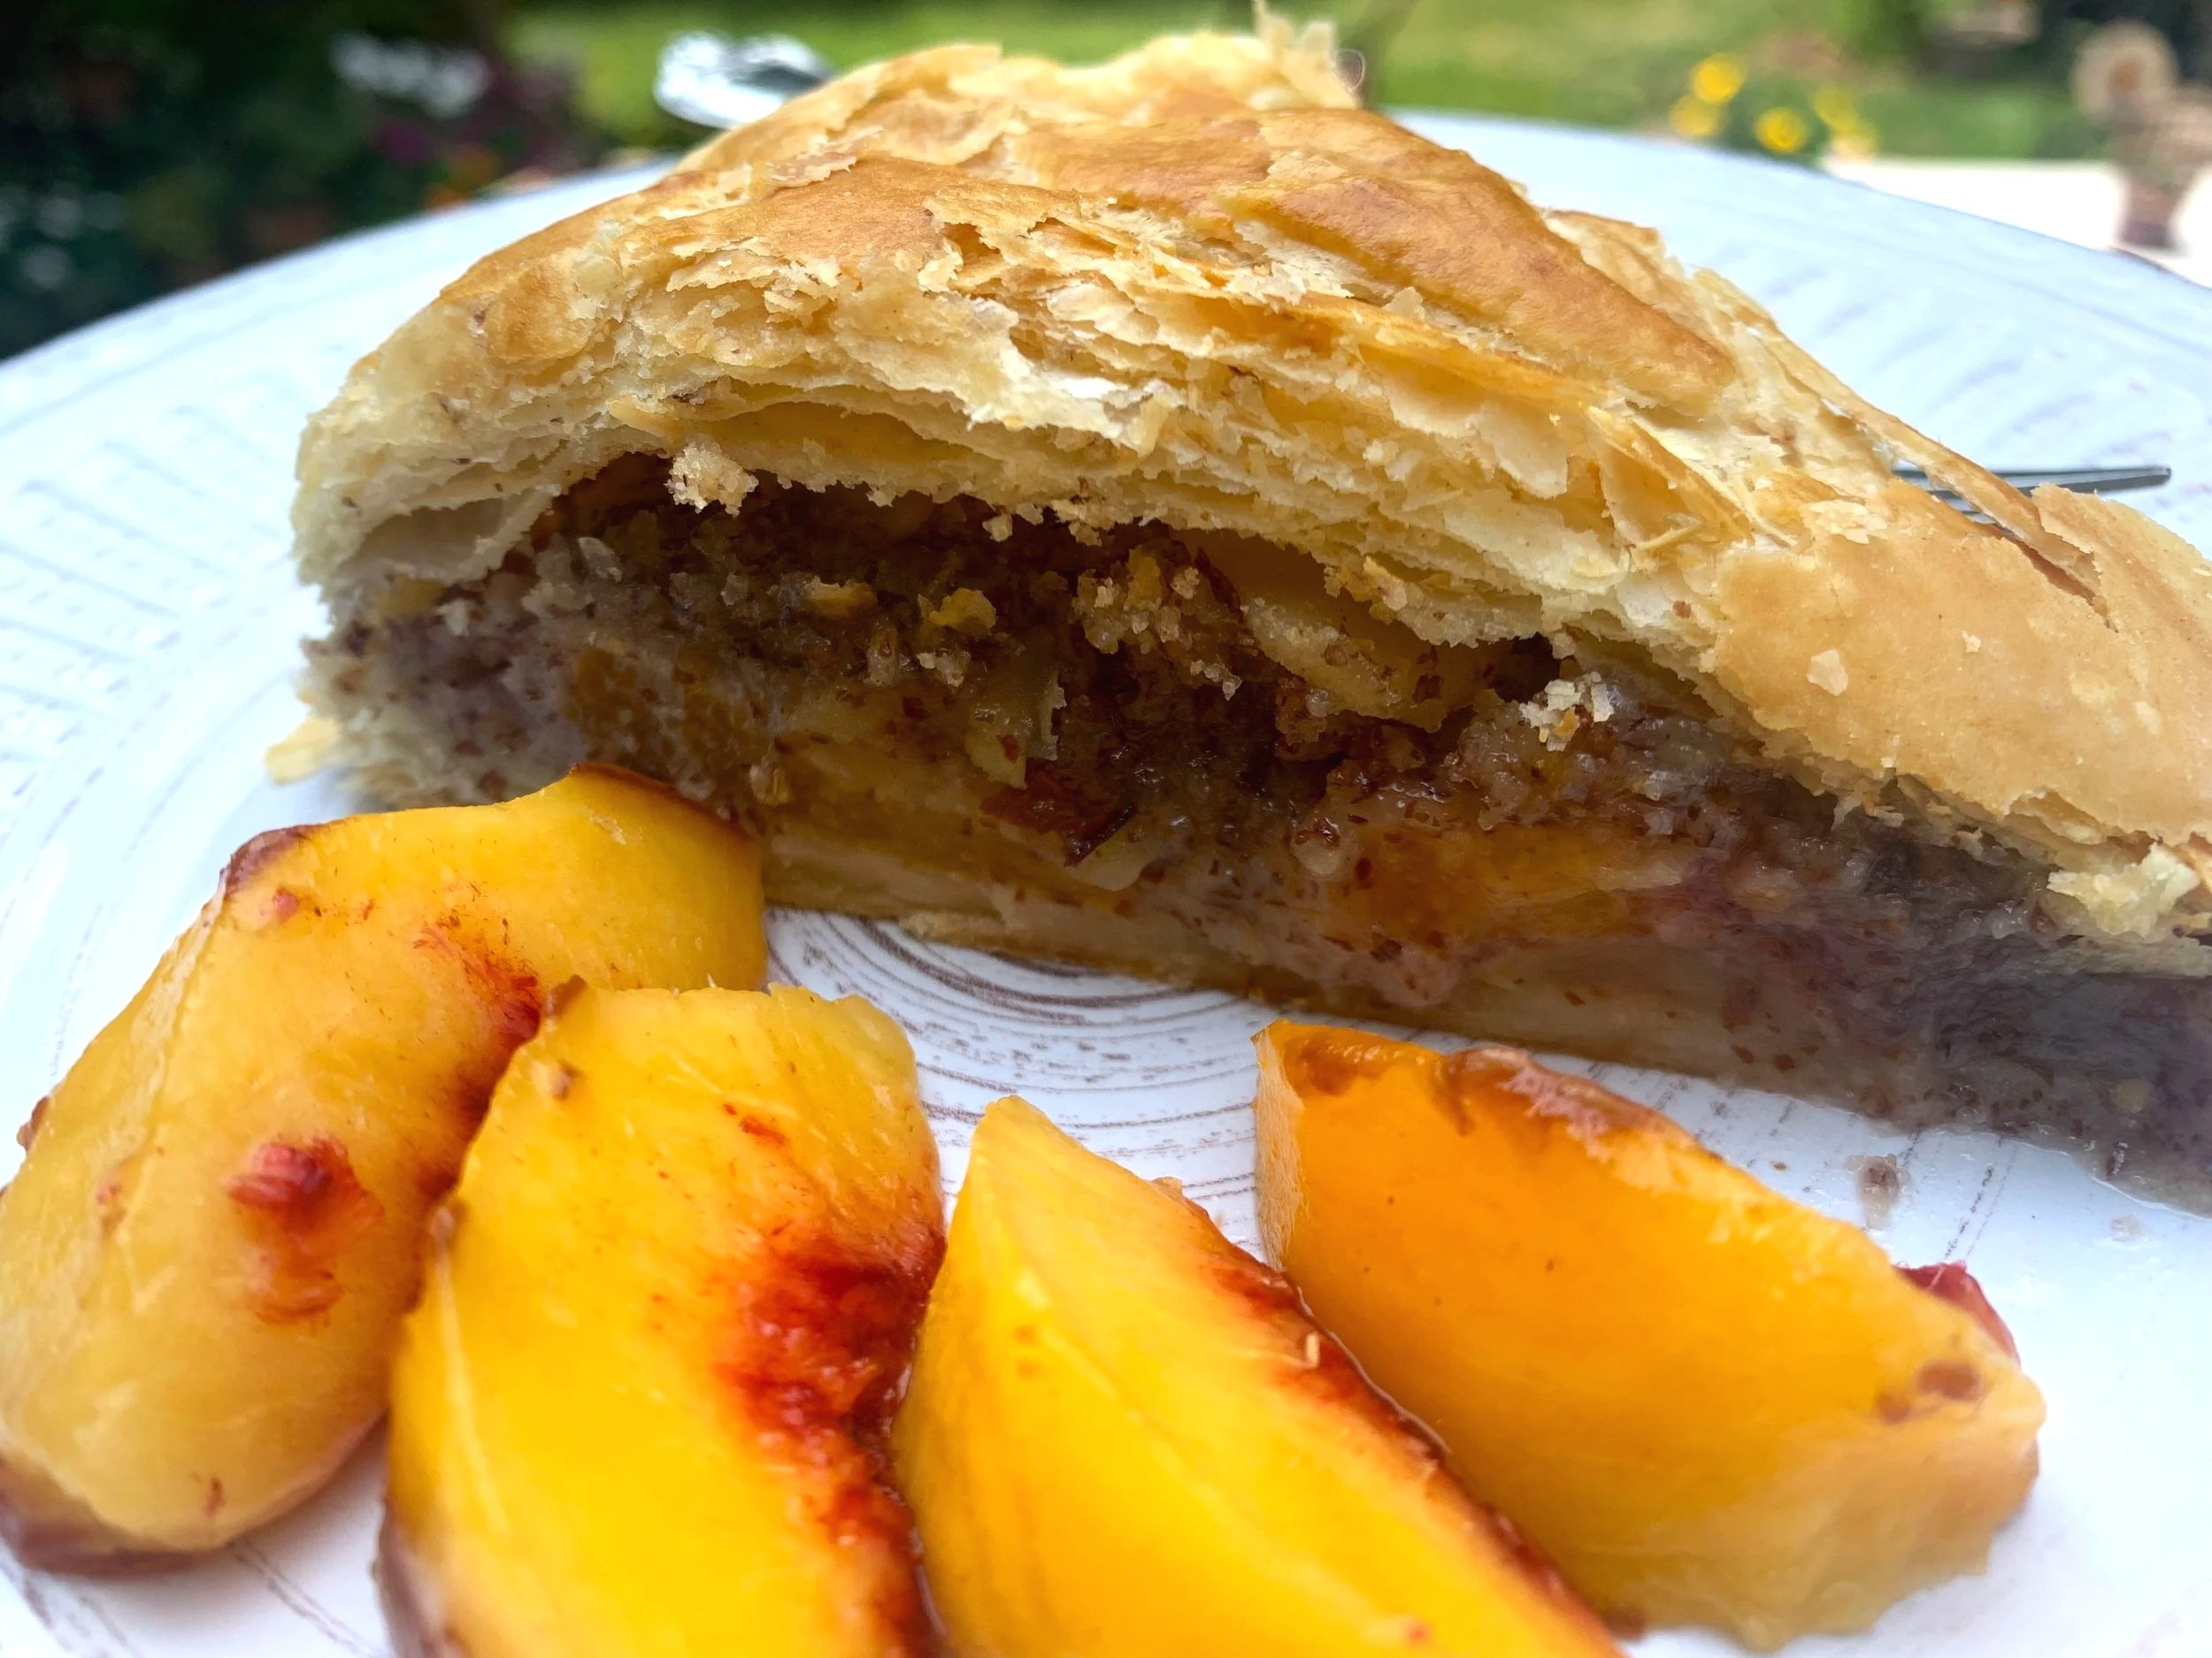
Sweet Pithivier with Almond Frangipane and Peaches

Peaches go beautifully with frangipane and more almonds on top, for the crunch, is always a good way to go!
Sweet Pithivier with Almond Frangipane and Peaches
2 frozen puff pastry sheets or 1 recipe homemade rough puff pastry
1 stick butter, softened (1/2 cup)
2⁄3 cup granulated sugar
2 eggs, at room temperature
1⁄2 teaspoon vanilla extract
1⁄2 teaspoon almond extract
1 1⁄3 cups finely ground almond flour
pinch of salt
3- 4 medium peaches, peeled and slivered
3/4 cup sliced almonds
1/4 teaspoon ground nutmeg
-Cream the softened butter with the sugar until creamy and slightly softer in color either by hand, mixer or food processor.
-Blend in the eggs, one a time until thoroughly incorporated. Add the vanilla and almond extracts. Thoroughly mix in the almond flour and salt until you have a well blended, smooth almond cream.
-Use immediately in your recipe or store in the fridge for three days or up to a month in the freezer. Allow the frangipane to come close to room temperature before using.
To Assemble the Pithivier:
-Remove pastry sheets from the wrappers and set them on the counter for about 5 minutes. Unfold each pastry sheet and open to the shape of a tent and allow them to continue to thaw another 5 - 10 minutes.
-Lightly flour your work surface and roll one sheet at a time out into a square, approximately 11 x 11 inches. Using a 10 inch round plate as a guide, lay it on top of each square, then trace the circle around the plate, cutting into the puff pastry. Pull away the excess edges. (If using home made puff pastry, roll out into a rectangle about 20 inches long by 10 inches wide. Pastry will be very thin. Trace and cut 2 10-inch circles side by side in the dough. Remove excess pastry)
-Brush edges of each circle with egg wash made of one beaten egg mixed with 2 tab. milk or water.
-There are 2 options for baking the pithivier:
#1 - With soft butter, grease the bottom and sides of a 10 inch spring form pan. Lay one circle of pastry inside and on the bottom of the ringed pan.
#2 - Line a baking sheet with parchment paper, then place one round in the center of the baking sheet. Continue directions below to complete the assembly of the Pithivier.
-Mound the frangipane in the center of the pastry and with a spatula or spoon, press the mixture flat and out to within 1 inch of the edges. Arrange the peach slices round the top of the frangipane covering the entire surface with slices. Sprinkle peaches with the nutmeg and then with the sliced almonds as evenly as possible.
-Place the 2nd round gently on top of the filling and peaches and push lightly to bring the edges of the top round down around the sides of the filling until the edges of the dough of the top round and the second round meet. (If using the spring form pan, this isn’t necessary. Just use a knife around the edges to push the edges of the top round down toward the bottom of the pan. The 2 rounds will not meet.) For the pastry on the the baking sheet, pinch the edges together to seal the top pastry dough to the bottom. Then crimp the edges firmly in a decorate manner and to seal the edges as much as possible.
-With a sharp paring knife, make a small vent hole in the very center of the top, then trace decorative lines swirling from the vent hole down to the edges of the top, as illustrated below. Brush the surface of the Pithivier with more of the egg mixture, using a pastry brush to cover all of the exposed dough.
-Bake in preheated 375 degree oven until puffy and golden, 30 - 35 minutes. Serve warm or at room temperature. For the sweet frangipane and peaches version, dust the top of the Pithivier very lightly with powdered sugar.
-Allow Pithivier to cool for about 15 minutes before serving. Serve while still warm or allow to cool completely and chill if desired. This is delicious served with vanilla ice cream, sweetened whipped cream or Sauce Anglaise if desired.
rough puff pastry
1/3 cup very cold water 2 cups all purpose flour 7 ounces of cold butter (1 cup minus 1 tablespoon) cut into about 1/2 inch cubes a pinch of salt 1 tablespoon sugar
-Place flour, salt and sugar in a medium sized mixing bowl and stir briefly. Place the cold butter cubes into the bowl and working with your hands, toss the butter cubes until they are completely coated with flour.
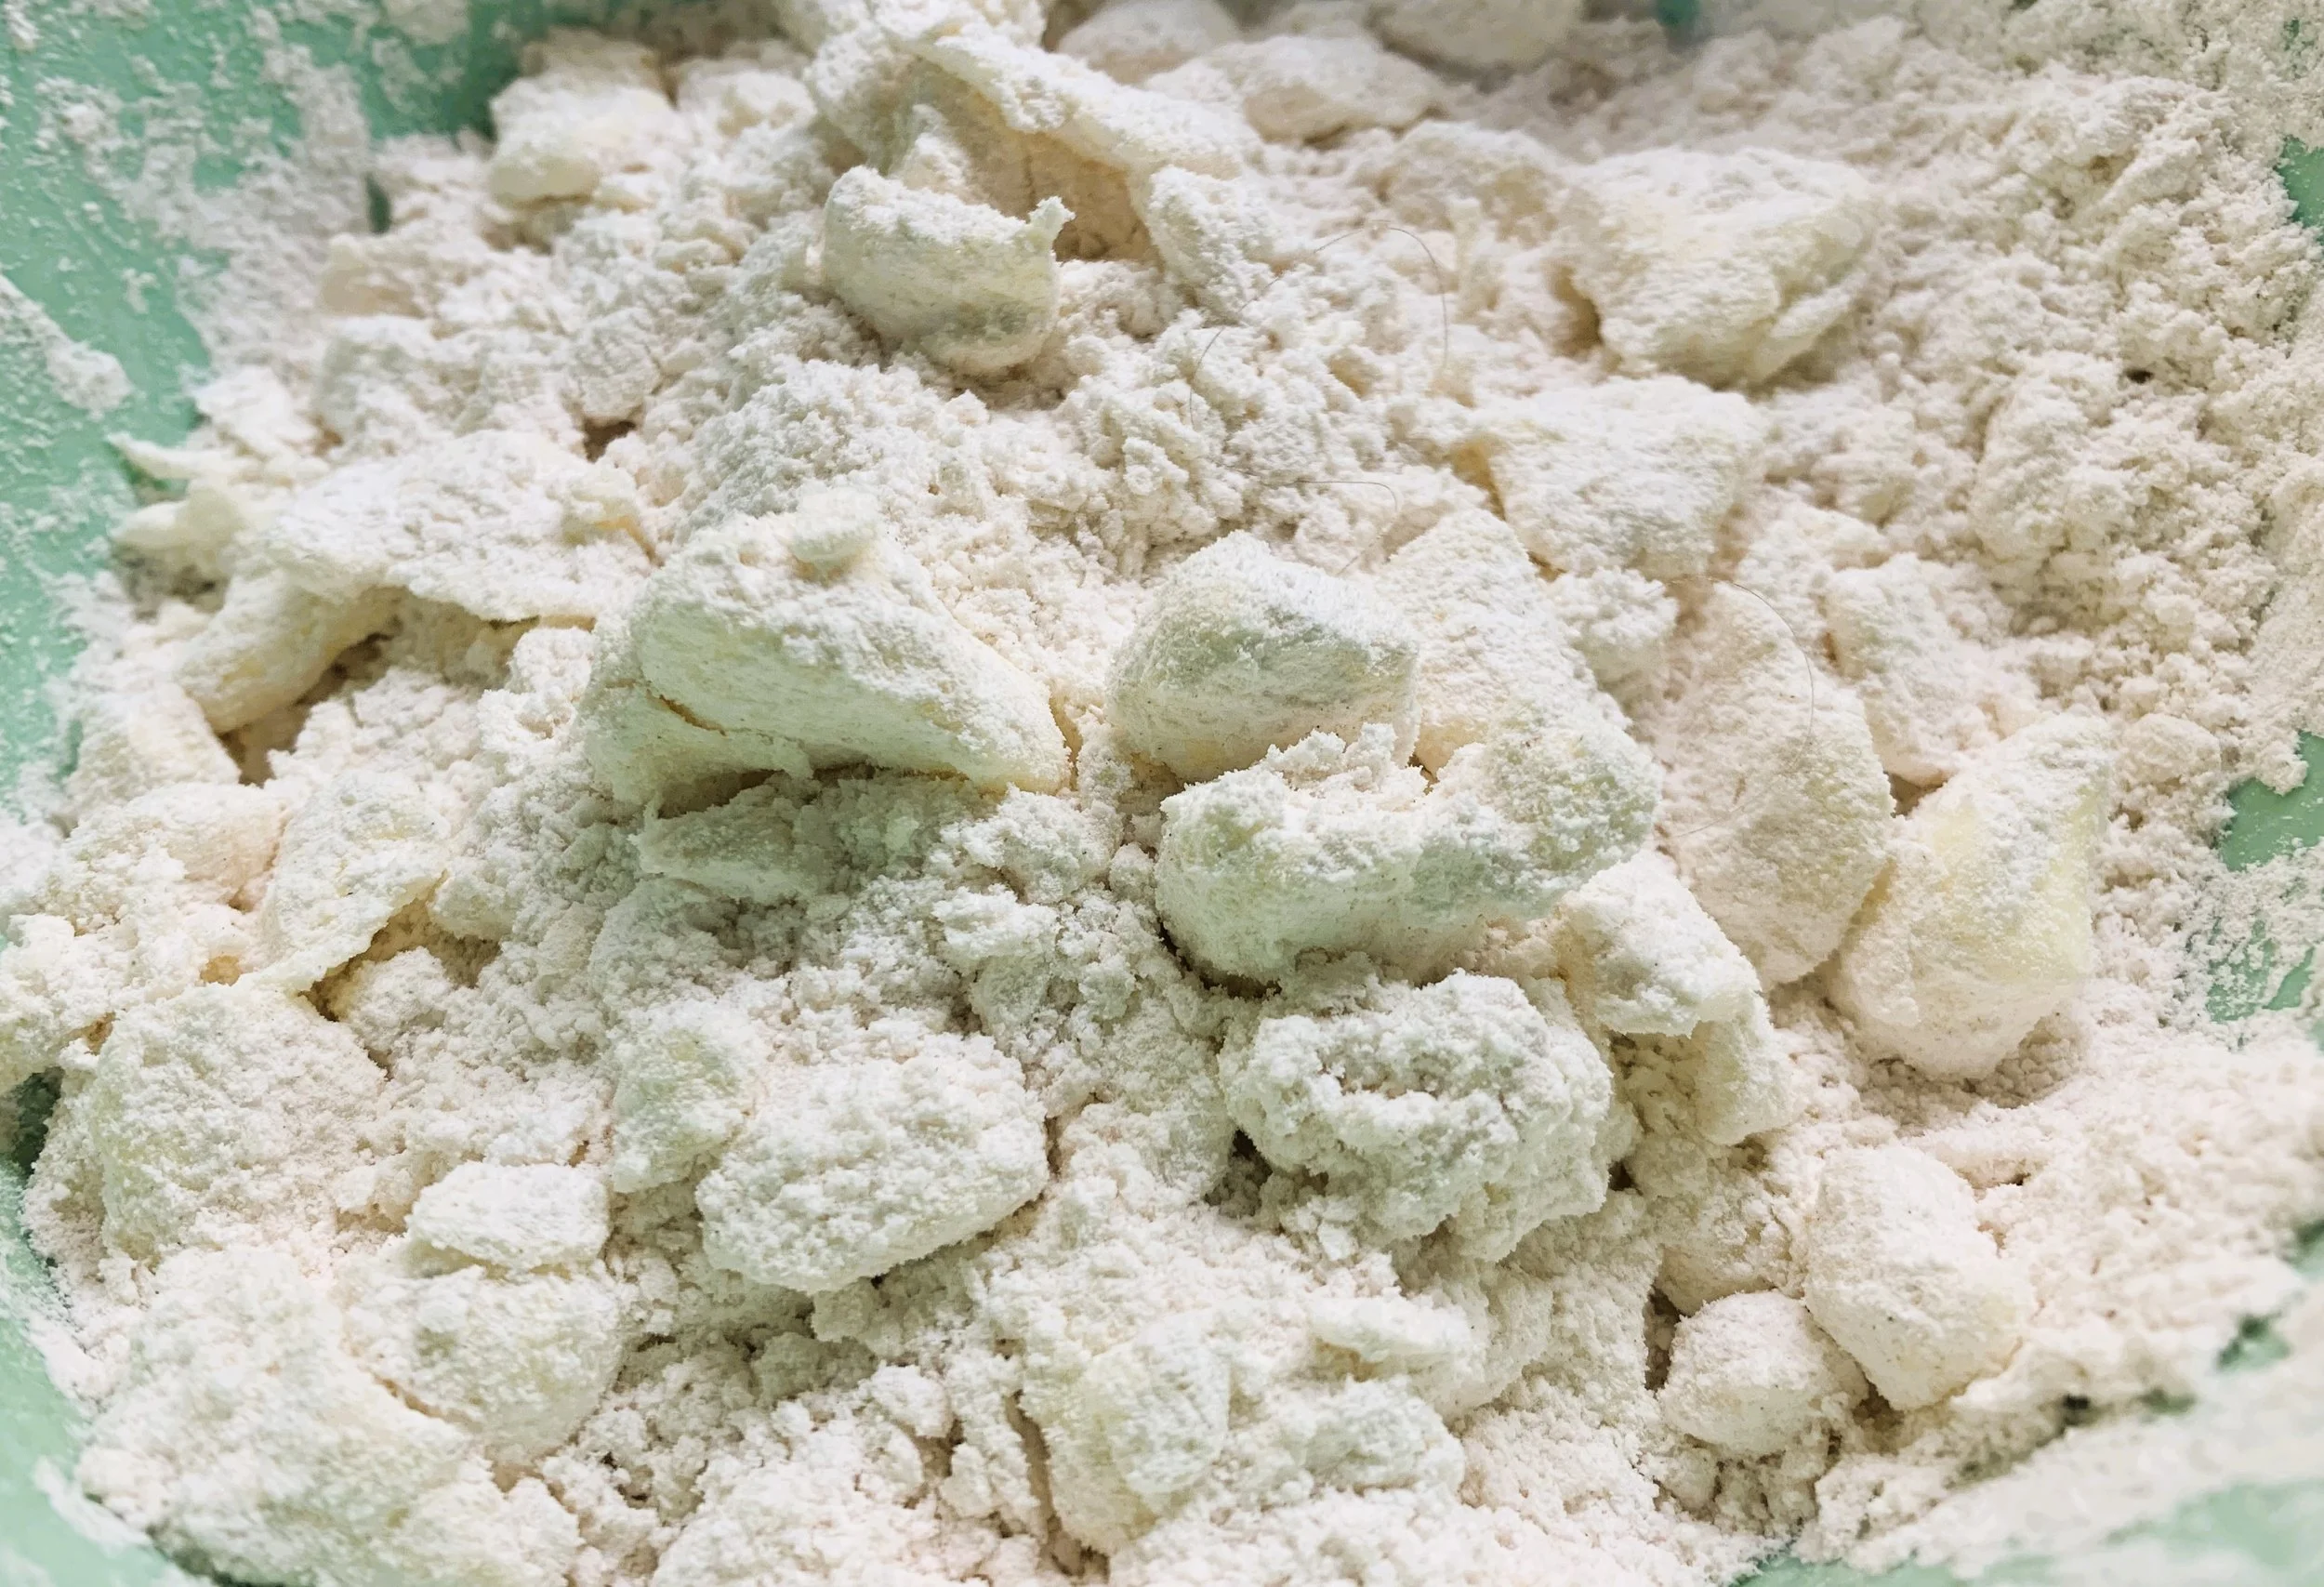
-Press and work the flour and butter together to crumble the butter up into the flour. Do not completely mix the butter into the flour but leave uneven chunks and pieces of butter unmixed. (Refer to picture below.)
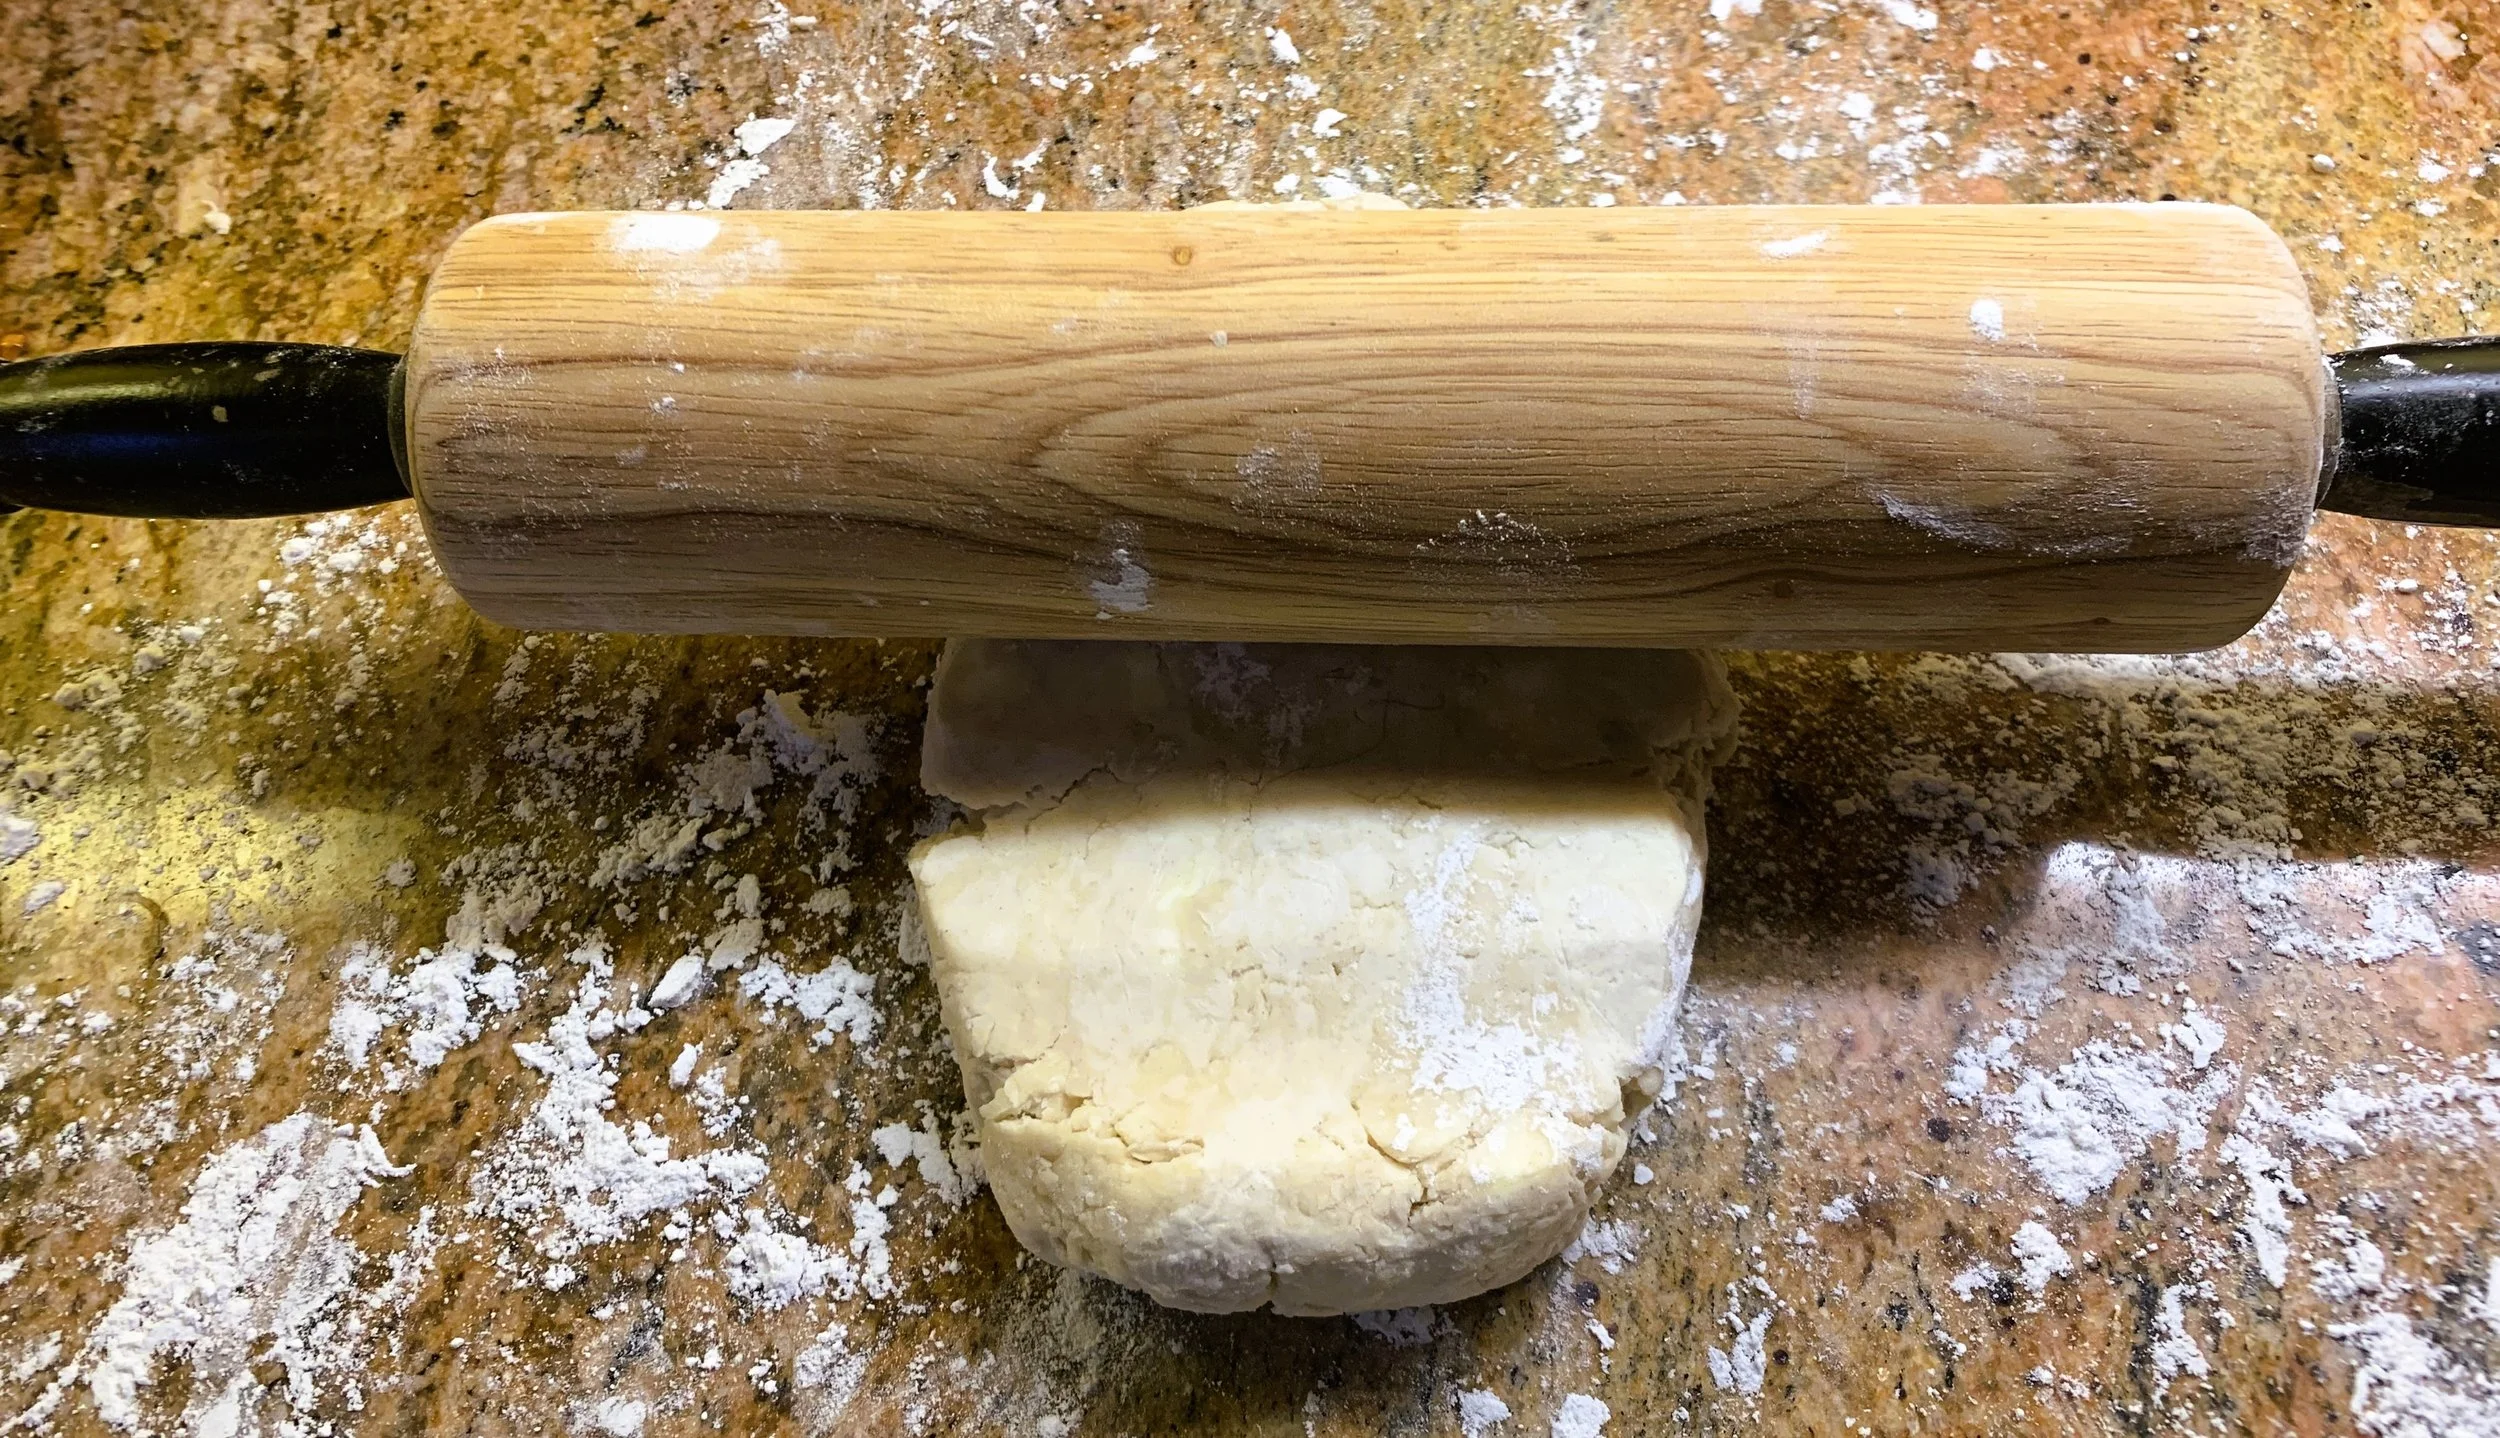
-Measure 3½ ounces cold water and add all but about 1 tablespoon of the water into the flour. Working with your hands toss and press the flour mixture with the liquid, trying to shape the dough into a mass. If you need to add the rest of the water to the dough, do that until you can press the dough into a rough ball. Do not overwork the dough. There will be lumps and bumps and shaggy bits. It will not be smooth and even. Knead it together 2 or 3 times then wrap it with cling film and let rest for 20 minutes in the fridge.
-Lightly flour your work surface and the chilled dough. With a rolling pin, press the dough down the length of the dough ball to flatten slightly. Then beginning at the center, begin to roll the dough in one direction, pushing lightly into a rectangle. Then start at the center and roll again in the other direction, pushing lightly into a rectangle. Stop to add a sprinkle more flour if the dough starts to stick either to the counter or the rolling pin, lifting it to make sure it isn’t sticking to the counter - if it is, sprinkle more flour under the dough. Keep a dry pastry brush handy and brush excess flour off the dough from time to time. (If the dough is difficult to roll out, walk away and let it rest for about 5 minutes. When you try again it should be easier to roll. Sometimes it just needs a bit of a rest!)
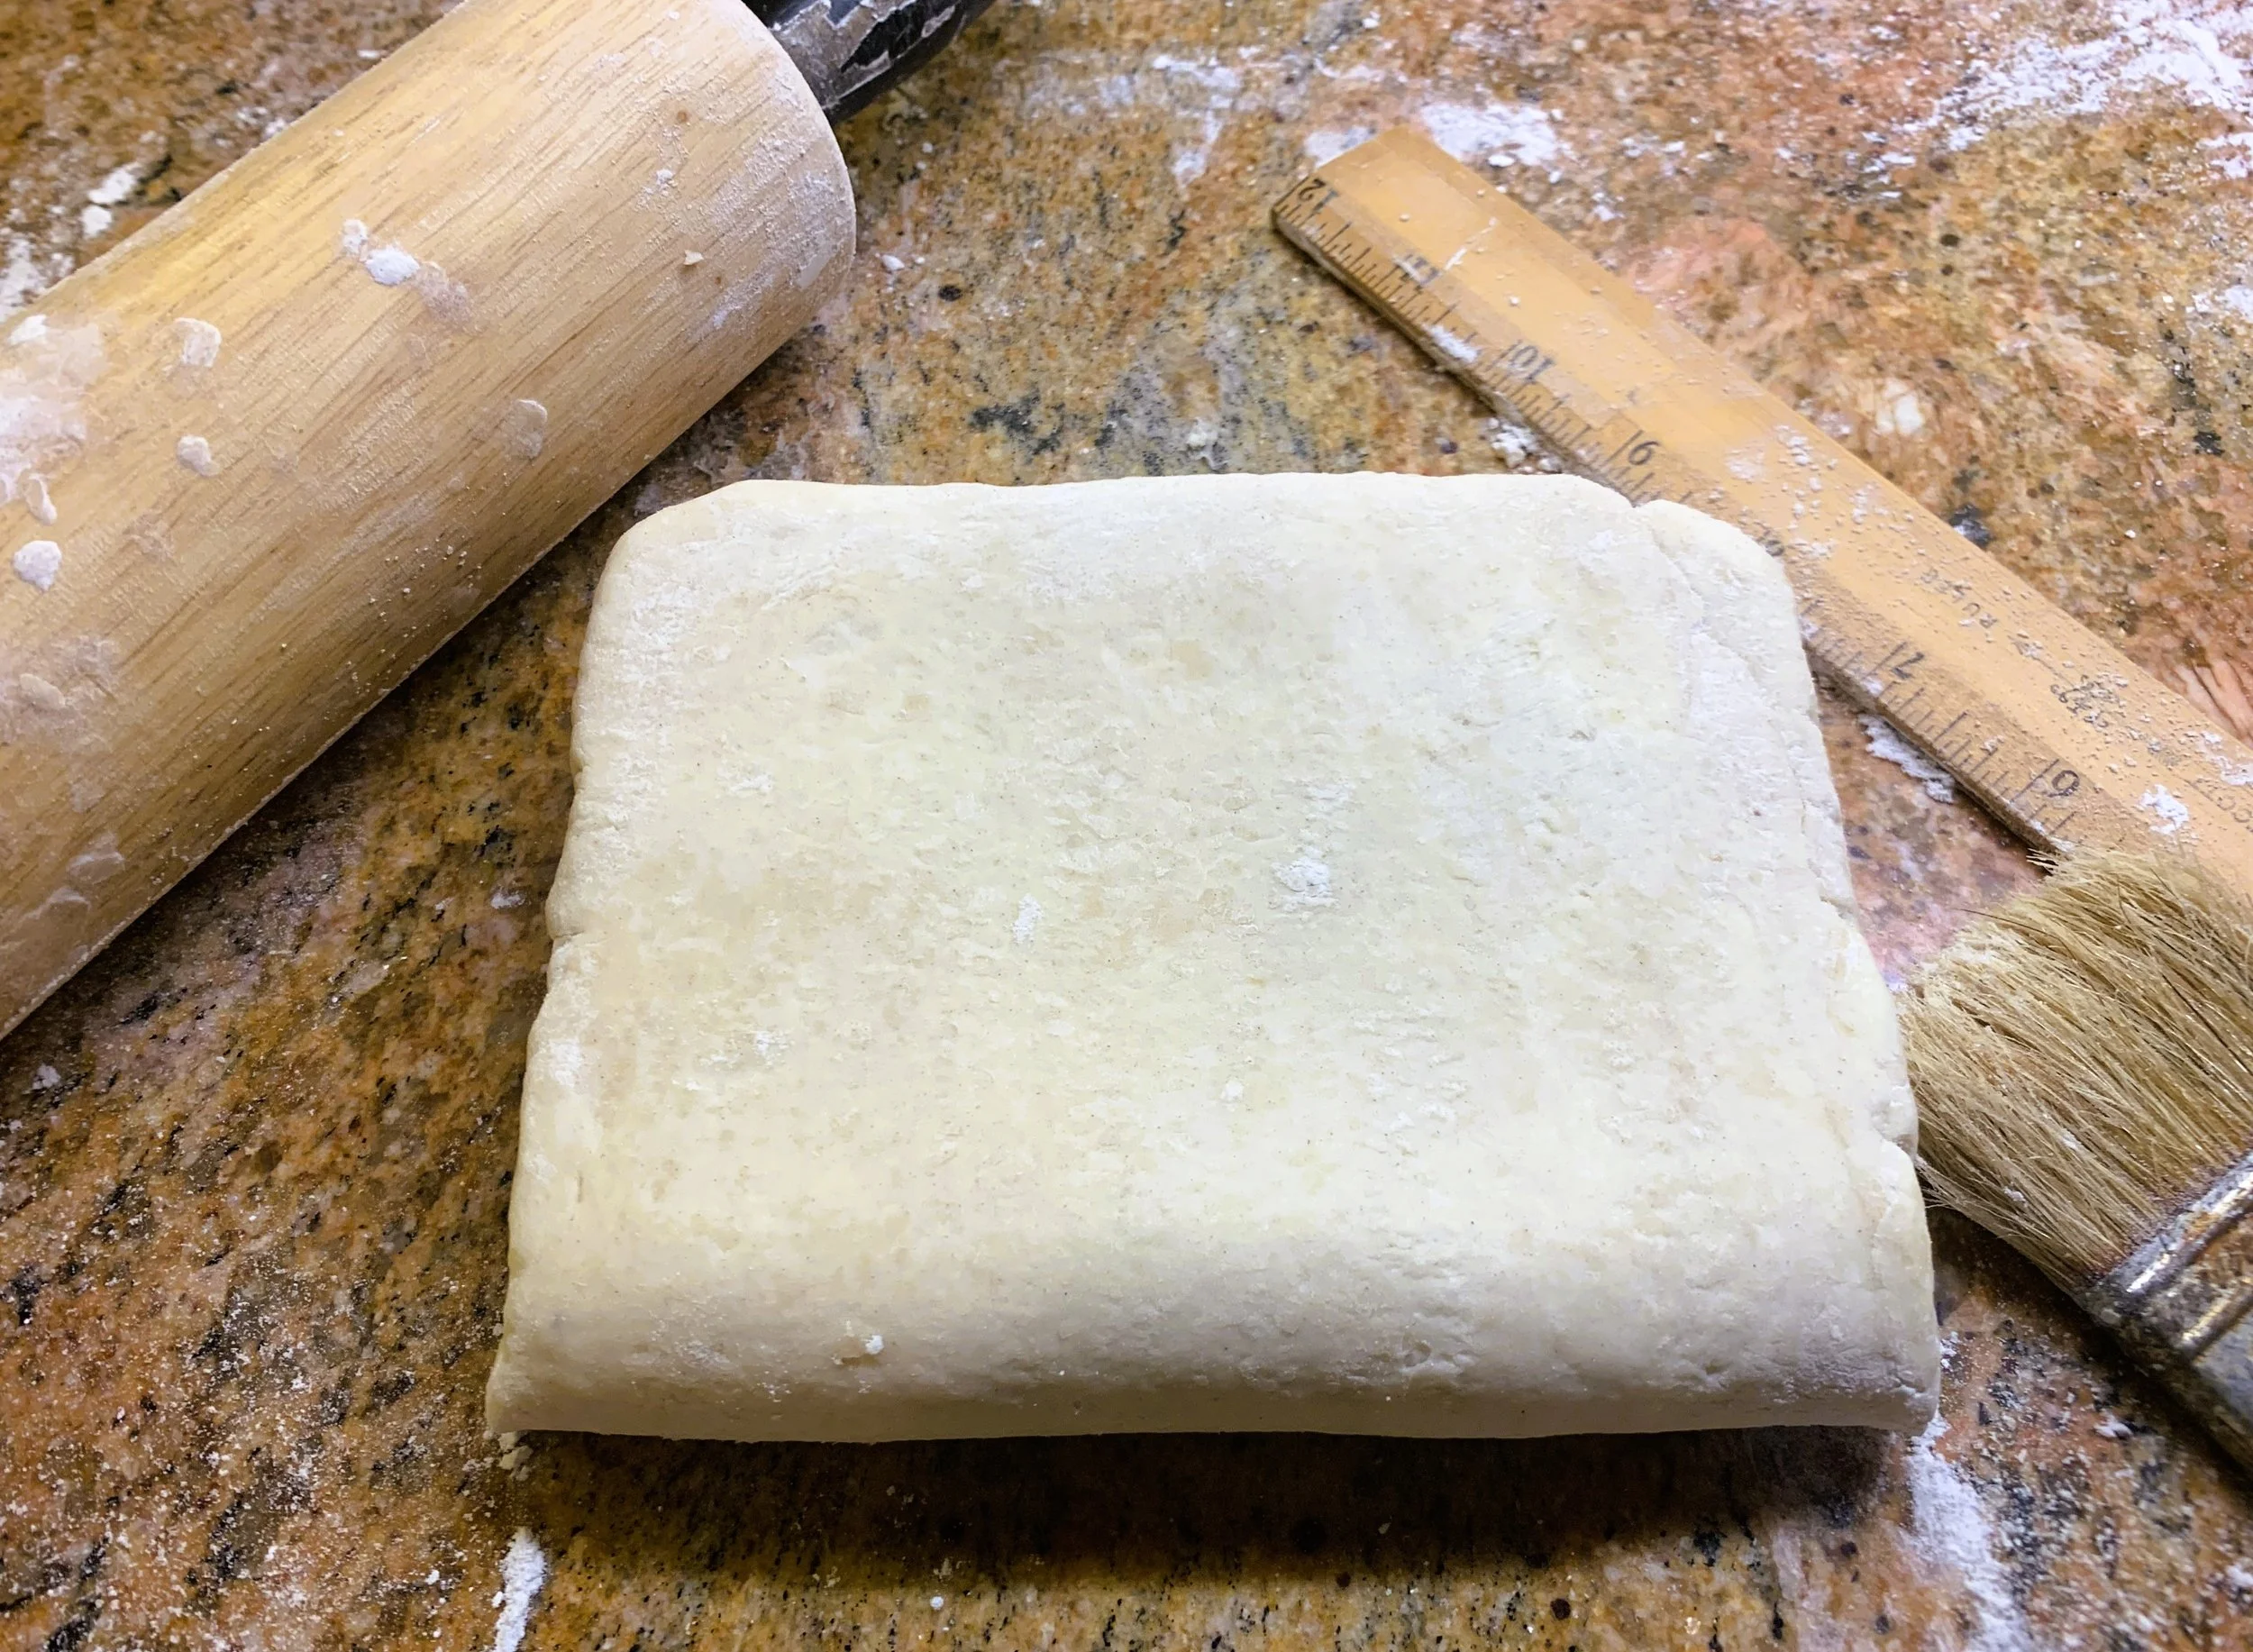
-Flip the dough over and roll on the other side as you continue to roll to create a rectangle about 14 inches long and 4 inches wide. Use a ruler, bench scraper, the rolling pin and your hands to keep your edges as straight and neat as possible. Brush off any excess flour and turn your dough over.
-Straighten the edges again then, folding as you do a tri-fold for a letter, fold the top third of the dough down over the dough rectangle, then the bottom third up over that so that you have 3 neat layers of dough. Gently push dough into a neat packet, then brush excess flour off again. Wrap in cling film and chill for 20 minutes. (This is called the first “turn”)
-Lightly flour work surface and pastry again. Place pastry with closed folded edge to your left. Roll the dough back out again to the approximate same rectangle size, flipping the dough from time to time and sprinkling with enough flour to keep it from sticking. You should begin to see streaks of butter in the dough, but don’t push so hard that the butter starts breaking and tearing the surface of the dough. Brush off excess flour and fold again in the same letter fold fashion, then wrap and chill for another 20 minutes. (This is called the 2nd “turn”)
- Repeat this roll, fold and chill process again two more times (for the 3rd and 4th “turns”) This process creates 81 layers of butter and flour, which is what allows the pastry to puff. After these four rolls and folds, pastry should no longer look streaky.
-Wrap and chill finished pastry for 30 minutes before using. This pastry can last in the fridge, well wrapped, for up to 3 days and can also be frozen well wrapped for up to 2 months.

To make Puff Pastry: Cut the chilled butter into pieces and place in the bowl with the flour.
Using your hands, toss the butter with the flour until well coated, then roughly work the butter in with the flour. Do not thoroughly incorporate the butter but leave chunks and pieces of butter in the mixture.

Sprinkle in the water and toss with the shaggy dough, forming into a rough ball.

Wrap the dough completely and chill in the fridge for 20 minutes.
Remove chilled dough, flour the rolling surface, the dough and rolling pin and push into the dough to flatten it a bit.

Roll the dough into a rectangle, approximately 14 inches long and 4 inches wide. Use a ruler, the rolling pin and your hands to keep the edges even and neat. Brush any excess flour off with a pastry brush as you work.
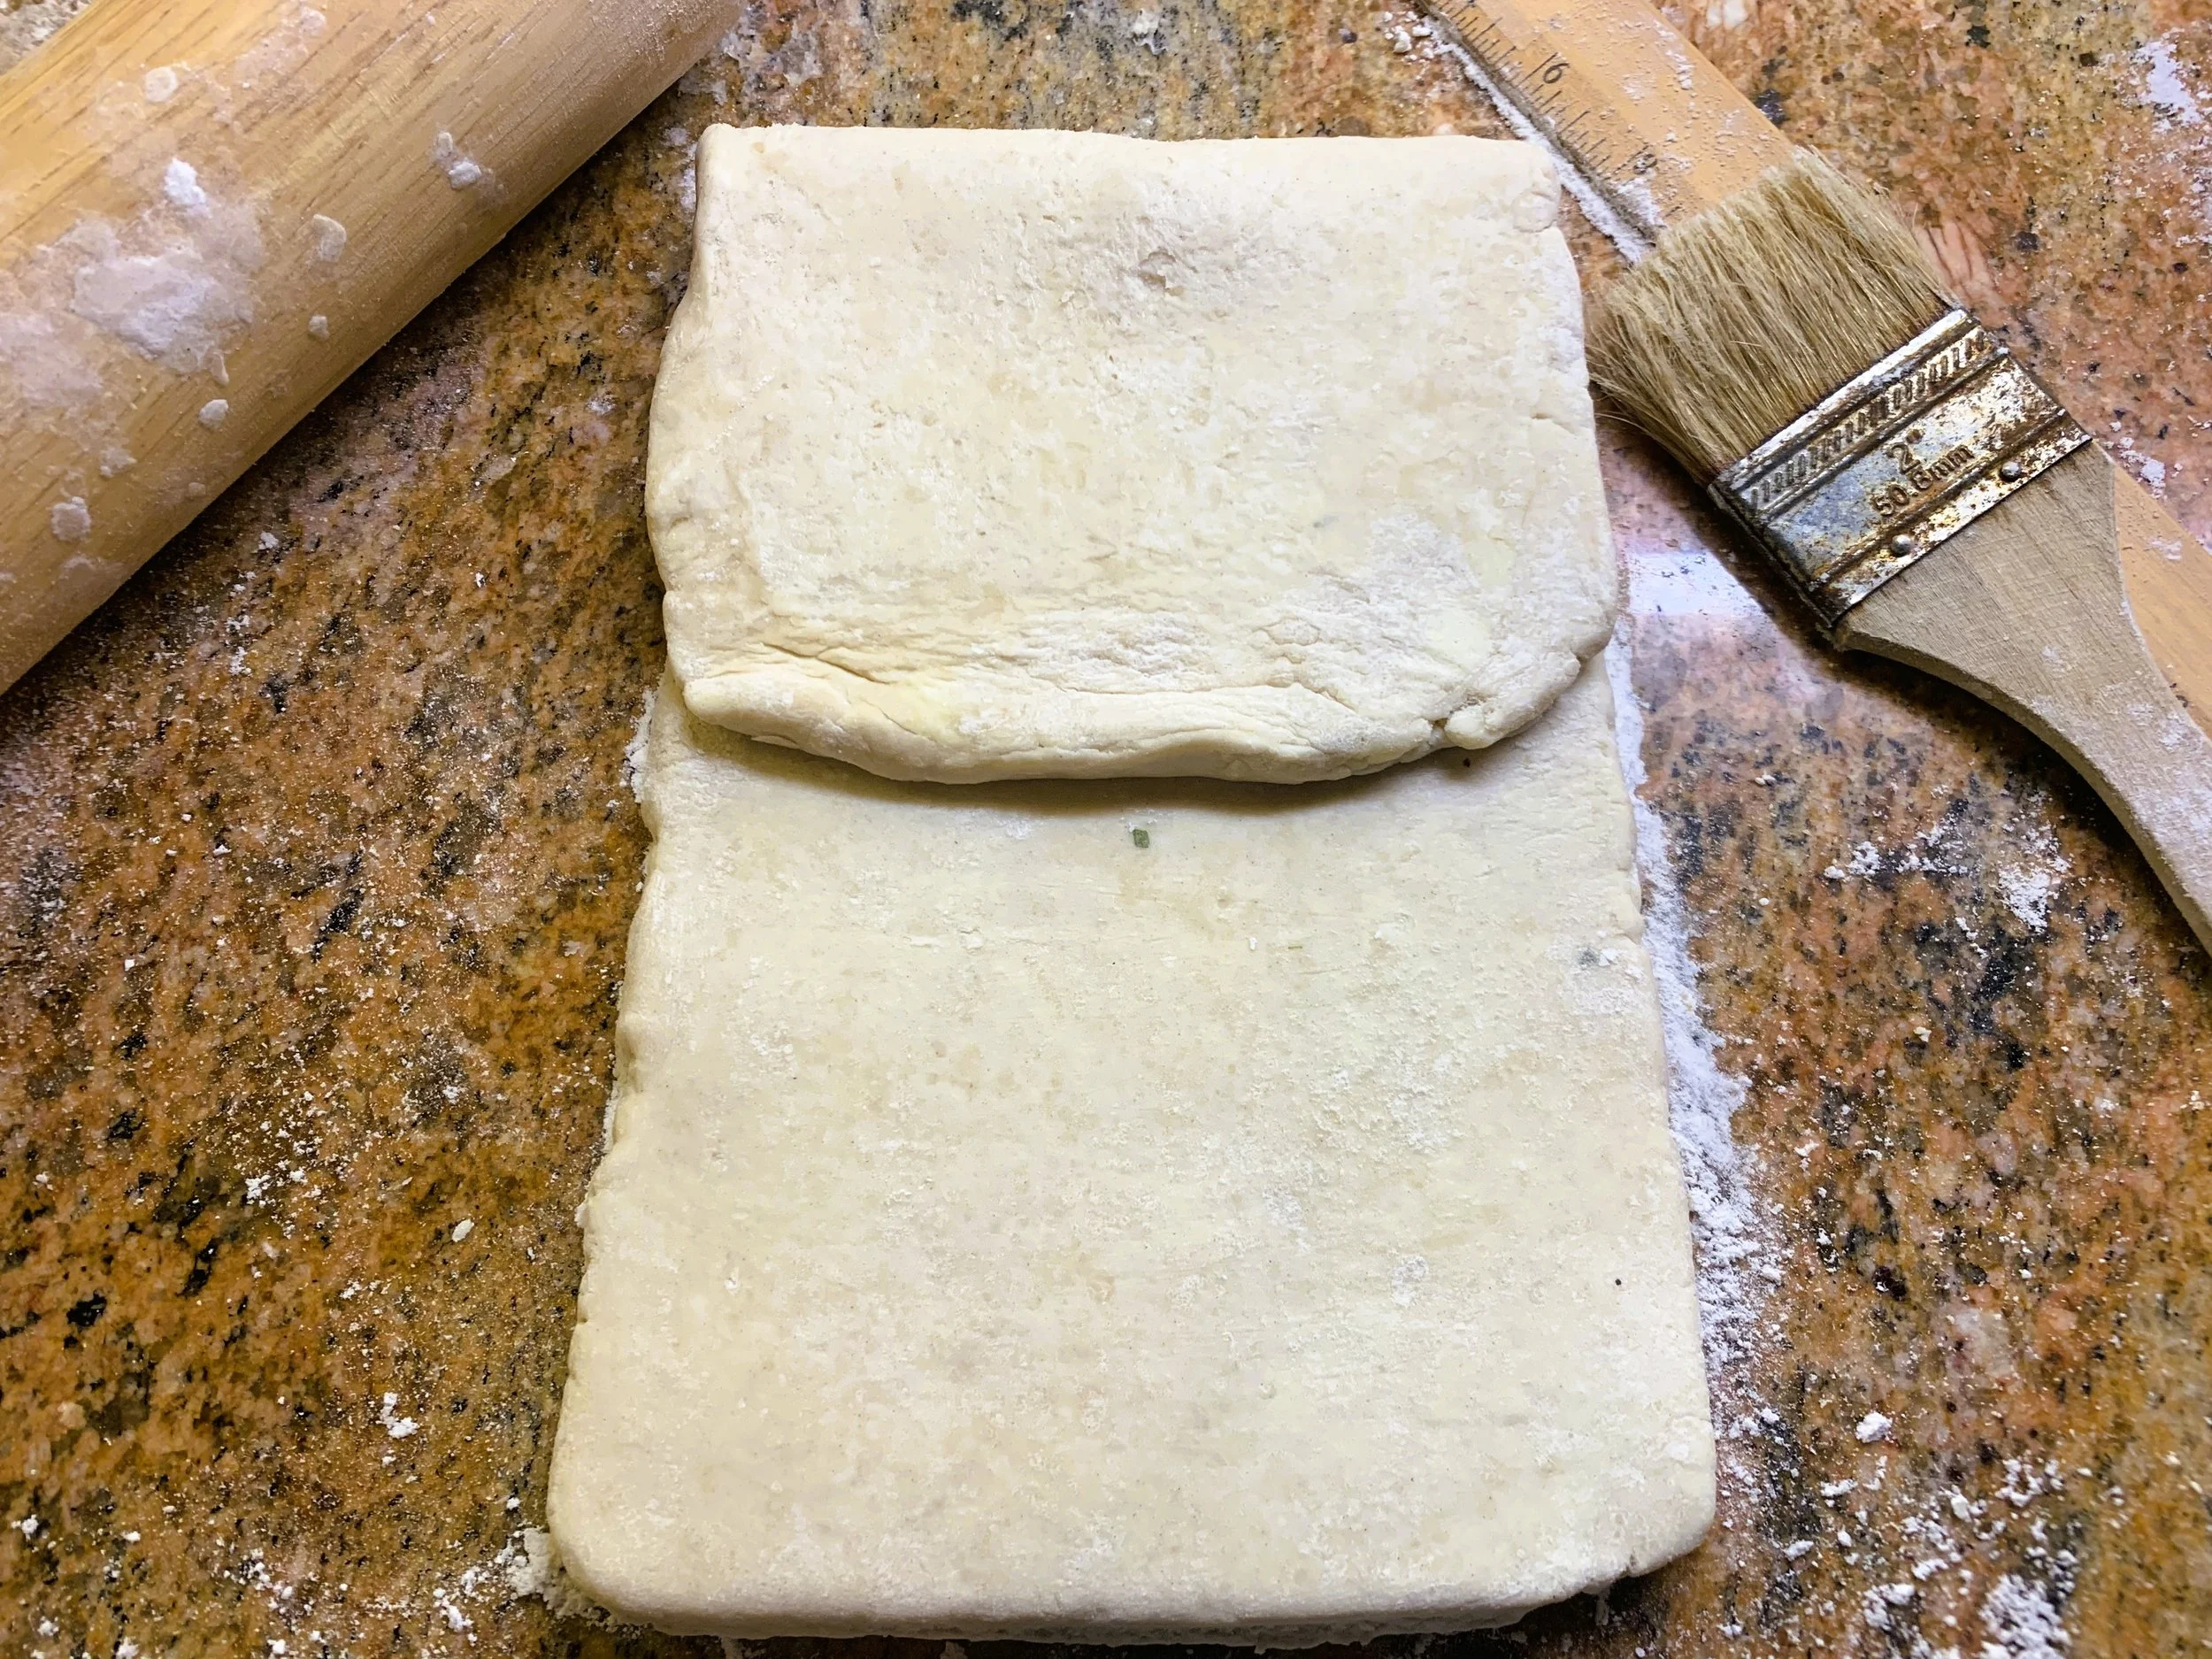
Add more flour as you work to keep dough from sticking. For the 1st “turn”, take the top 3rd of dough and fold it down 2/3s of the way of the rectangle.
Then take the bottom 1/3 of the dough and fold it up over the other dough, trying to keep the edges as even as possible. This is called a tri-fold or one turn.

You will have 3 layers of dough at this point. Wrap and chill for 20 minutes. Repeat this process 3 more times so you have completed 4 “turns”.

Here you can see the layers of butter and dough when you have completed all 4 “turns”. This creates 81 layers in the dough!

Roll the dough out as described in the recipe, then cut out 2, 10-inch circles.
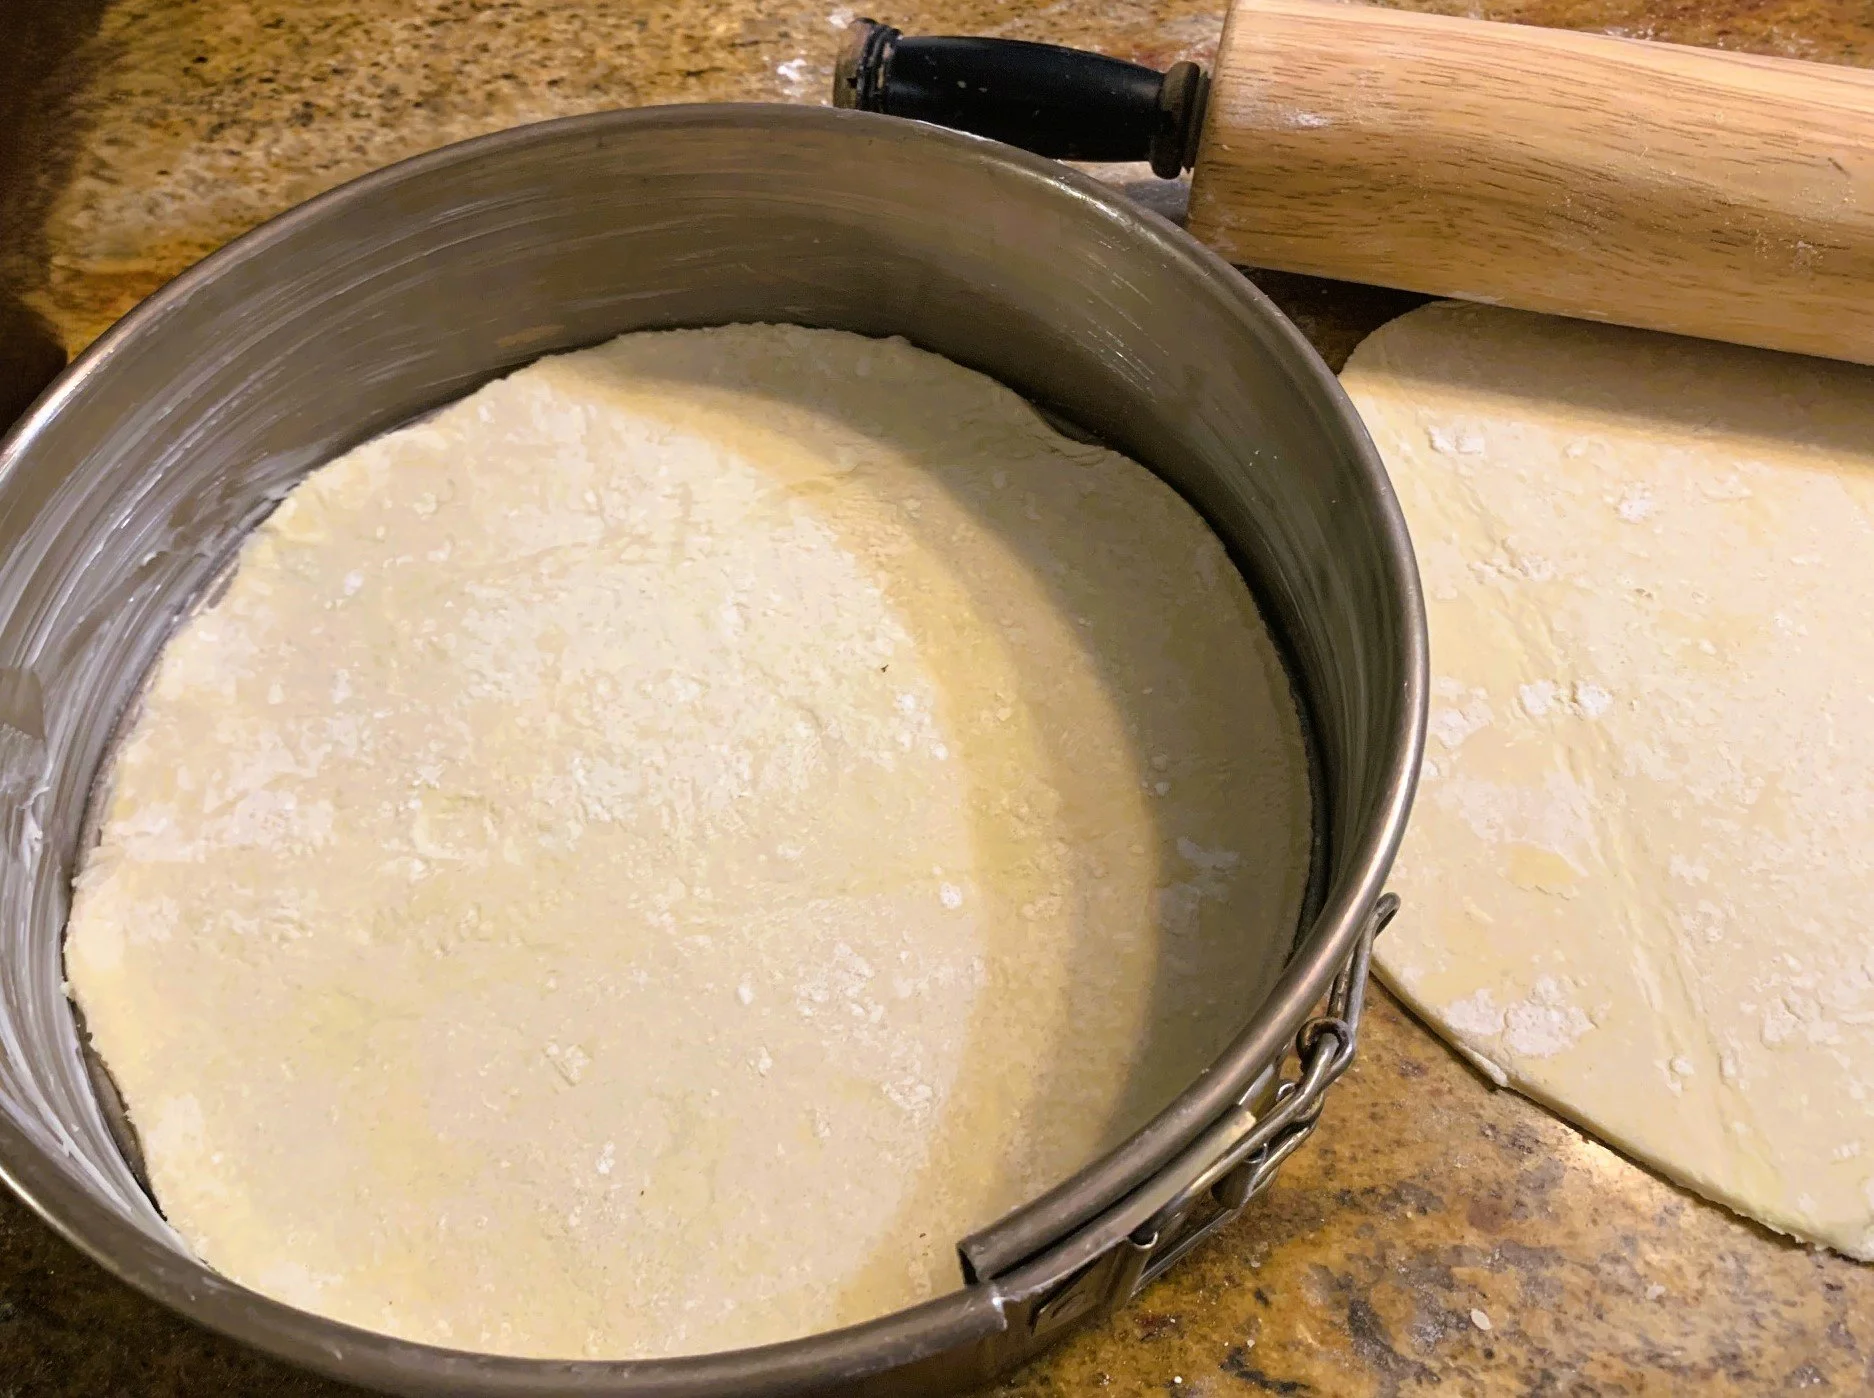
If assembling your Pithivier in a spring form pan, butter the bottom and edges well, then place one round of dough in the bottom of the pan.
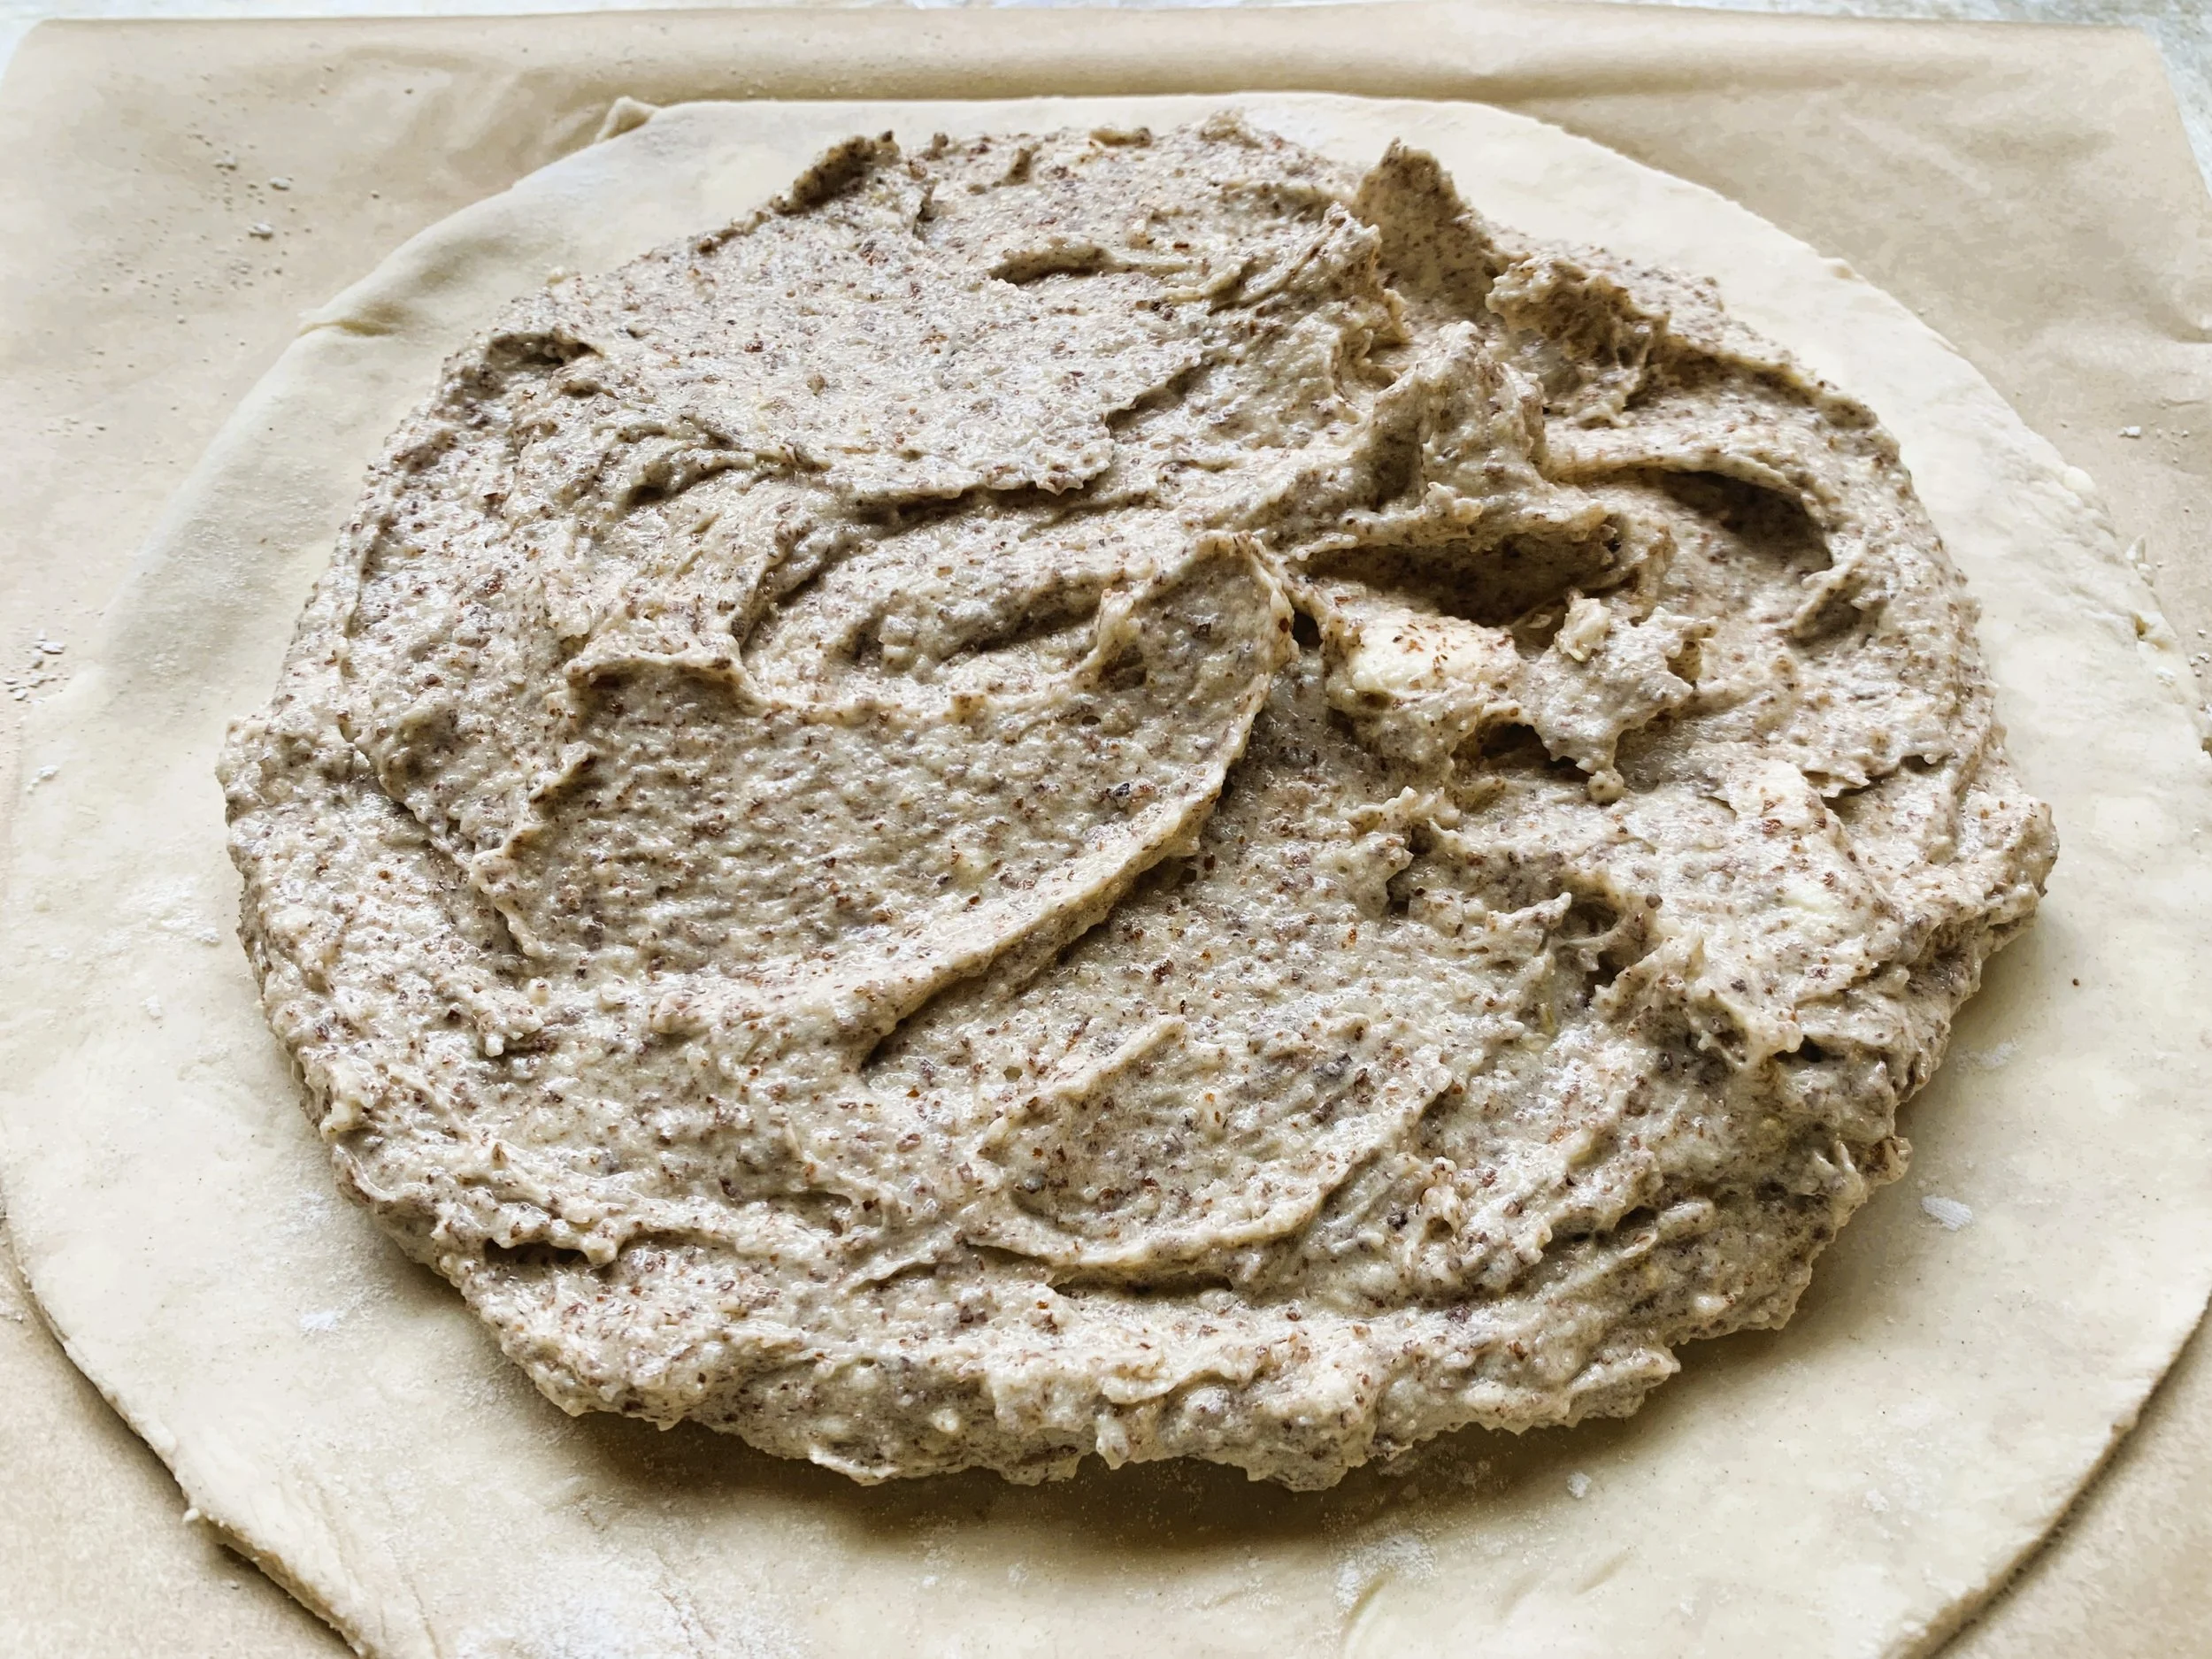
For the sweet Pithivier: Mound the frangipane filling onto the center of the bottom round, then spread it out with a spatula to within 1 inch of the edges.
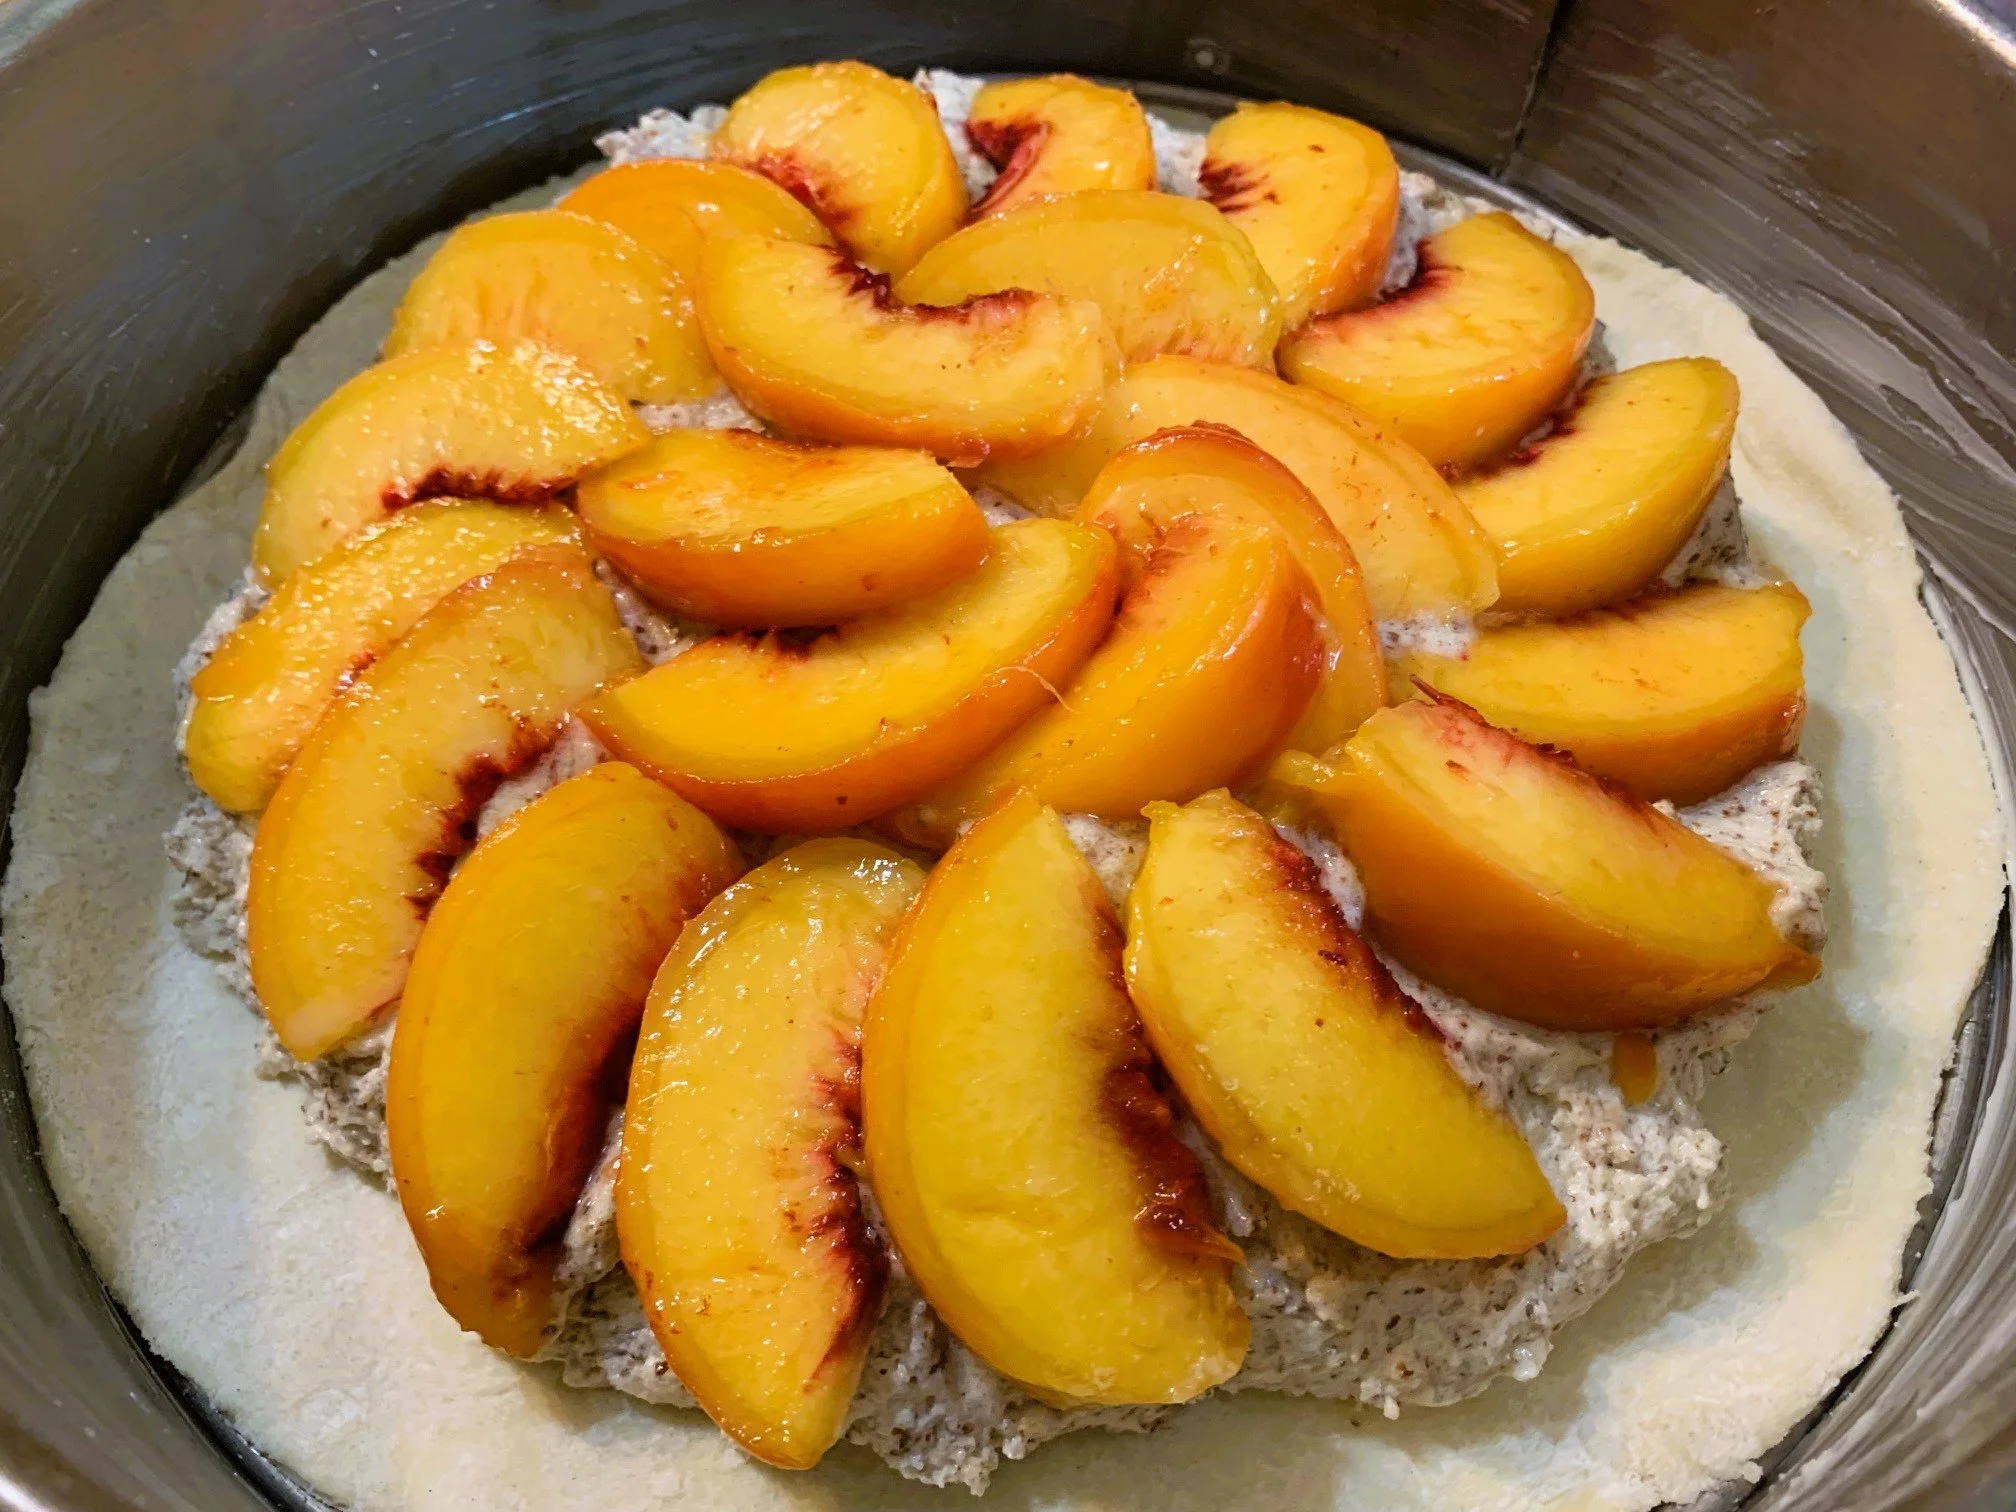
Arrange the peaches on the top of the frangipane, covering the entire surface, then sprinkle with nutmeg.
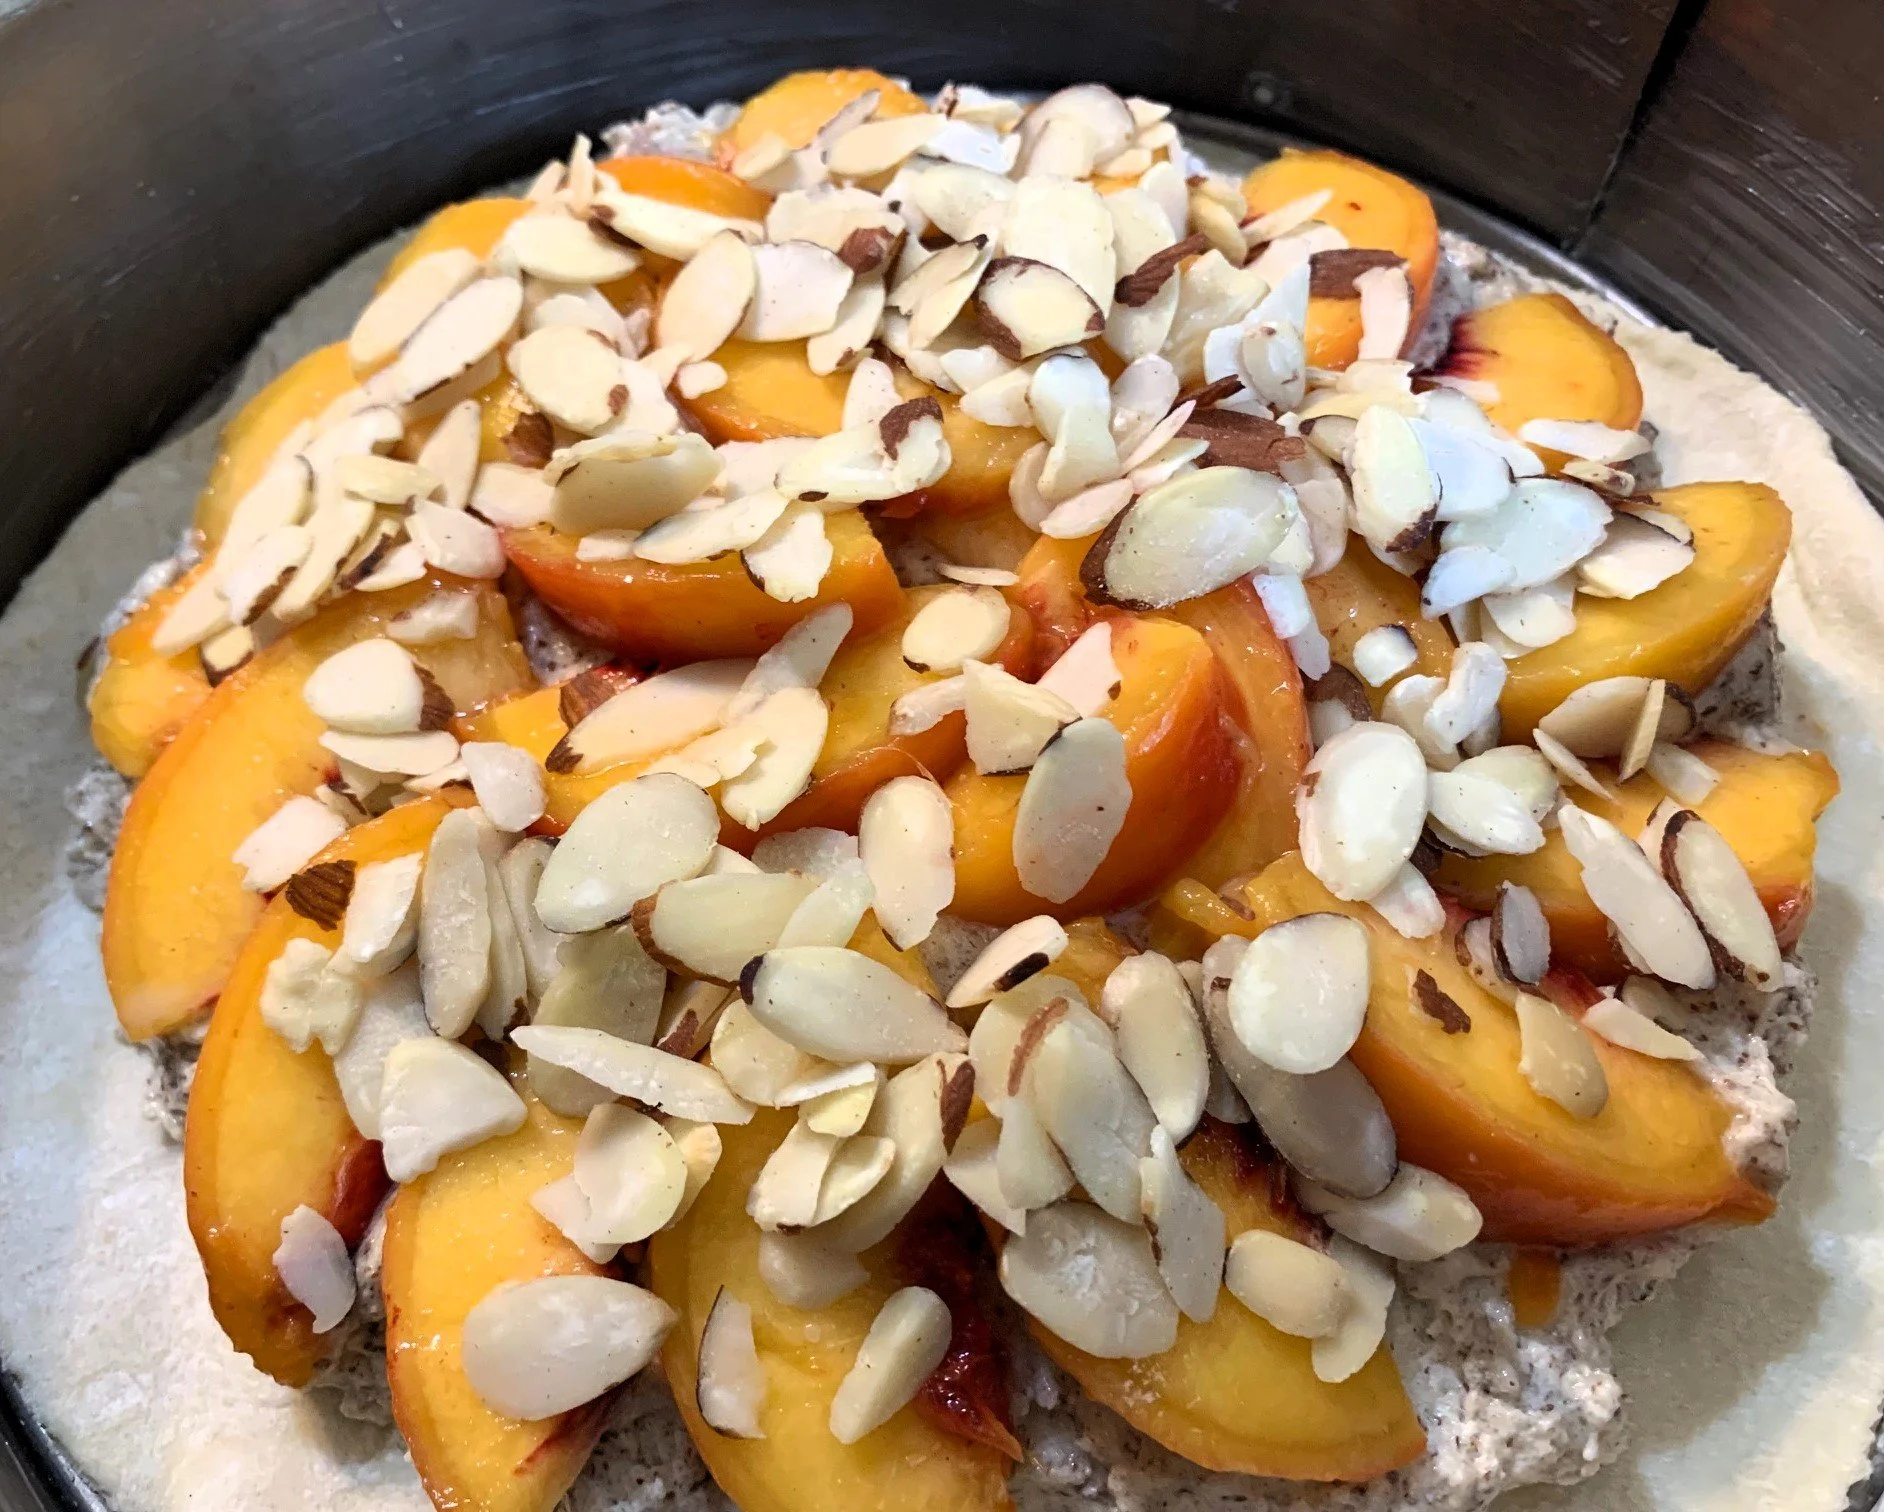
Sprinkle the almonds over the top of the peaches.
Place the other round of dough over the top of the filling, pushing gently on the sides to mold the pastry, until the edges meet. Push and seal together then crimp the edges.
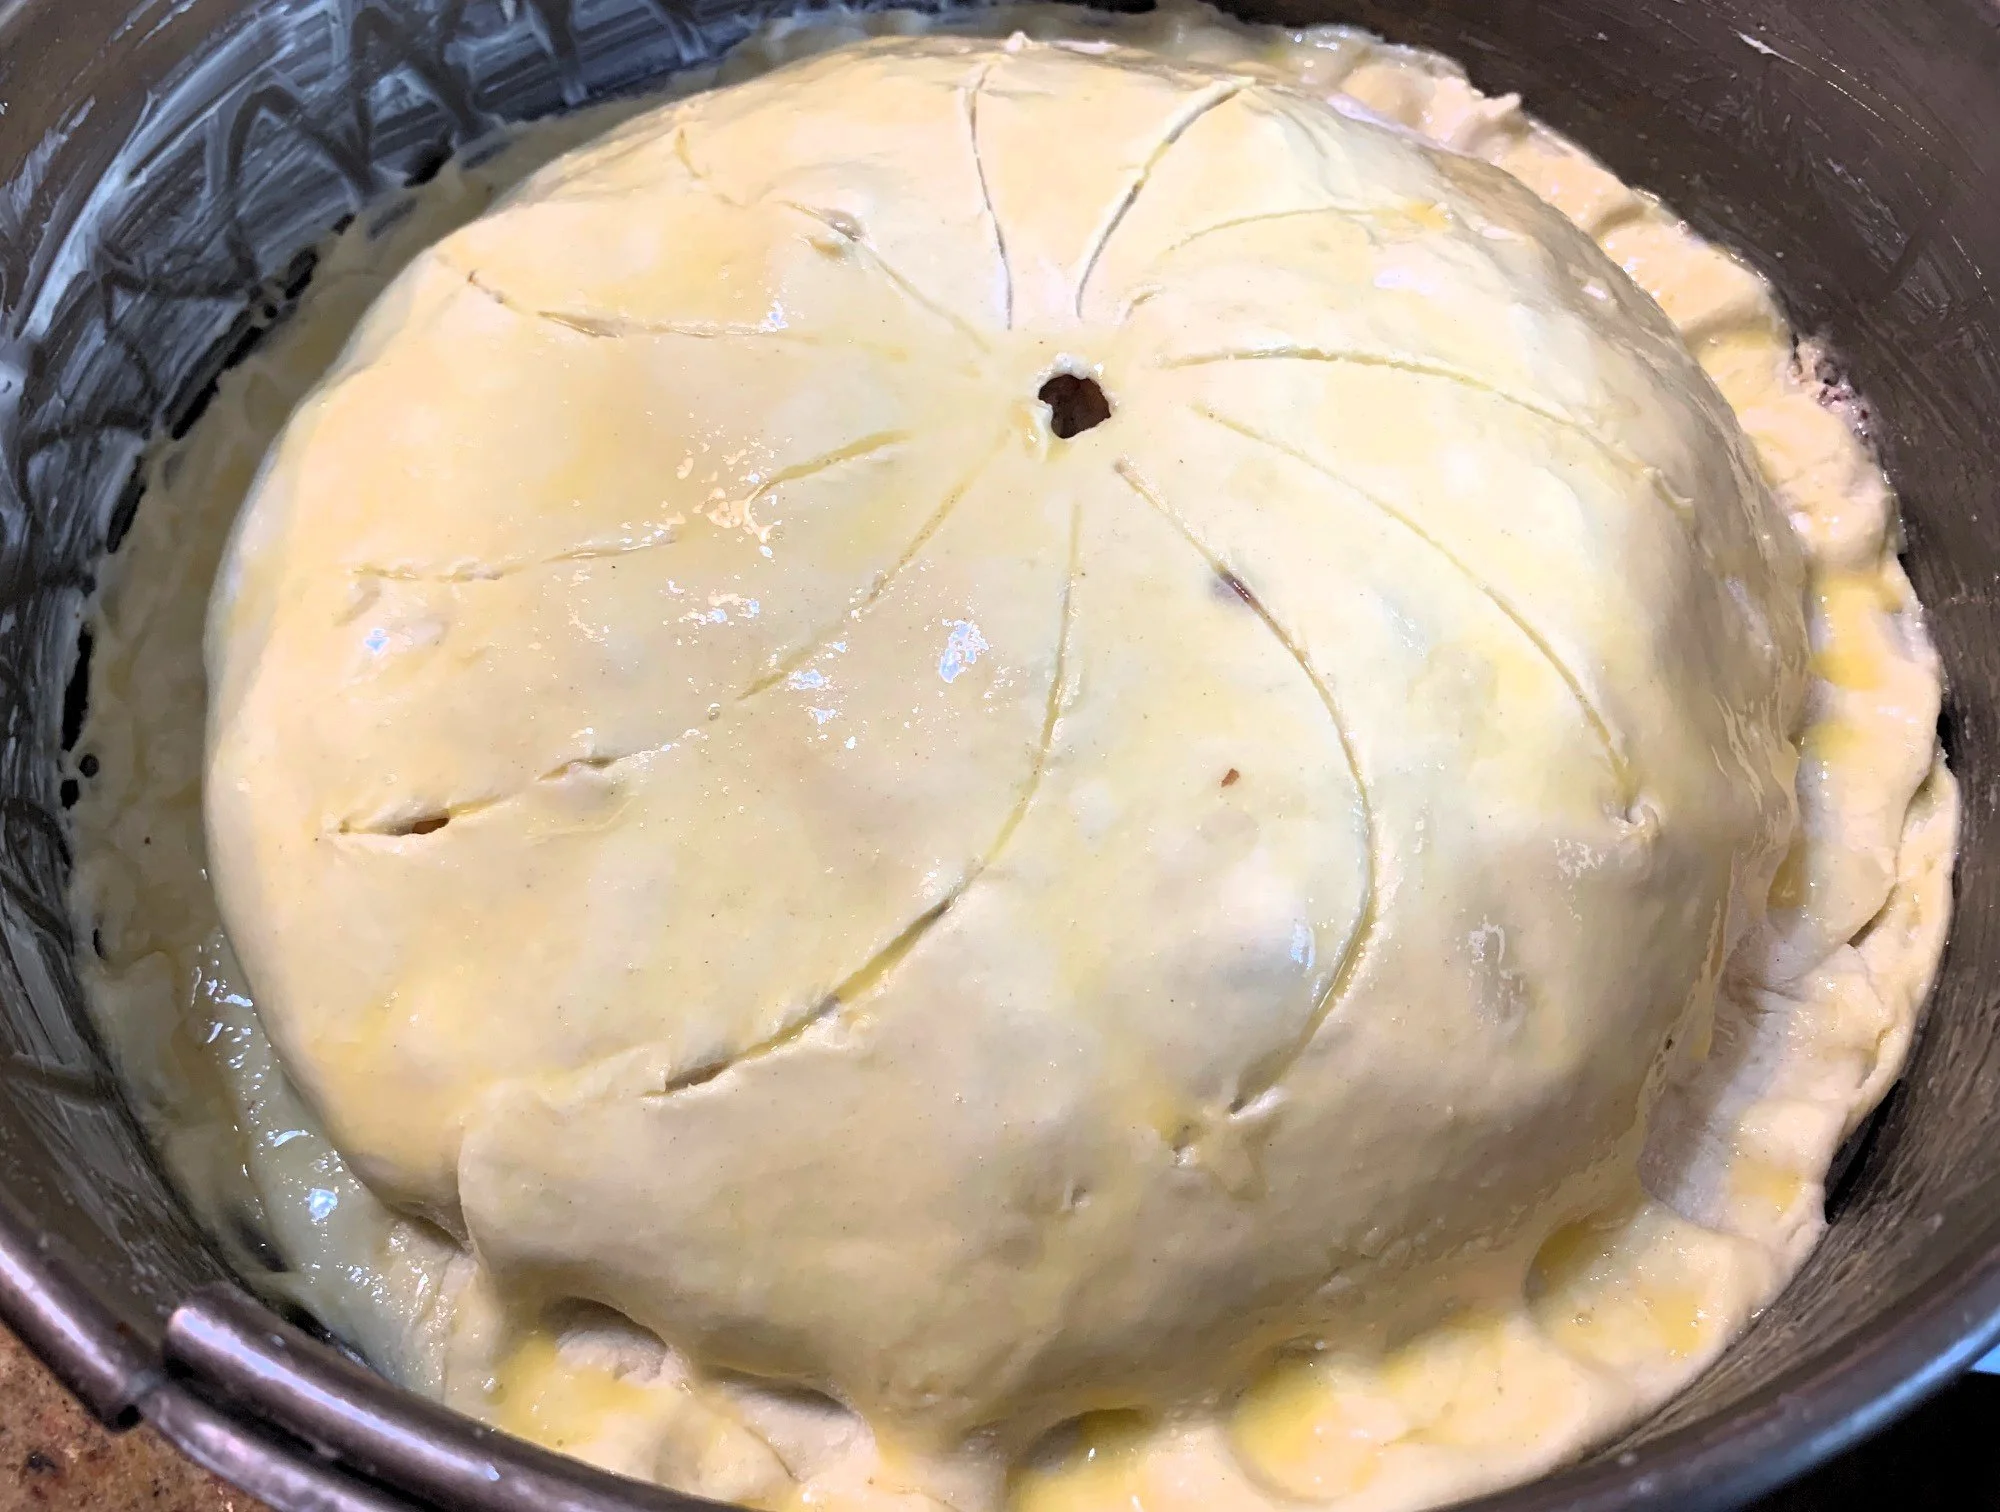
Make a small vent hole in the top of the pastry with a sharp knife, then score decorative lines from the vent hole down toward the bottom. Brush the entire surface with egg wash.
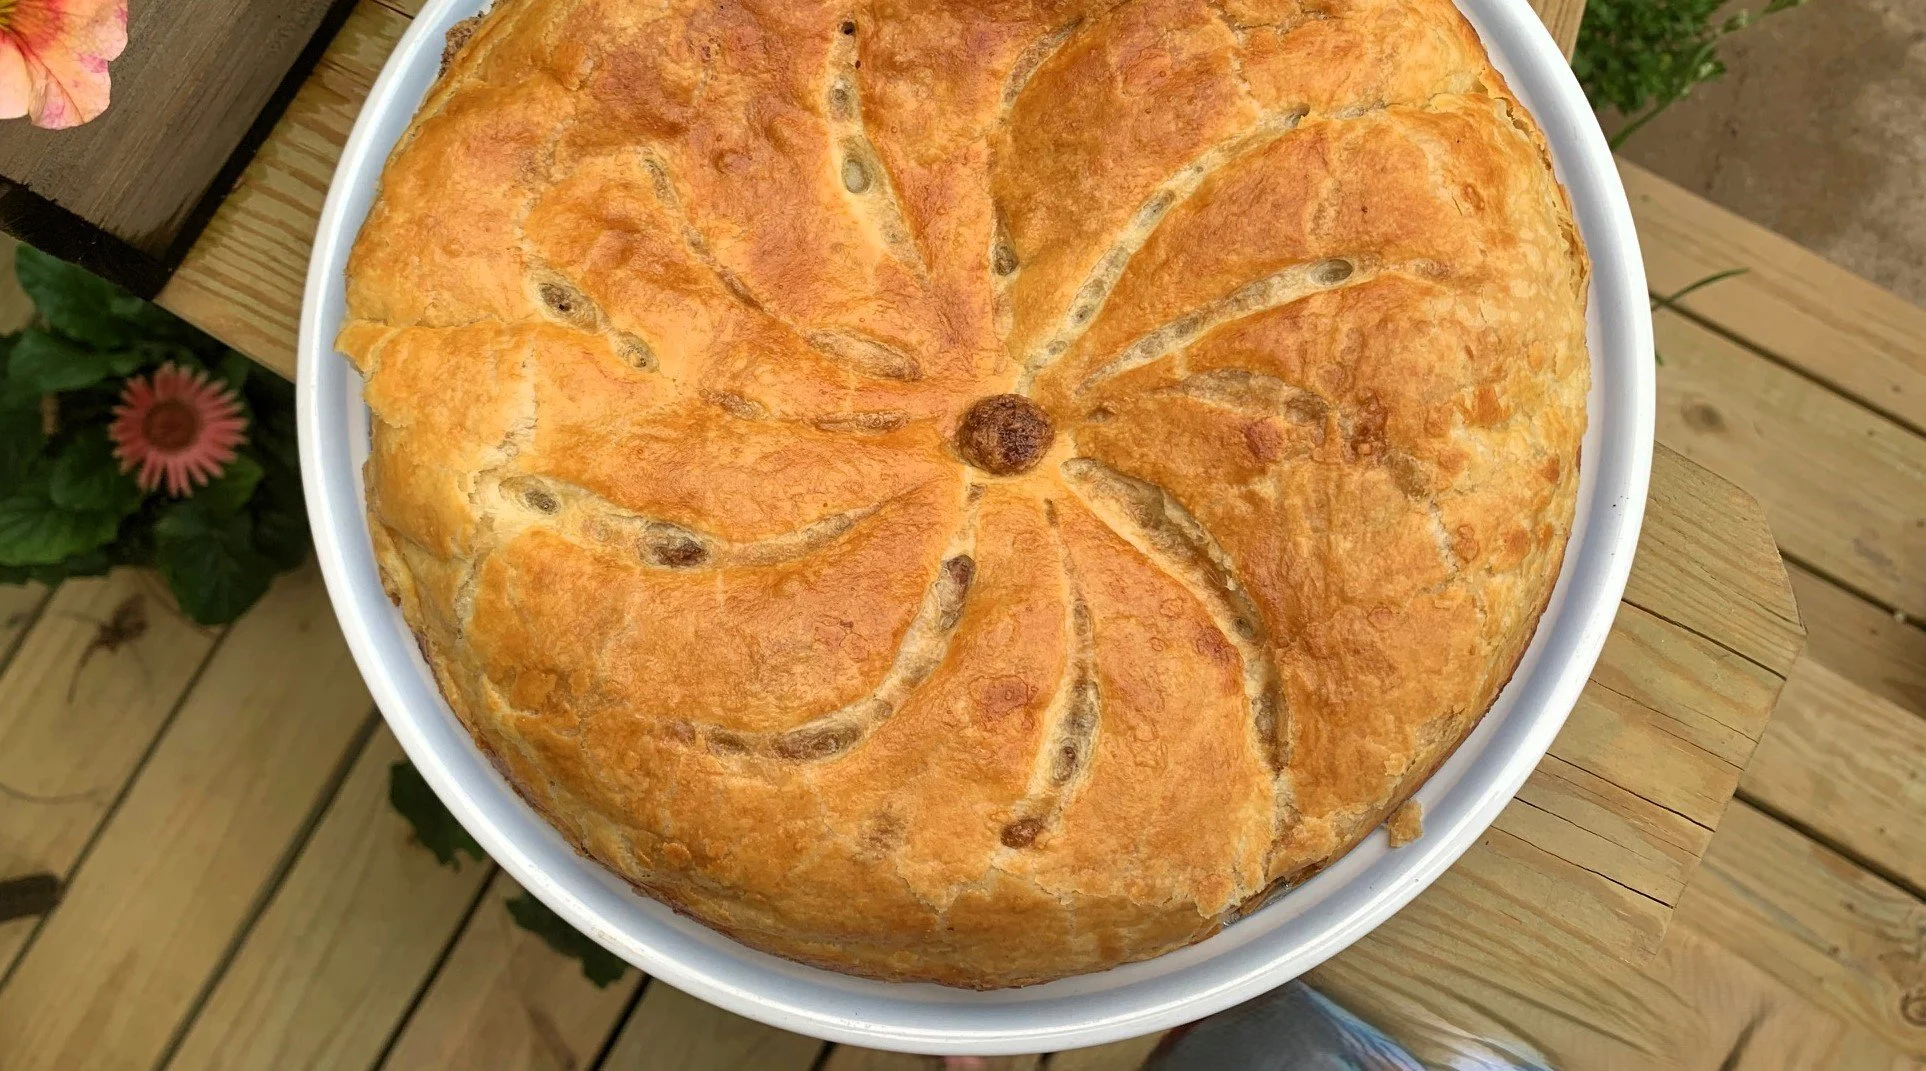
Bake Pithivier until golden and puffy. Remove and cool about 15 minutes before cutting.
Serve the sweet pastry with extra fruit, ice cream, or sweetened whipped cream if desired.
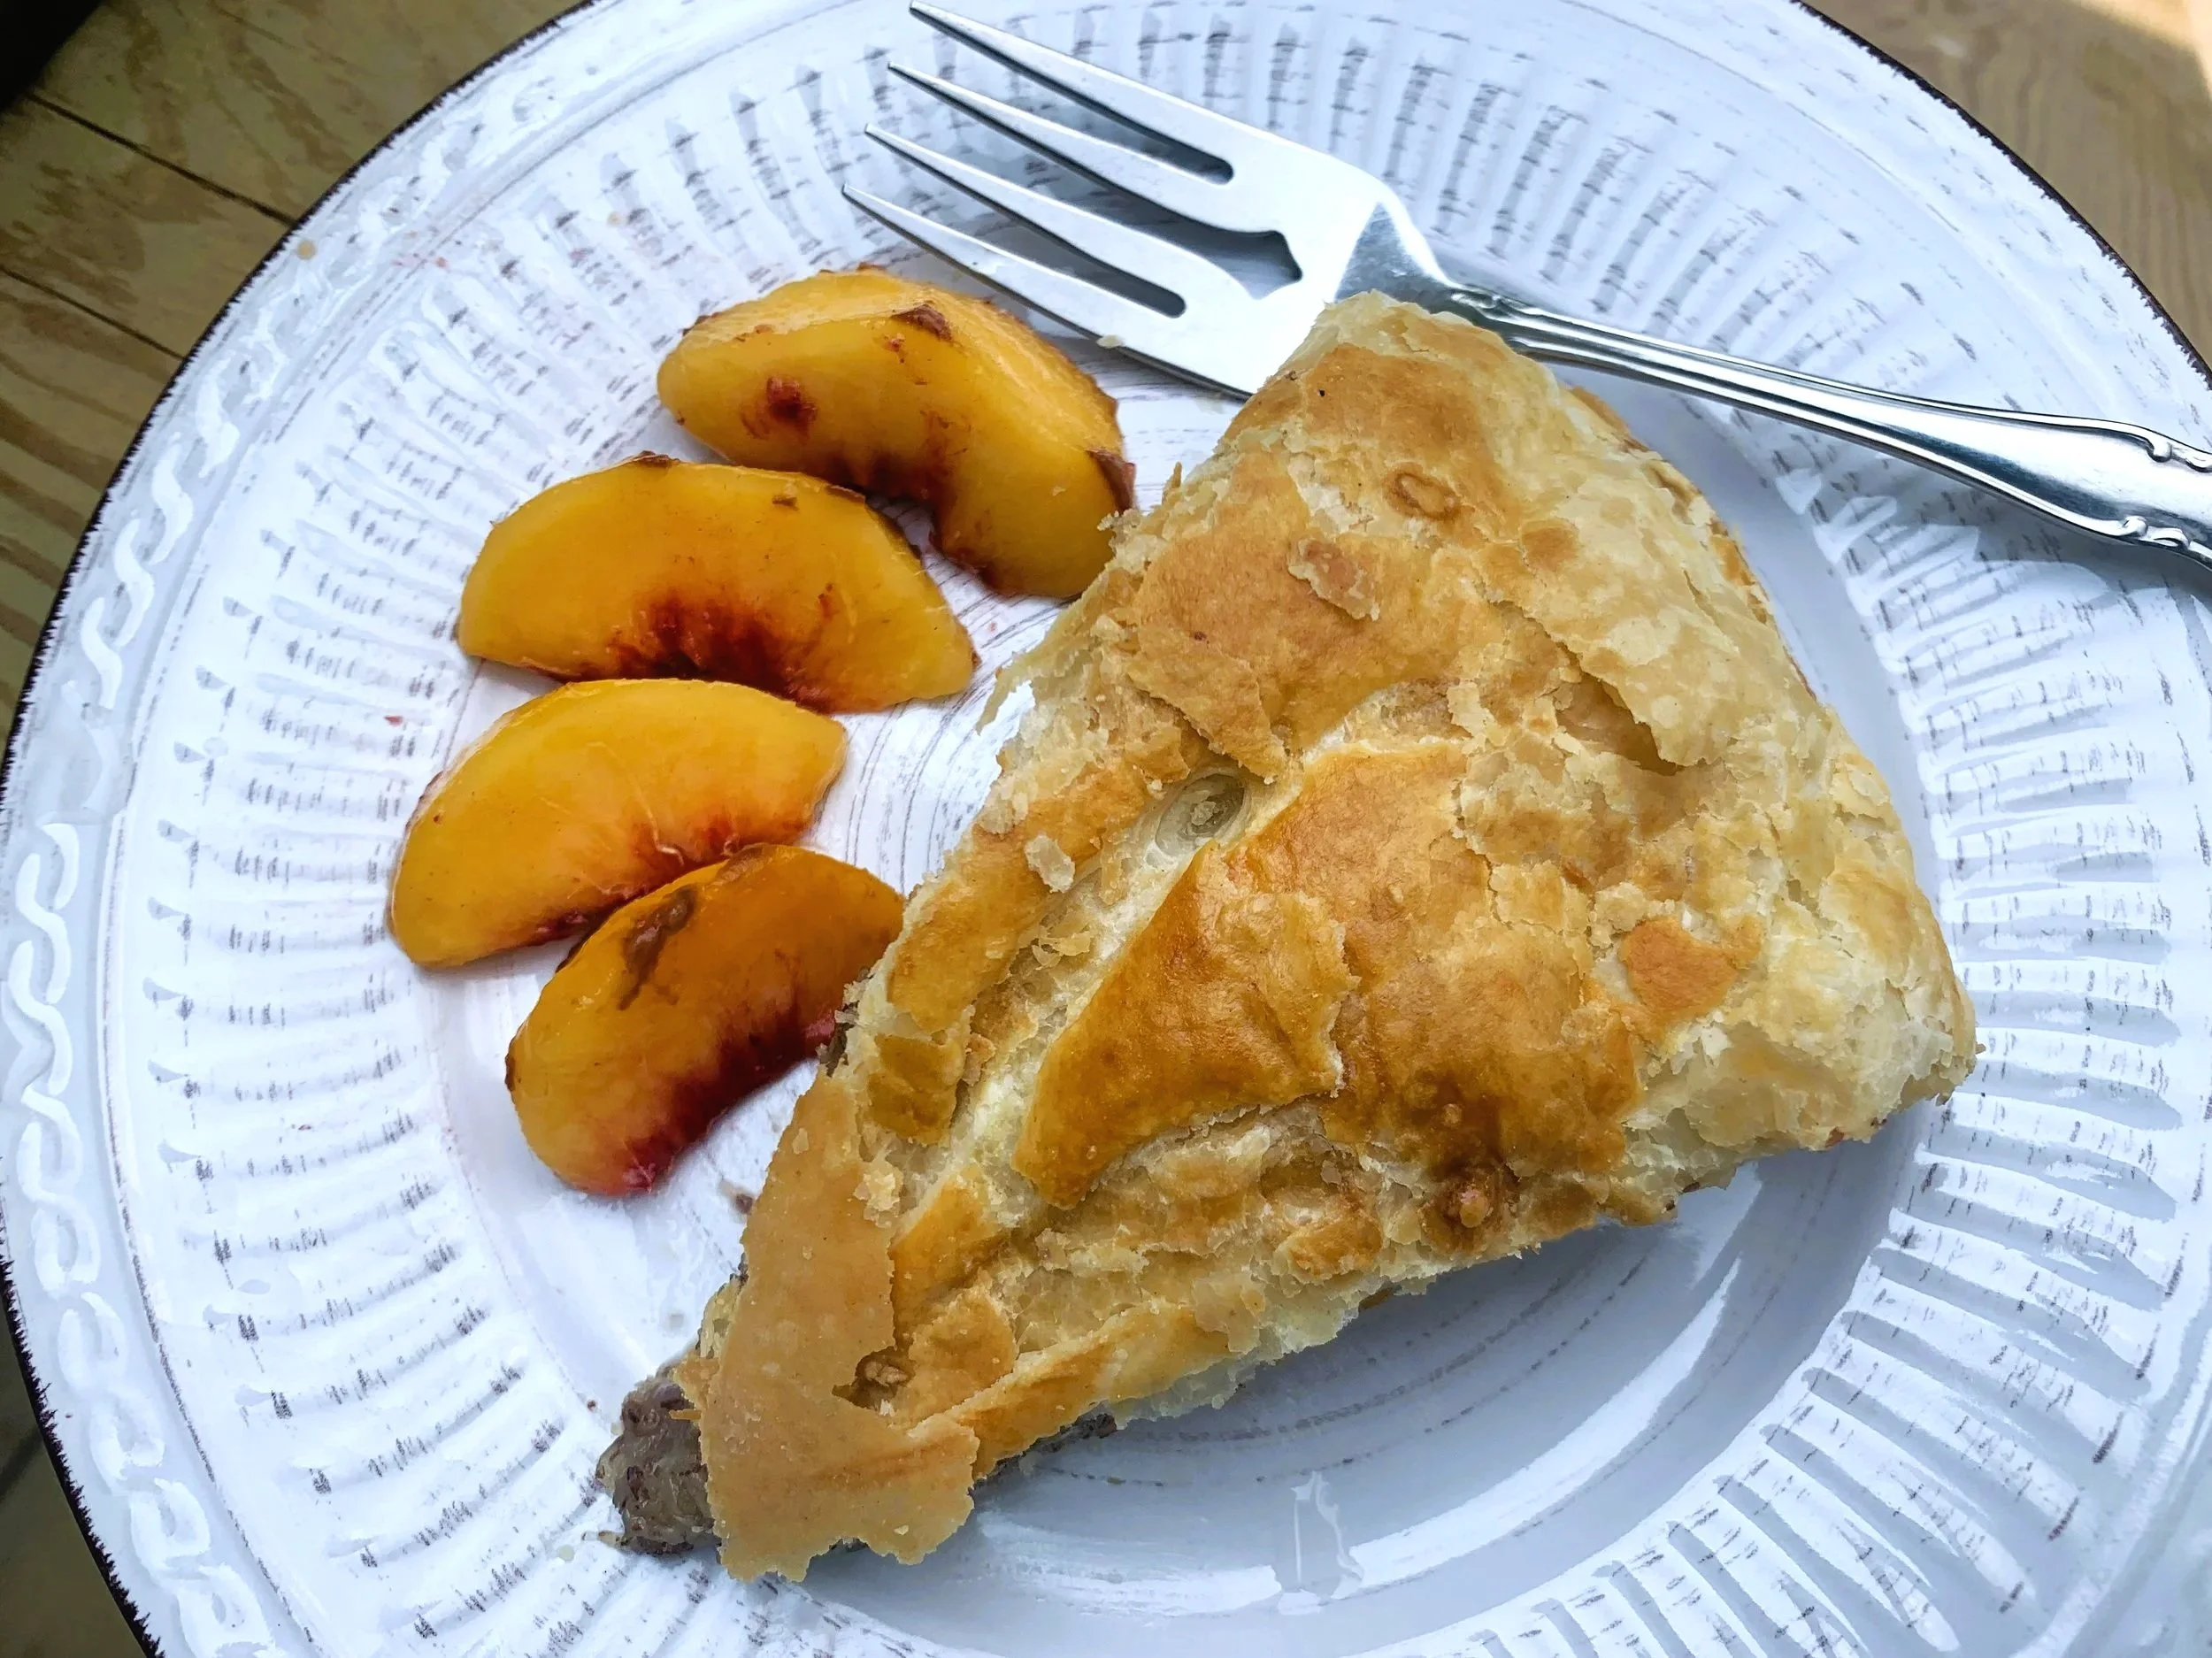
Layers of buttery, delicate pastry with fruit make this an elegant dessert.
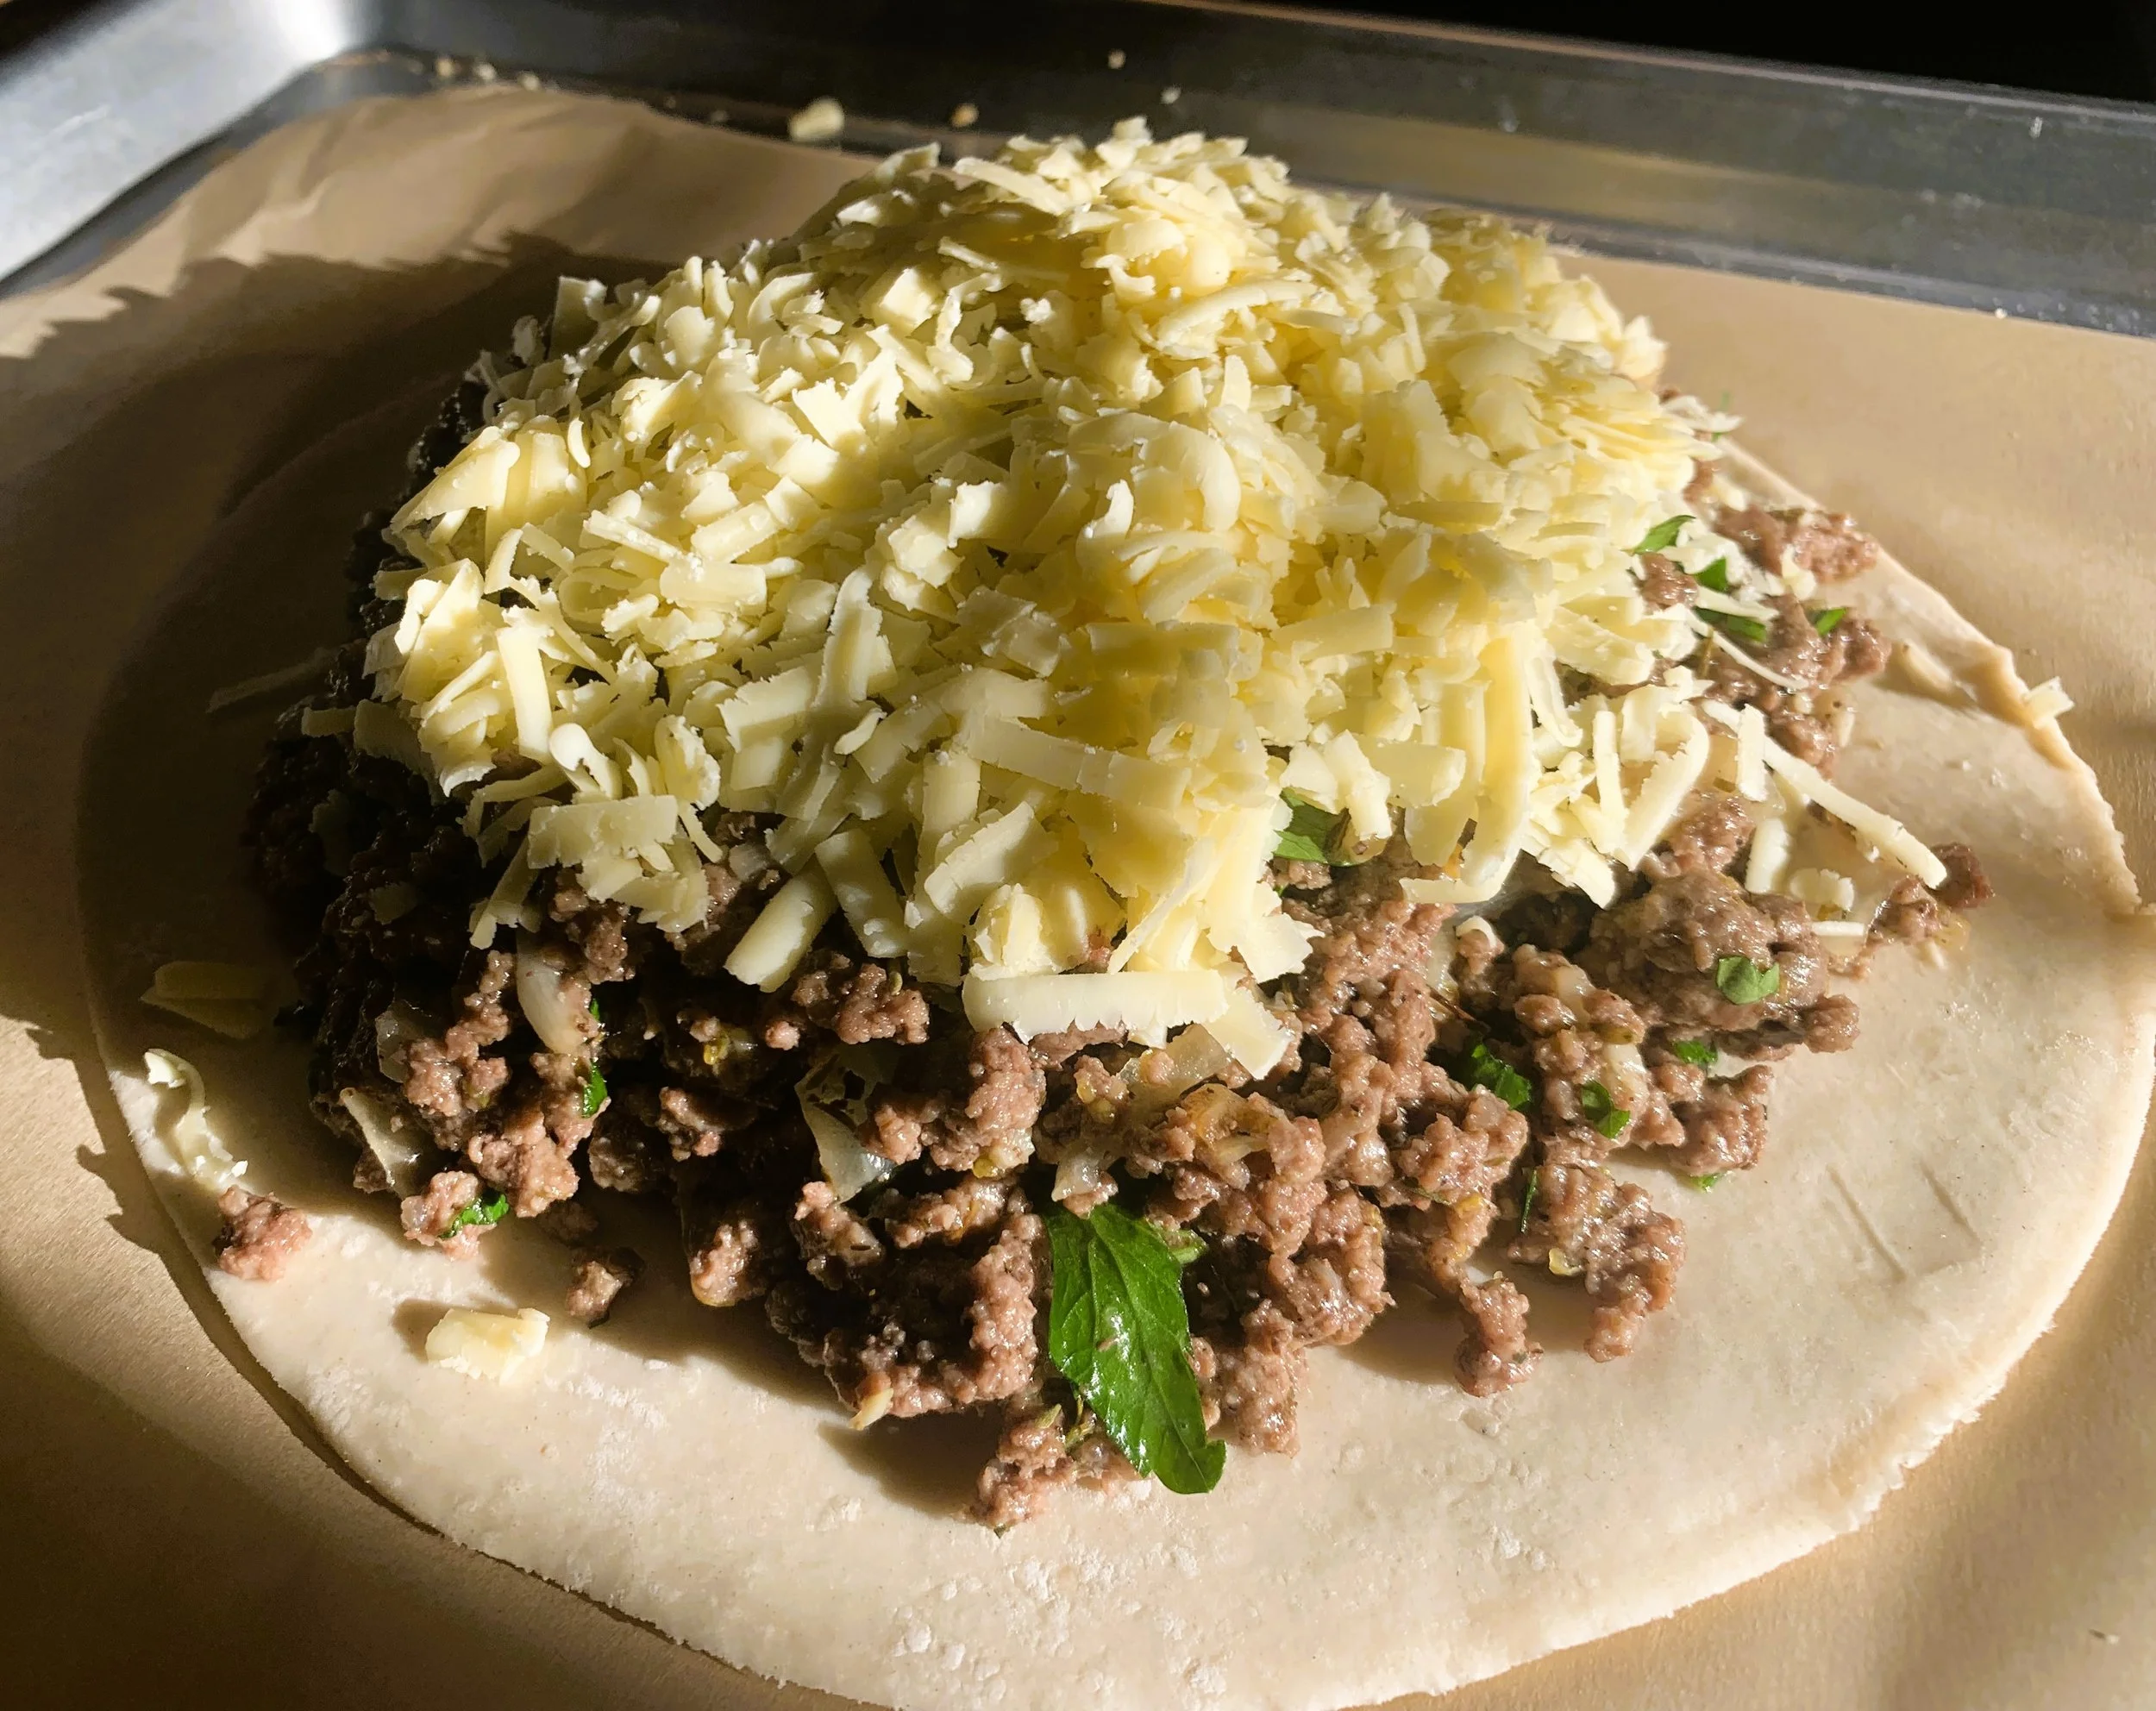
For the savory Pithivier: Mound the filling onto the center of the bottom round. Top with the grated cheese and caramelized onions.

Follow the procedure described above to encase the filling in the pastry, seal the edges and brush with egg wash.

The grated cheese and caramelized onions on top, create a creamy, silky layer to the beef filling.
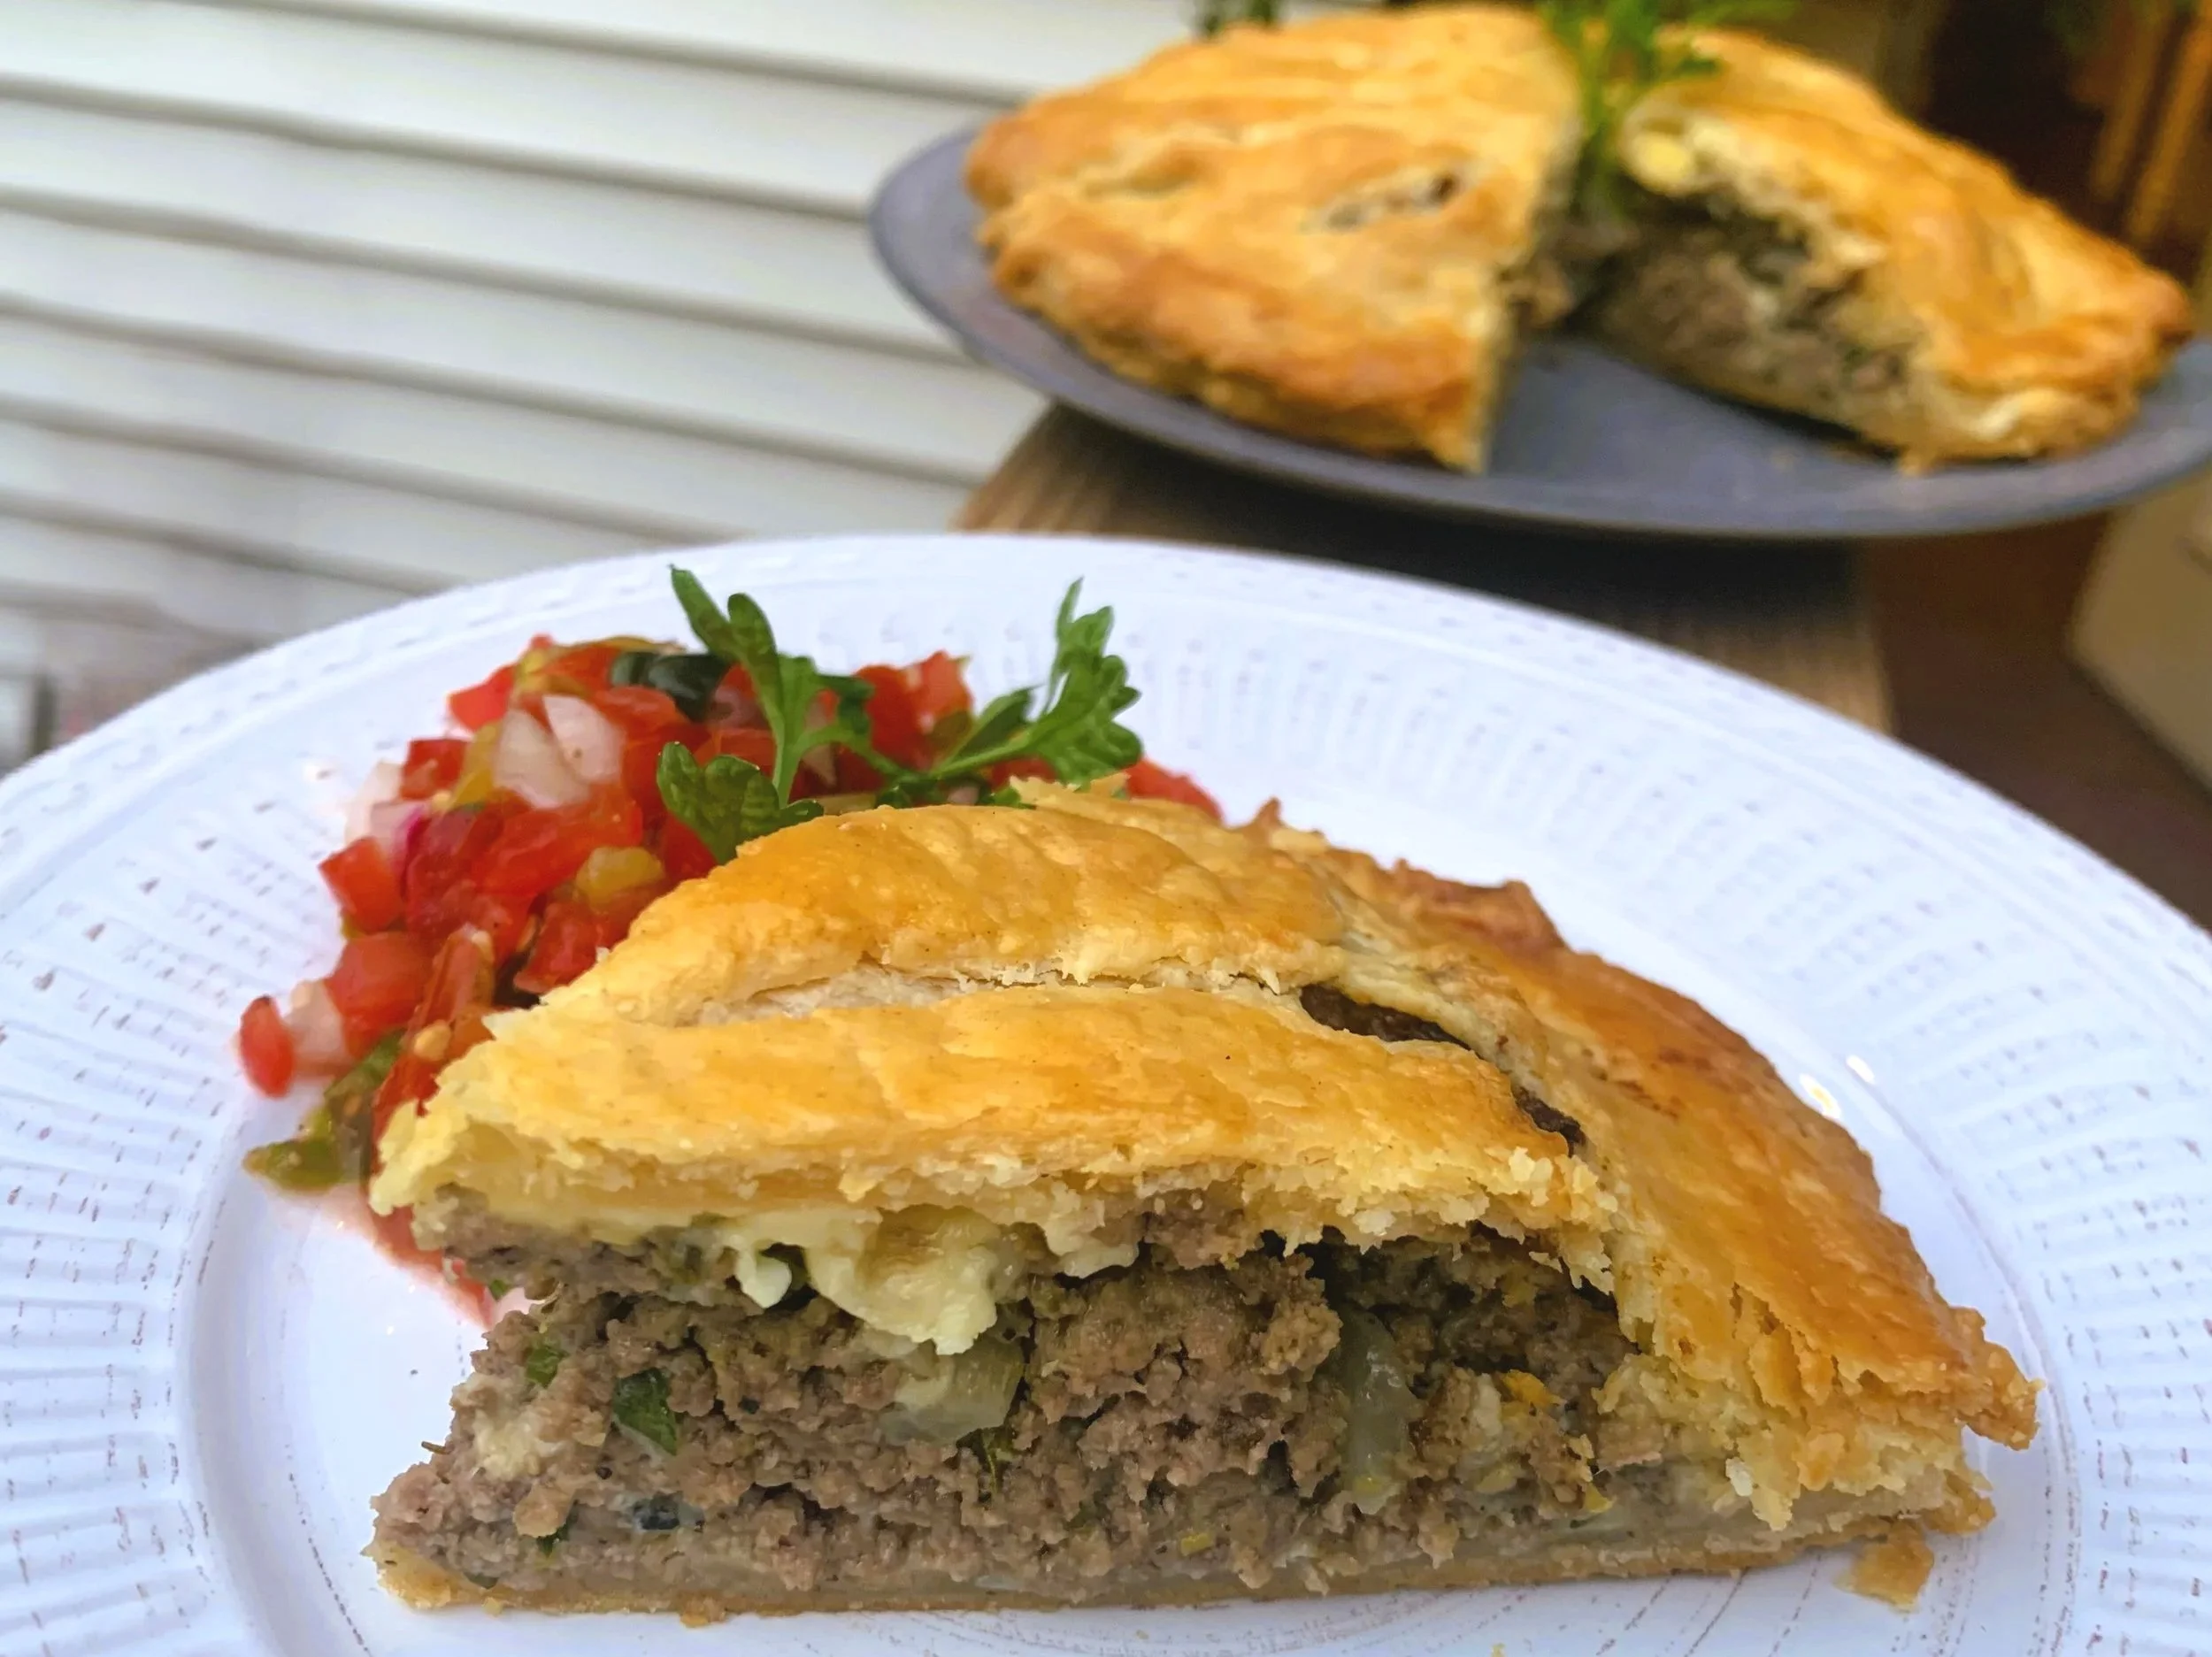
The savory beef and onion filling is every bit as delicious encased in this versatile pastry, as the sweet version. Try them both - but maybe not at the same meal!
PERSNICKETY NOTES:
**There is no shame in using store bought frozen Puff Pastry. It is easier, faster and dependably puffy (thank heaven for modern inventions) but you might find it fun to try your hand at making your own. It just takes a bit of time, patience and a cool kitchen to go with your cool demeanor - keeping it “chill” will help make it enjoyable. And then you can puff up yourself and proudly declare, “I made it myself!”
**To easily peel peaches, fill a medium-sized pot halfway with hot water. Bring to a rolling boil. Submerge the peaches in the boiling water for about 2 minutes. Remove the fruit then plunge into cold water to stop the cooking process. Take a paring knife and easily pull off the skin.
**Ham and Swiss Cheese Savory Filling: Another delicious savory filling consists of a layer of mushroom pate, followed by a ham filling and then topped with Swiss Cheese. Find the recipe for the mushroom pate and ham filling on this post: https://www.persnicketypanhandler.com/blog/f5p2p5zrcyo4znozlx454jlcbt9dq7?rq=Ham
**Other sweet fillings might include: sweetened cranberries, apricot, apple, pear, cherry, even chocolate! Anything that goes well with almond frangipane…..or leave the frangipane out for endless inspirations!