

Middle Eastern Kibbeh
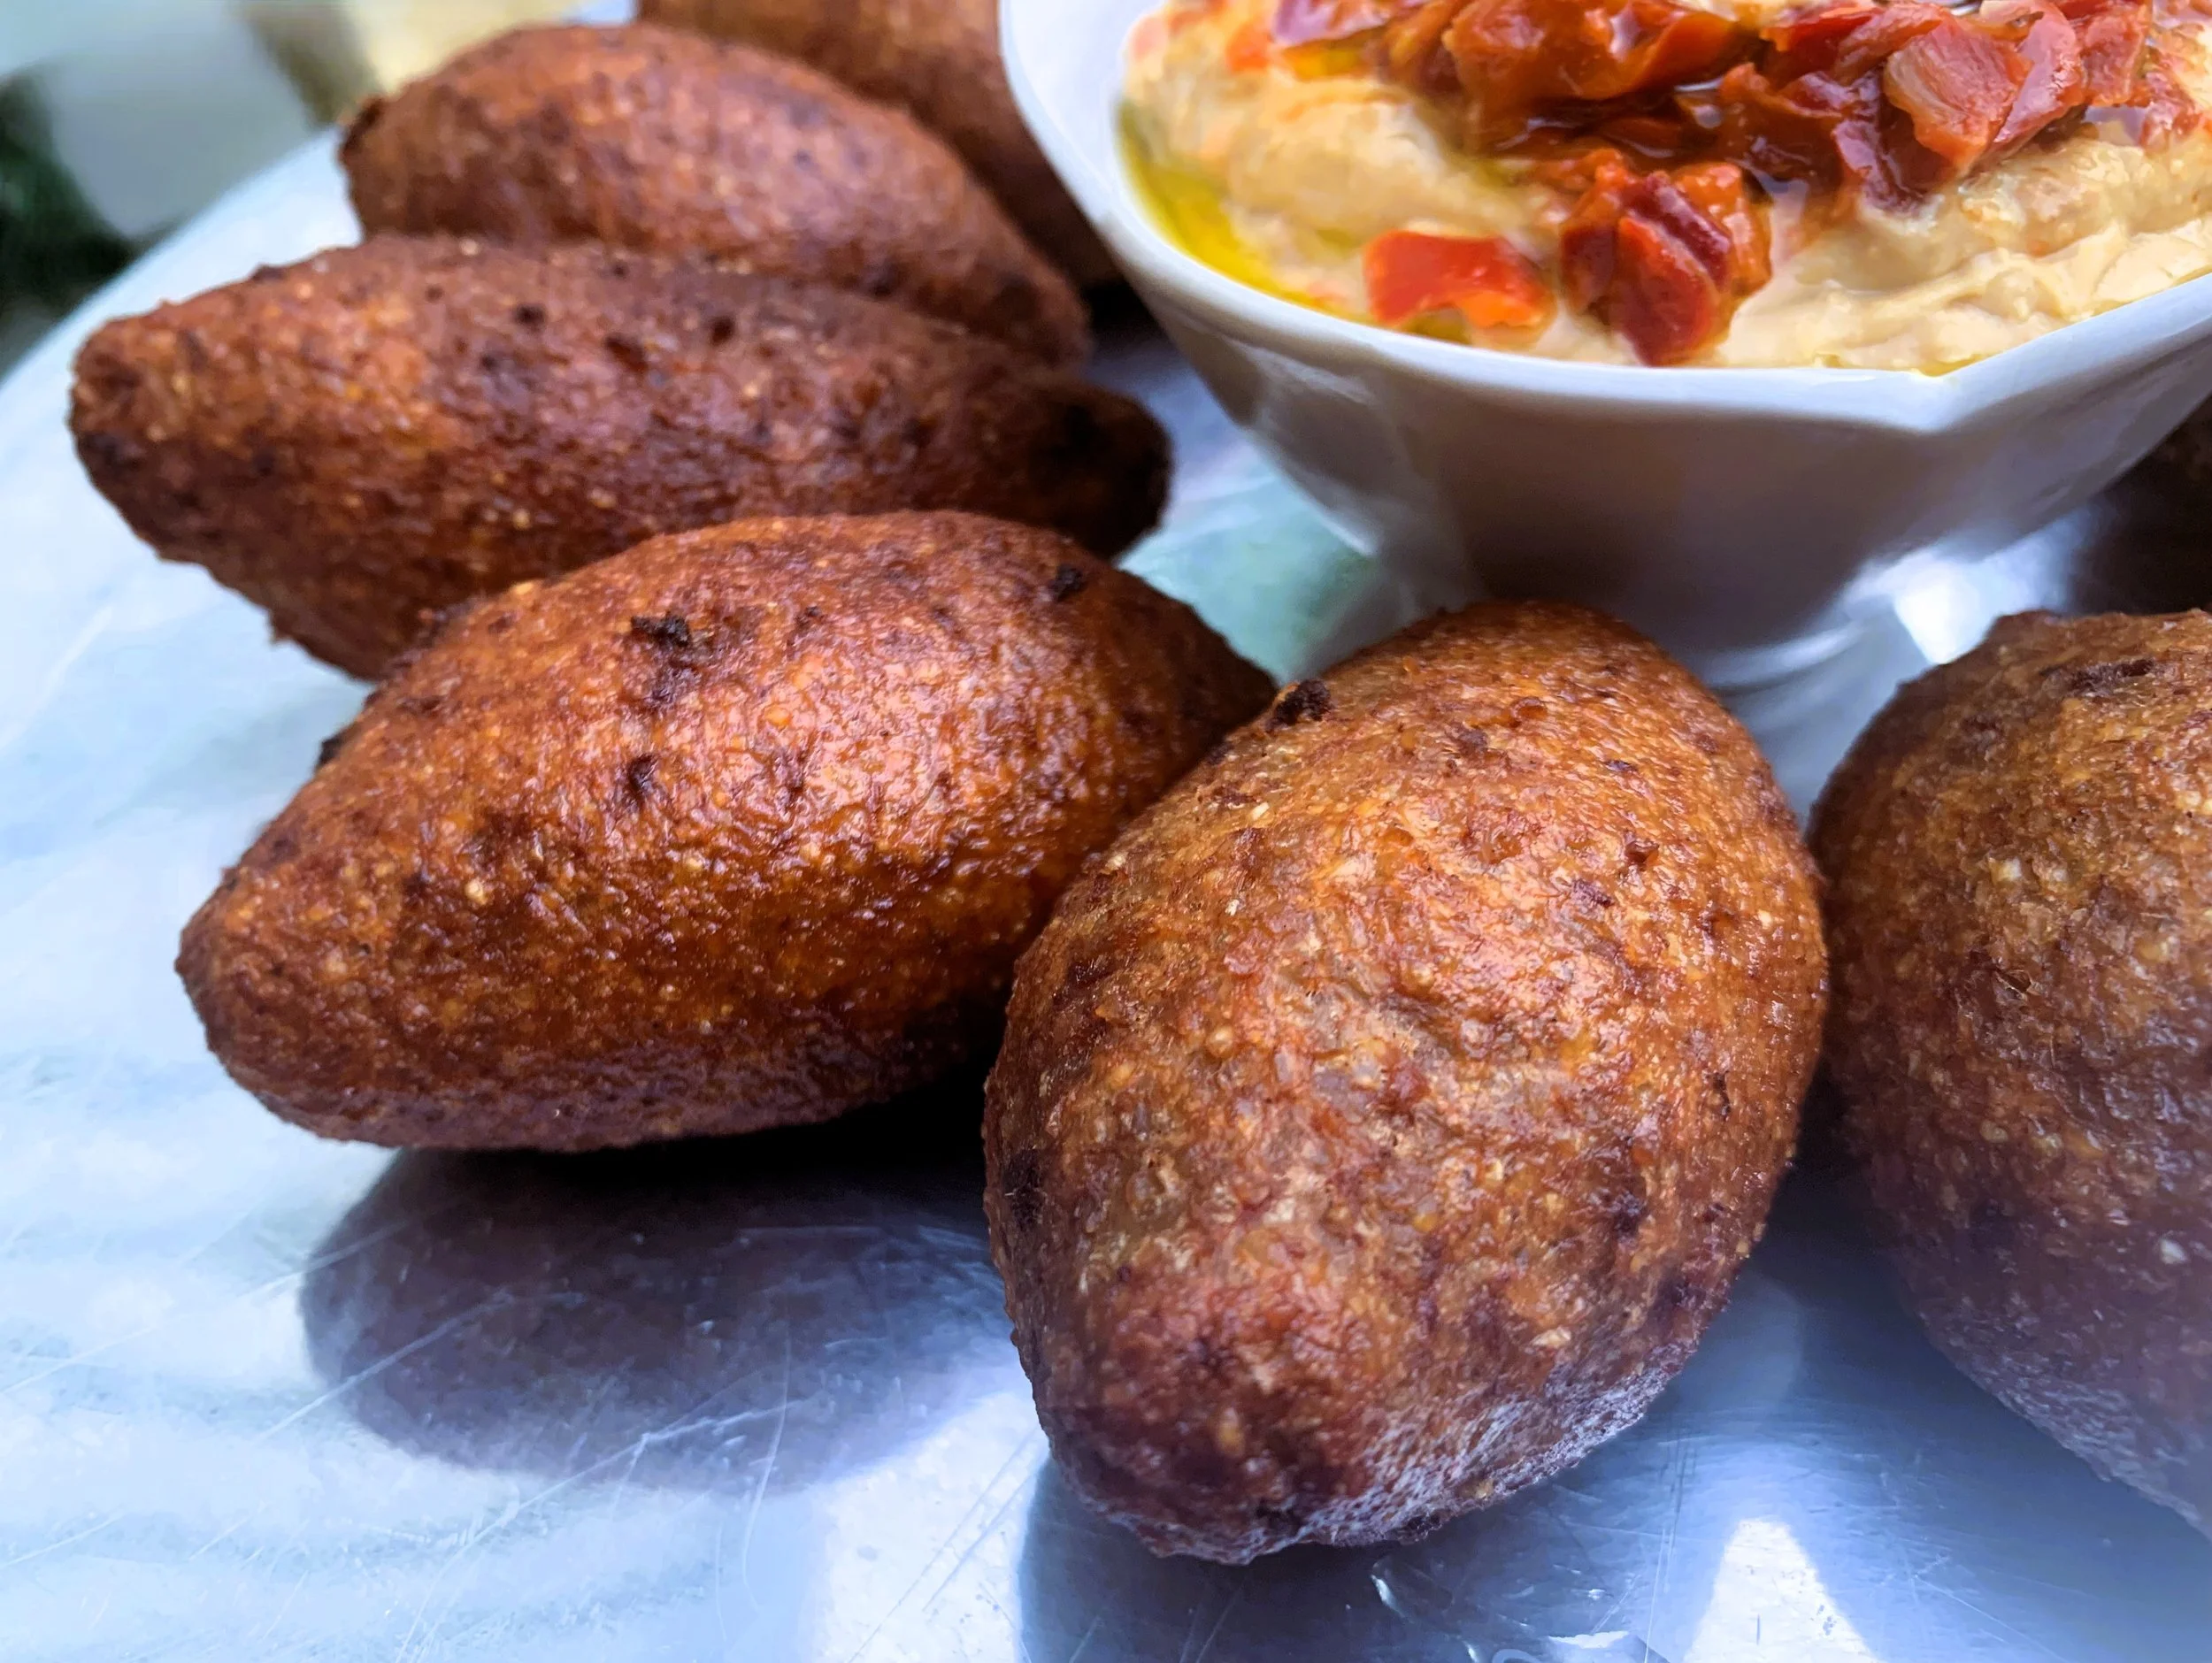
Kibbeh is prepared in different forms, but this one is the King of Kibbeh, possibly because they are so impressive! A crispy bulghur and meat shell is filled with an Arab meat/onion filling studded with cinnamon, allspice and pine nuts. The quintessential Arab Meat (Foot) ball!
Baked Kibbeh (or Kibbeh Bil Sayneeye - the easier version! (See recipe in notes below.)
jordanian Kibbeh
For the Filling:
1/2 cup butter 2 finely chopped yellow onions 1 tablespoon ground cinnamon 1 tablespoon ground allspice 1 pound lean ground beef (90% lean) or lamb (lamb is most often used in Jordan) ½ cup pine nuts salt and pepper to taste
-In a large frying pan, melt the butter. Add the onions then saute in
the butter over medium-low heat until very soft, but not browned, stirring frequently, about 20 minutes.
-Add the ground beef and simmer till brown breaking it up into very small pieces
as it cooks. Add cinnamon, allspice, salt and pepper and stir well. Simmer another 15 -20 minutes then stir in pine nuts. Set aside.
For the Bulgur Dough,
1/2 pound of lean ground beef, 90% lean 2 cups fine bulgur 3 tablespoons semolina 1 tablespoon tomato paste 1 1/2 teaspoons cinnamon 1 teaspoon ground allspice 1 teaspoon black pepper, freshly ground 1 teaspoon salt 1 - 1 1/2 cups crushed ice ½ to 1 cup all-purpose flour
-For the bulgur dough, mix the semolina with 1/2 cup plus 1 tablespoon water and let it soak for 5 minutes.
-Using a stand mixer (recommended) or by hand, mix the bulgur with the semolina and knead with the paddle or dough hook. Add in the ground beef, tomato paste, cinnamon, allspice, black pepper and salt and begin to knead on low speed. Add in the ice cubes a few at time, every 2 - 3 minutes while kneading. Knead for 15 minutes or until mixture becomes a paste. (This will take longer, around 30 minutes, if kneading by hand.) Test the texture by taking a piece of dough in your hand and press to flatten it. If the sides crack, it should be kneaded longer with more ice added.
-Finally, add in a 1/2 cup flour and continue to knead another couple of minutes. Test the dough again. It is ready when it does not stick to your hands and rolls out easily. If it hasn’t reached that point add another 1/4 cup of flour, knead, then test the texture again. If necessary, add the last 1/4 cup flour and knead to achieve the correct consistency.
-Place a bowl of water near your working station. Moisten your hands, take a 2 1/2 ounce lump of dough (or about 1/3 cup) and shape the dough into balls by pressing together then rolling in your hands. Keep a bowl of water beside you to wet your hands before shaping each ball.
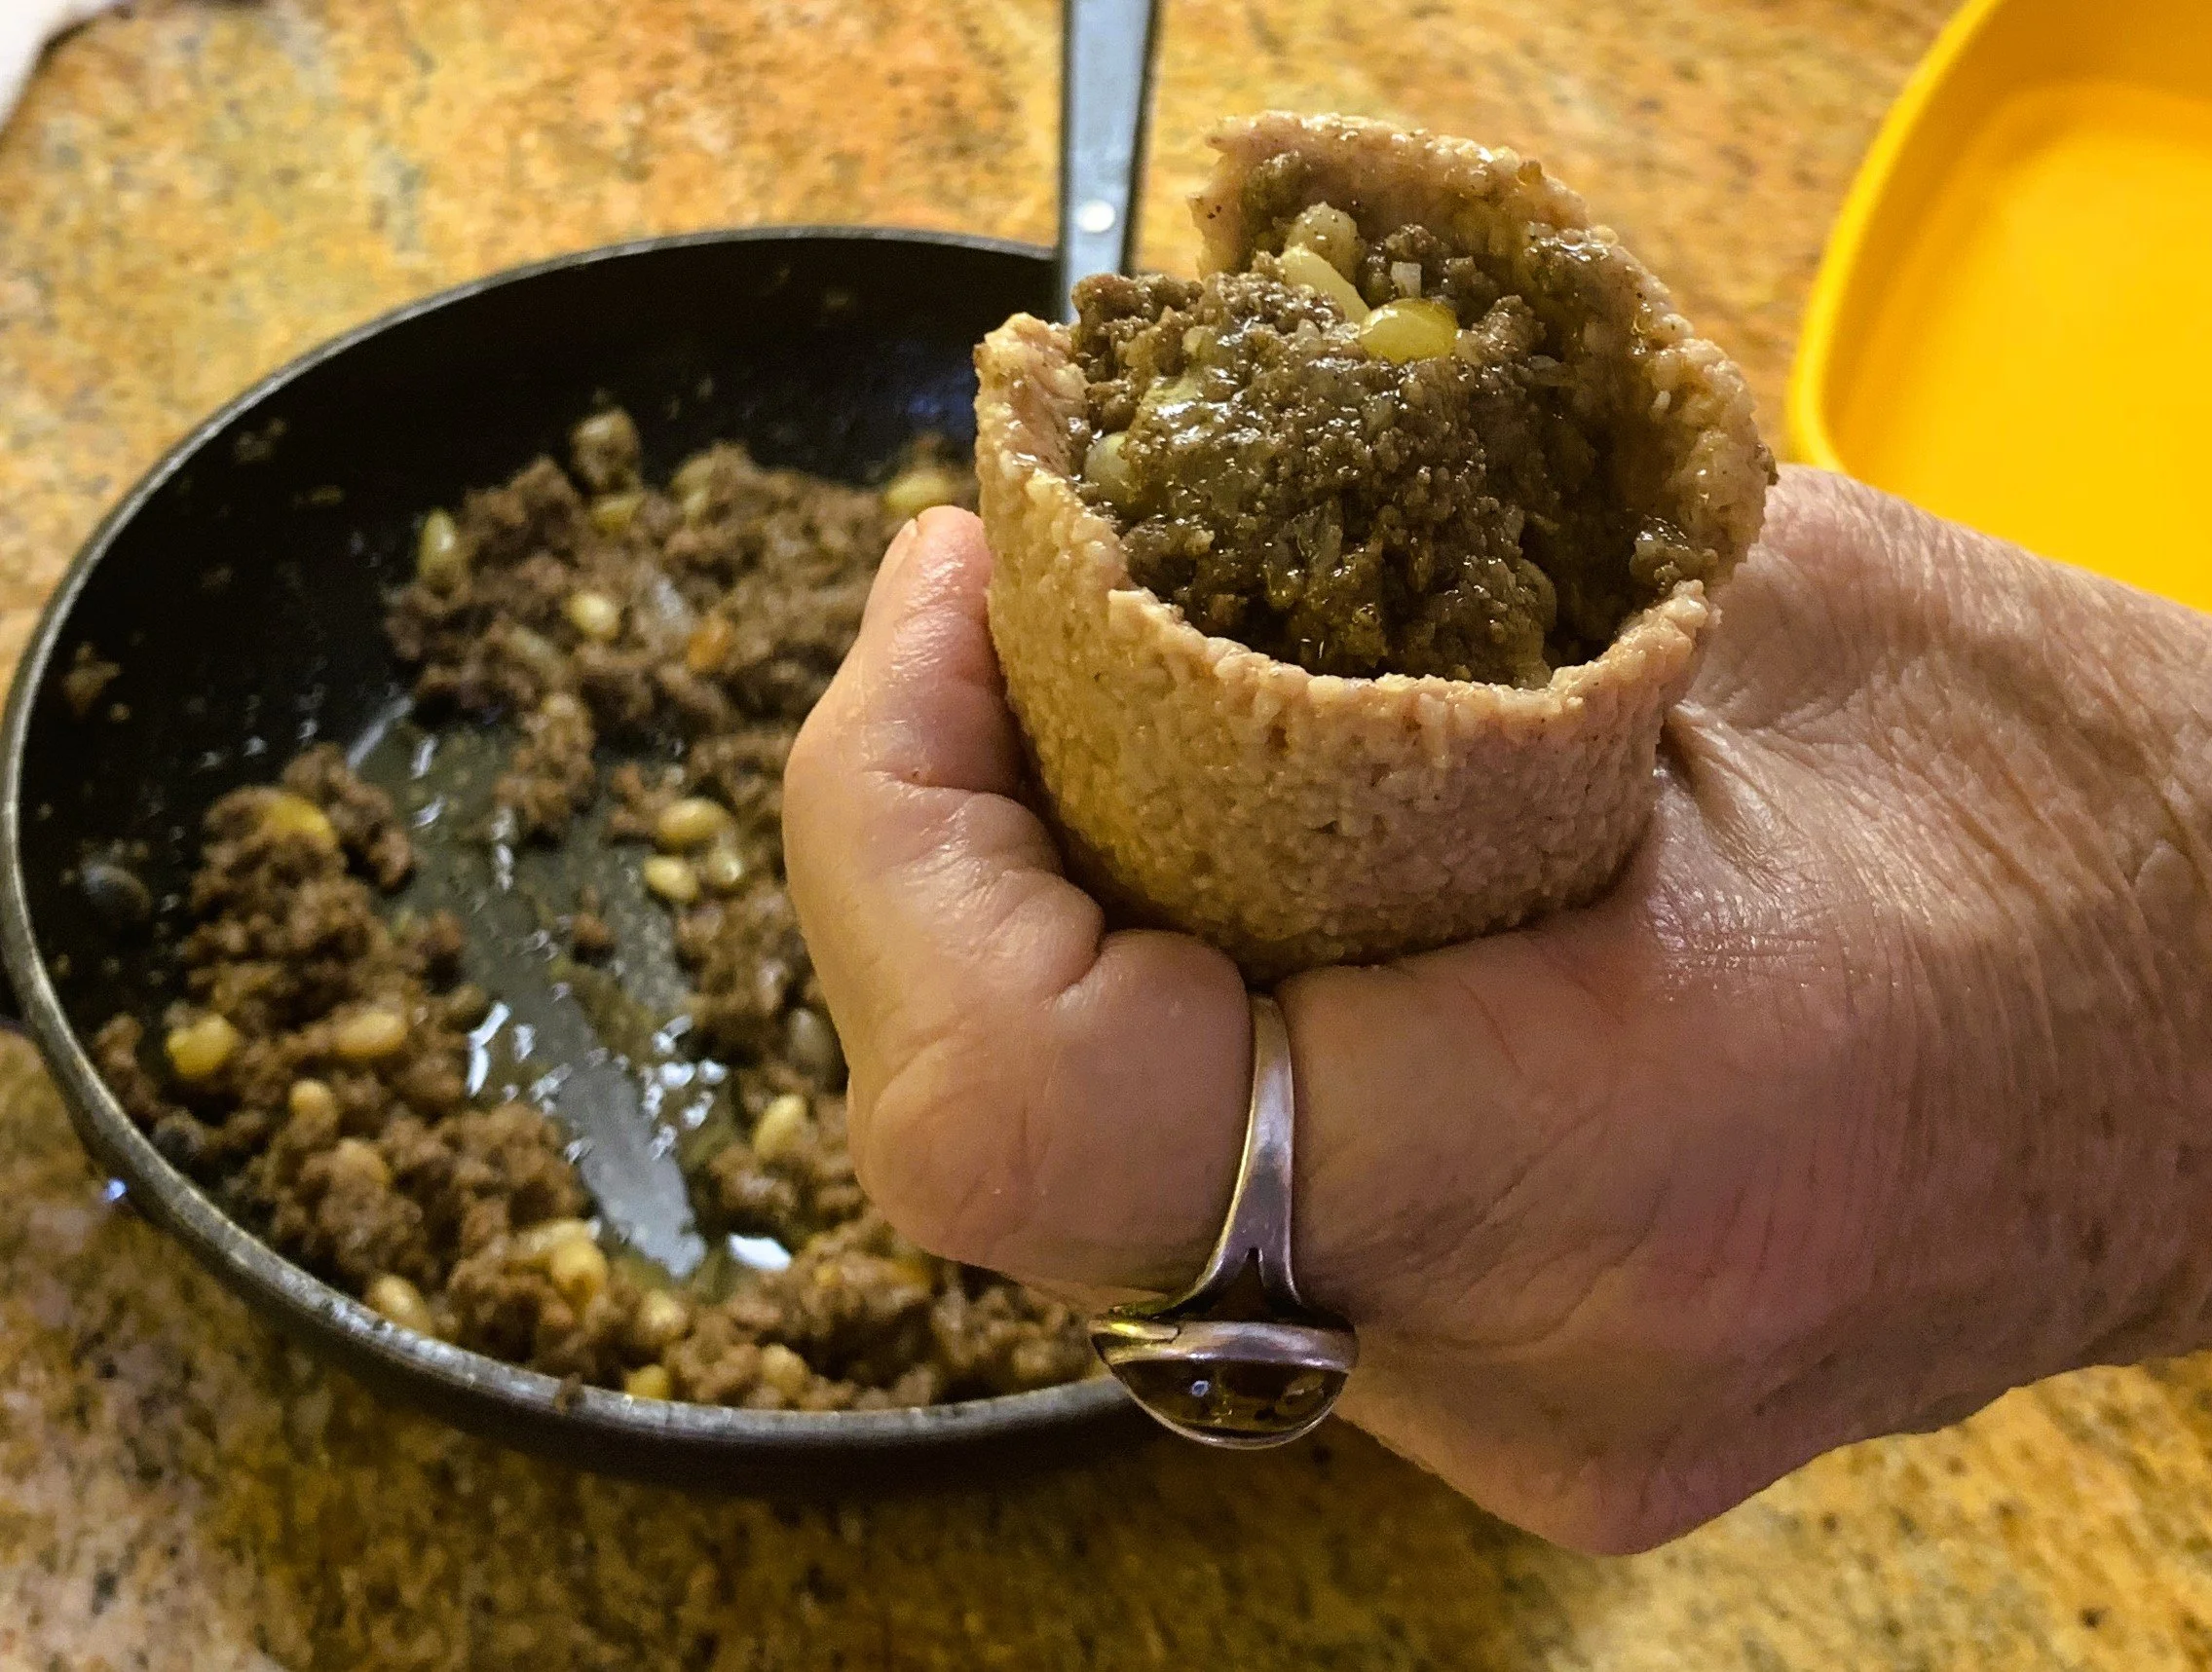
-Wet your hands again, roll each ball out into an oval shape, then make a hole in one end of the oval with your index finger. Then, with light movements, rotate or slowly twirl the dough in your palm and make the hole bigger with your index finger by pushing down on your palm to make the walls of the hole as thin as possible. If you are able to fit two fingers in as the hole becomes larger, this will allow you to make the walls of the shell very thin. You want the outsides of the hole or shell of the Kibbeh dough to be as thin as possible without breaking through it.
-Fill the cavity in with the cooled beef mixture, around 2 tablespoons. Continue to wet your hands as you are working with the Kibbeh. Close the open end of each Kibbeh by slowly squeezing it between your index finger and thumb. Then wetting your hands again, smooth out the shape into a football shape, pointed at each end, working to smooth over any cracks or cover any exposed filling. The final shape should be about the size of an elongated lemon. Prepare the remaining Kibbeh in the same way. Place the prepared Kibbehs on a plate or cookie sheet and chill in the fridge for 30 minutes to an hour.
-In a wide, deep bottomed saucepan, pour in enough oil to reach a depth of at least 3 inches, then heat over medium-high heat, to 375 degrees on a thermometer. Carefully spoon the Kibbehs into the hot oil, 3 -4 at a time and fry until a deep golden color, turning frequently with a spider utensil or slotted spoon. Remove the Kibbeh from the oil and drain on paper towels until cooled. May be served warm or at room temperature.
-Kibbeh are tasty served with hummous or moutabel (Baba Ghounouj), Cucumber Yogurt Salad (Khyar bi laban), or other Arab dips. Also serve with quartered lemons, for squirting on the Kibbeh as you eat.
-Makes about 2 dozen Kibbeh.
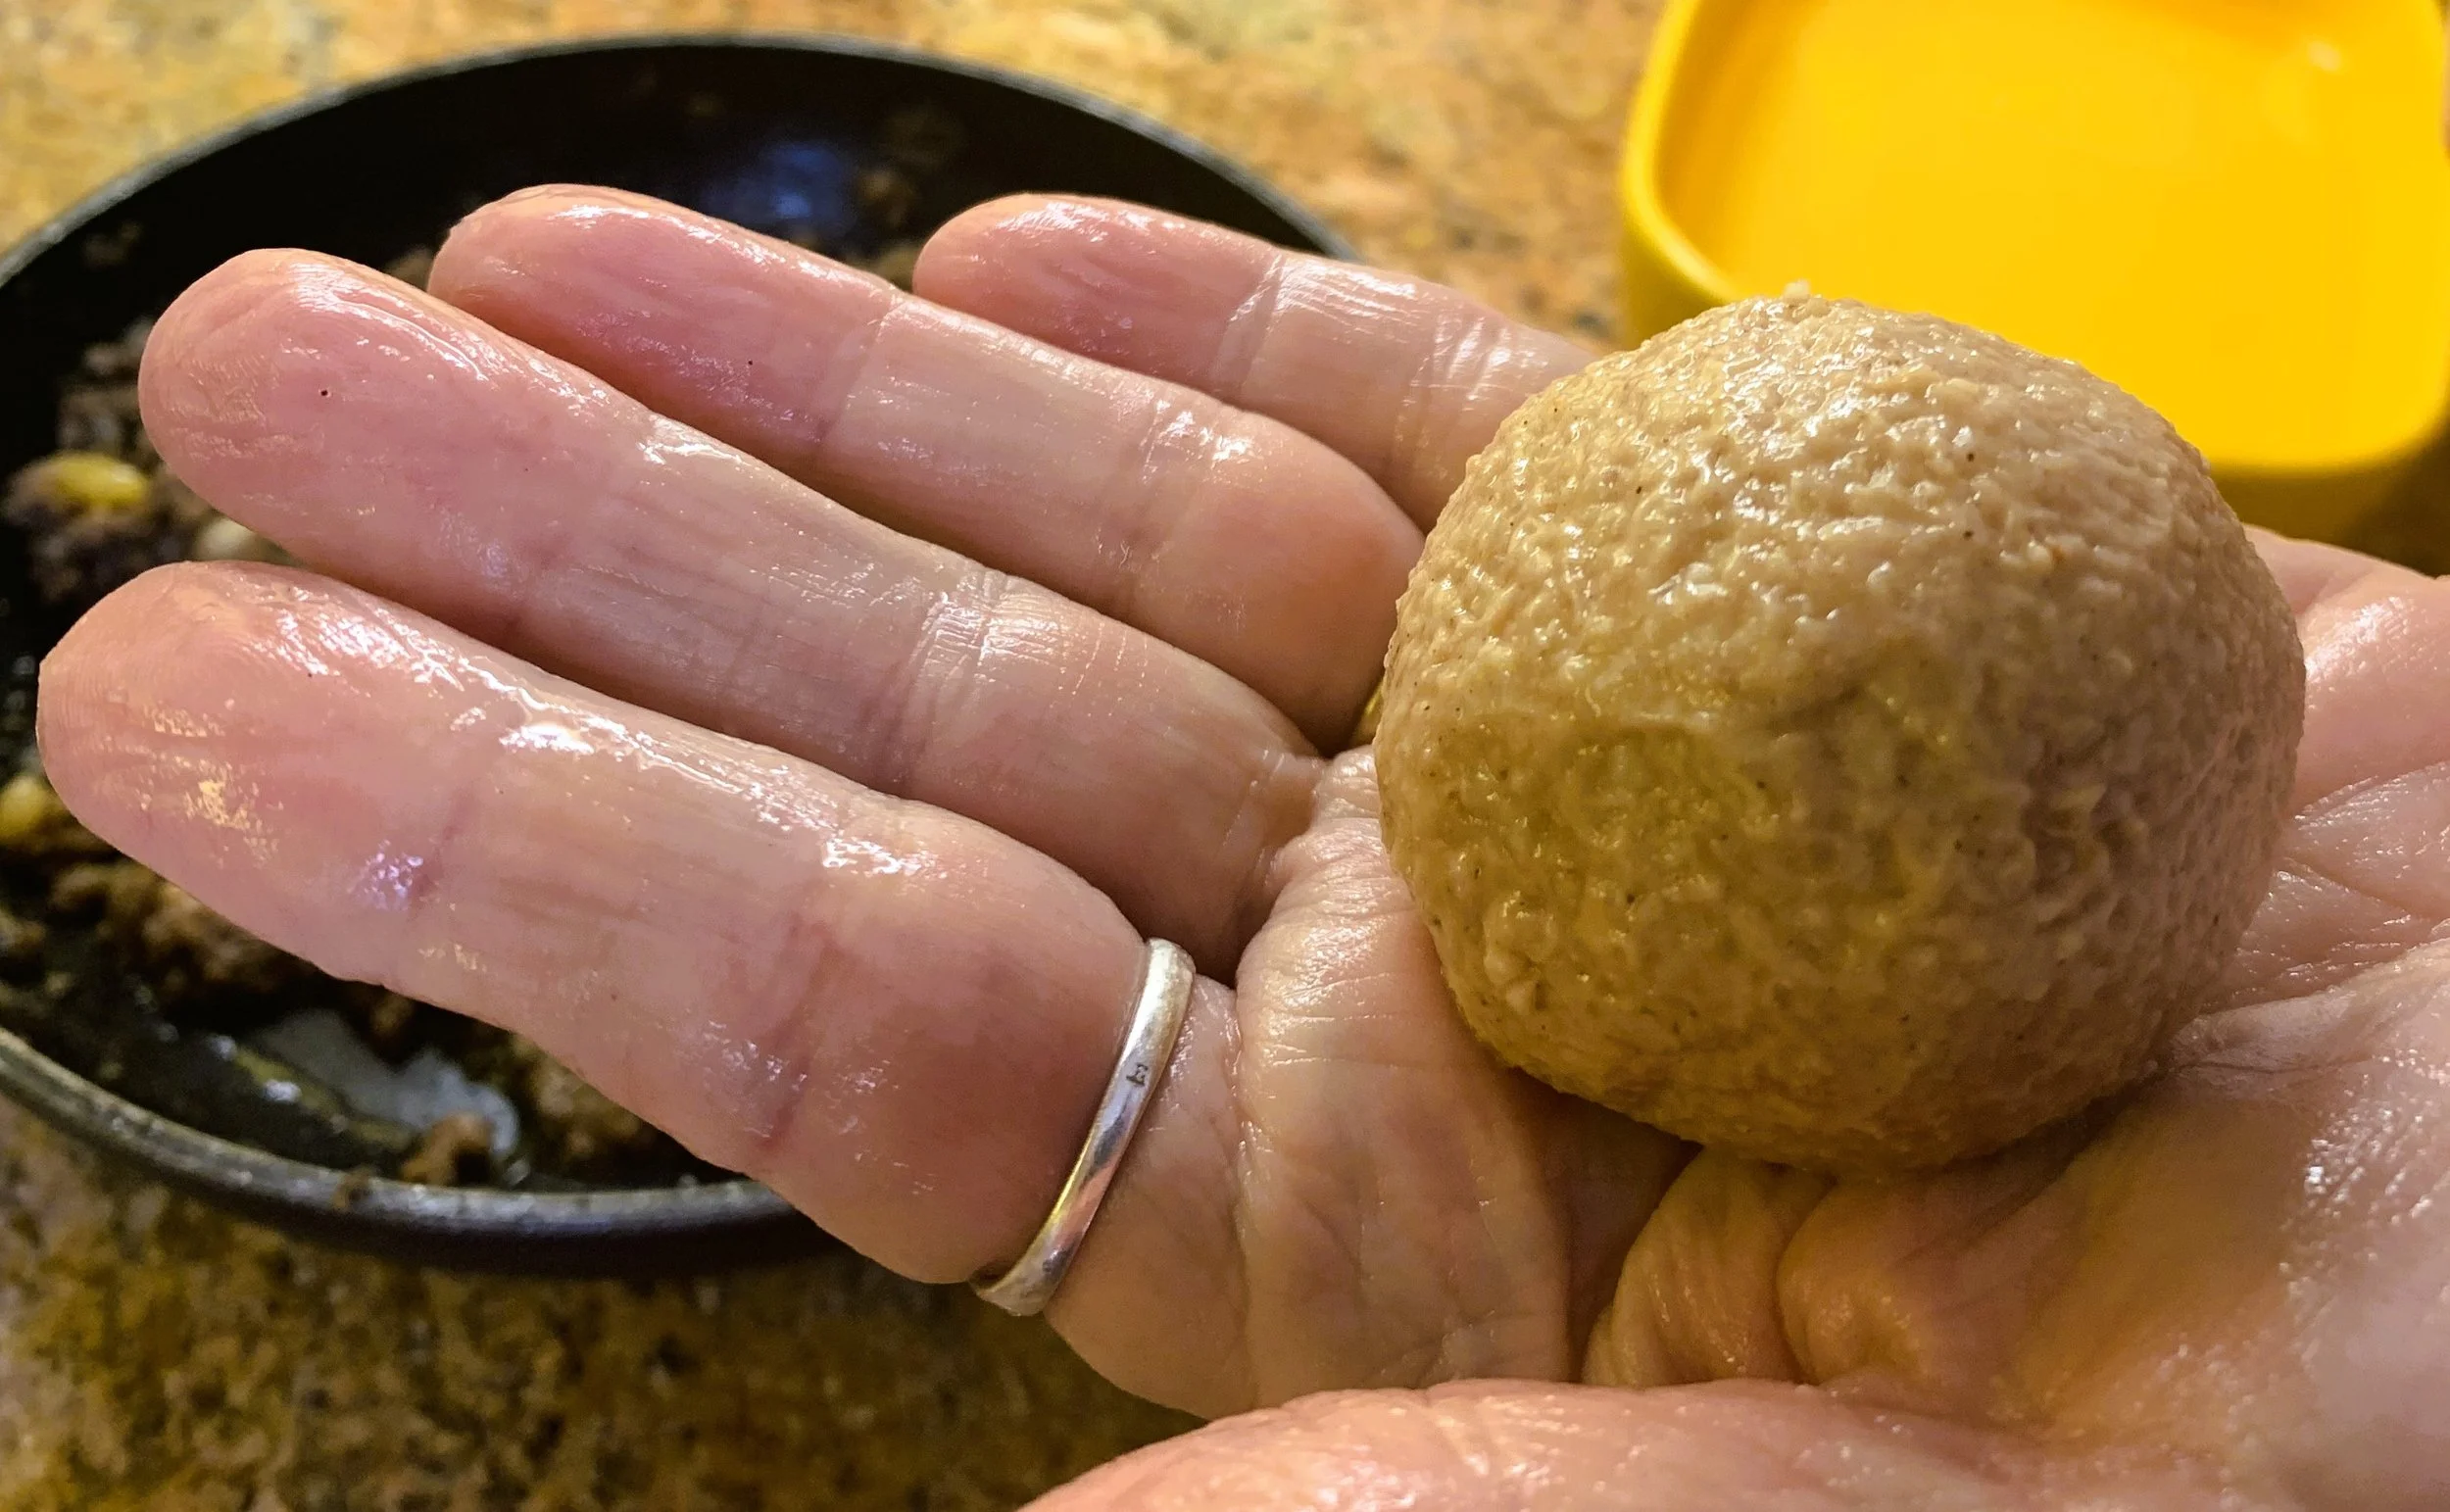
After preparing the dough for the outer shell, take a piece and with wet hands, press and roll into ball shapes.

Shape each ball into an oblong, then with your index finger, push a hole in through one end to create a cavity. Rotate the dough in your hand as you press with your finger to create a deep cavity with very thin sides.

The sides of the cavity should be as thin as possible without breaking through.

Place about 2 tablespoons of filling, into the cavity of the dough.
With wet hands, close the top end by smoothing with your index finger and thumb to close it.

Wet your hands again, and smooth out any cracks in the dough, covering any filling that may be peeking out. Shape into a football shape, pointed on each end.

Place formed Kibbeh on platter or cookie sheet.

Chill in fridge for 30 minutes to an hour.

Heat 3 inches of oil in a deep pan and bring to 375 degrees. Place a few Kibbeh at a time in the oil.

Stir frequently and check every 2 -3 minutes to see if they are done. This one needs a bit more time in the oil.

When the Kibbeh have become a deep golden brown, remove them from the oil then set on paper towels to drain.

Serve Kibbeh while still warm or at room temperature.

The crispy exterior holds a tasty surprise in the middle - beef, silky onions fried in butter and all the spices you would expect in this Arab speciality.

Serve Kibbeh with lemon slices to dress them as well as with Cumcumber Yogurt Salad or other Arab dips.

Hummous makes our favorite dip for glorious, golden, crunchy Kibbeh - the star of the Mezzah!

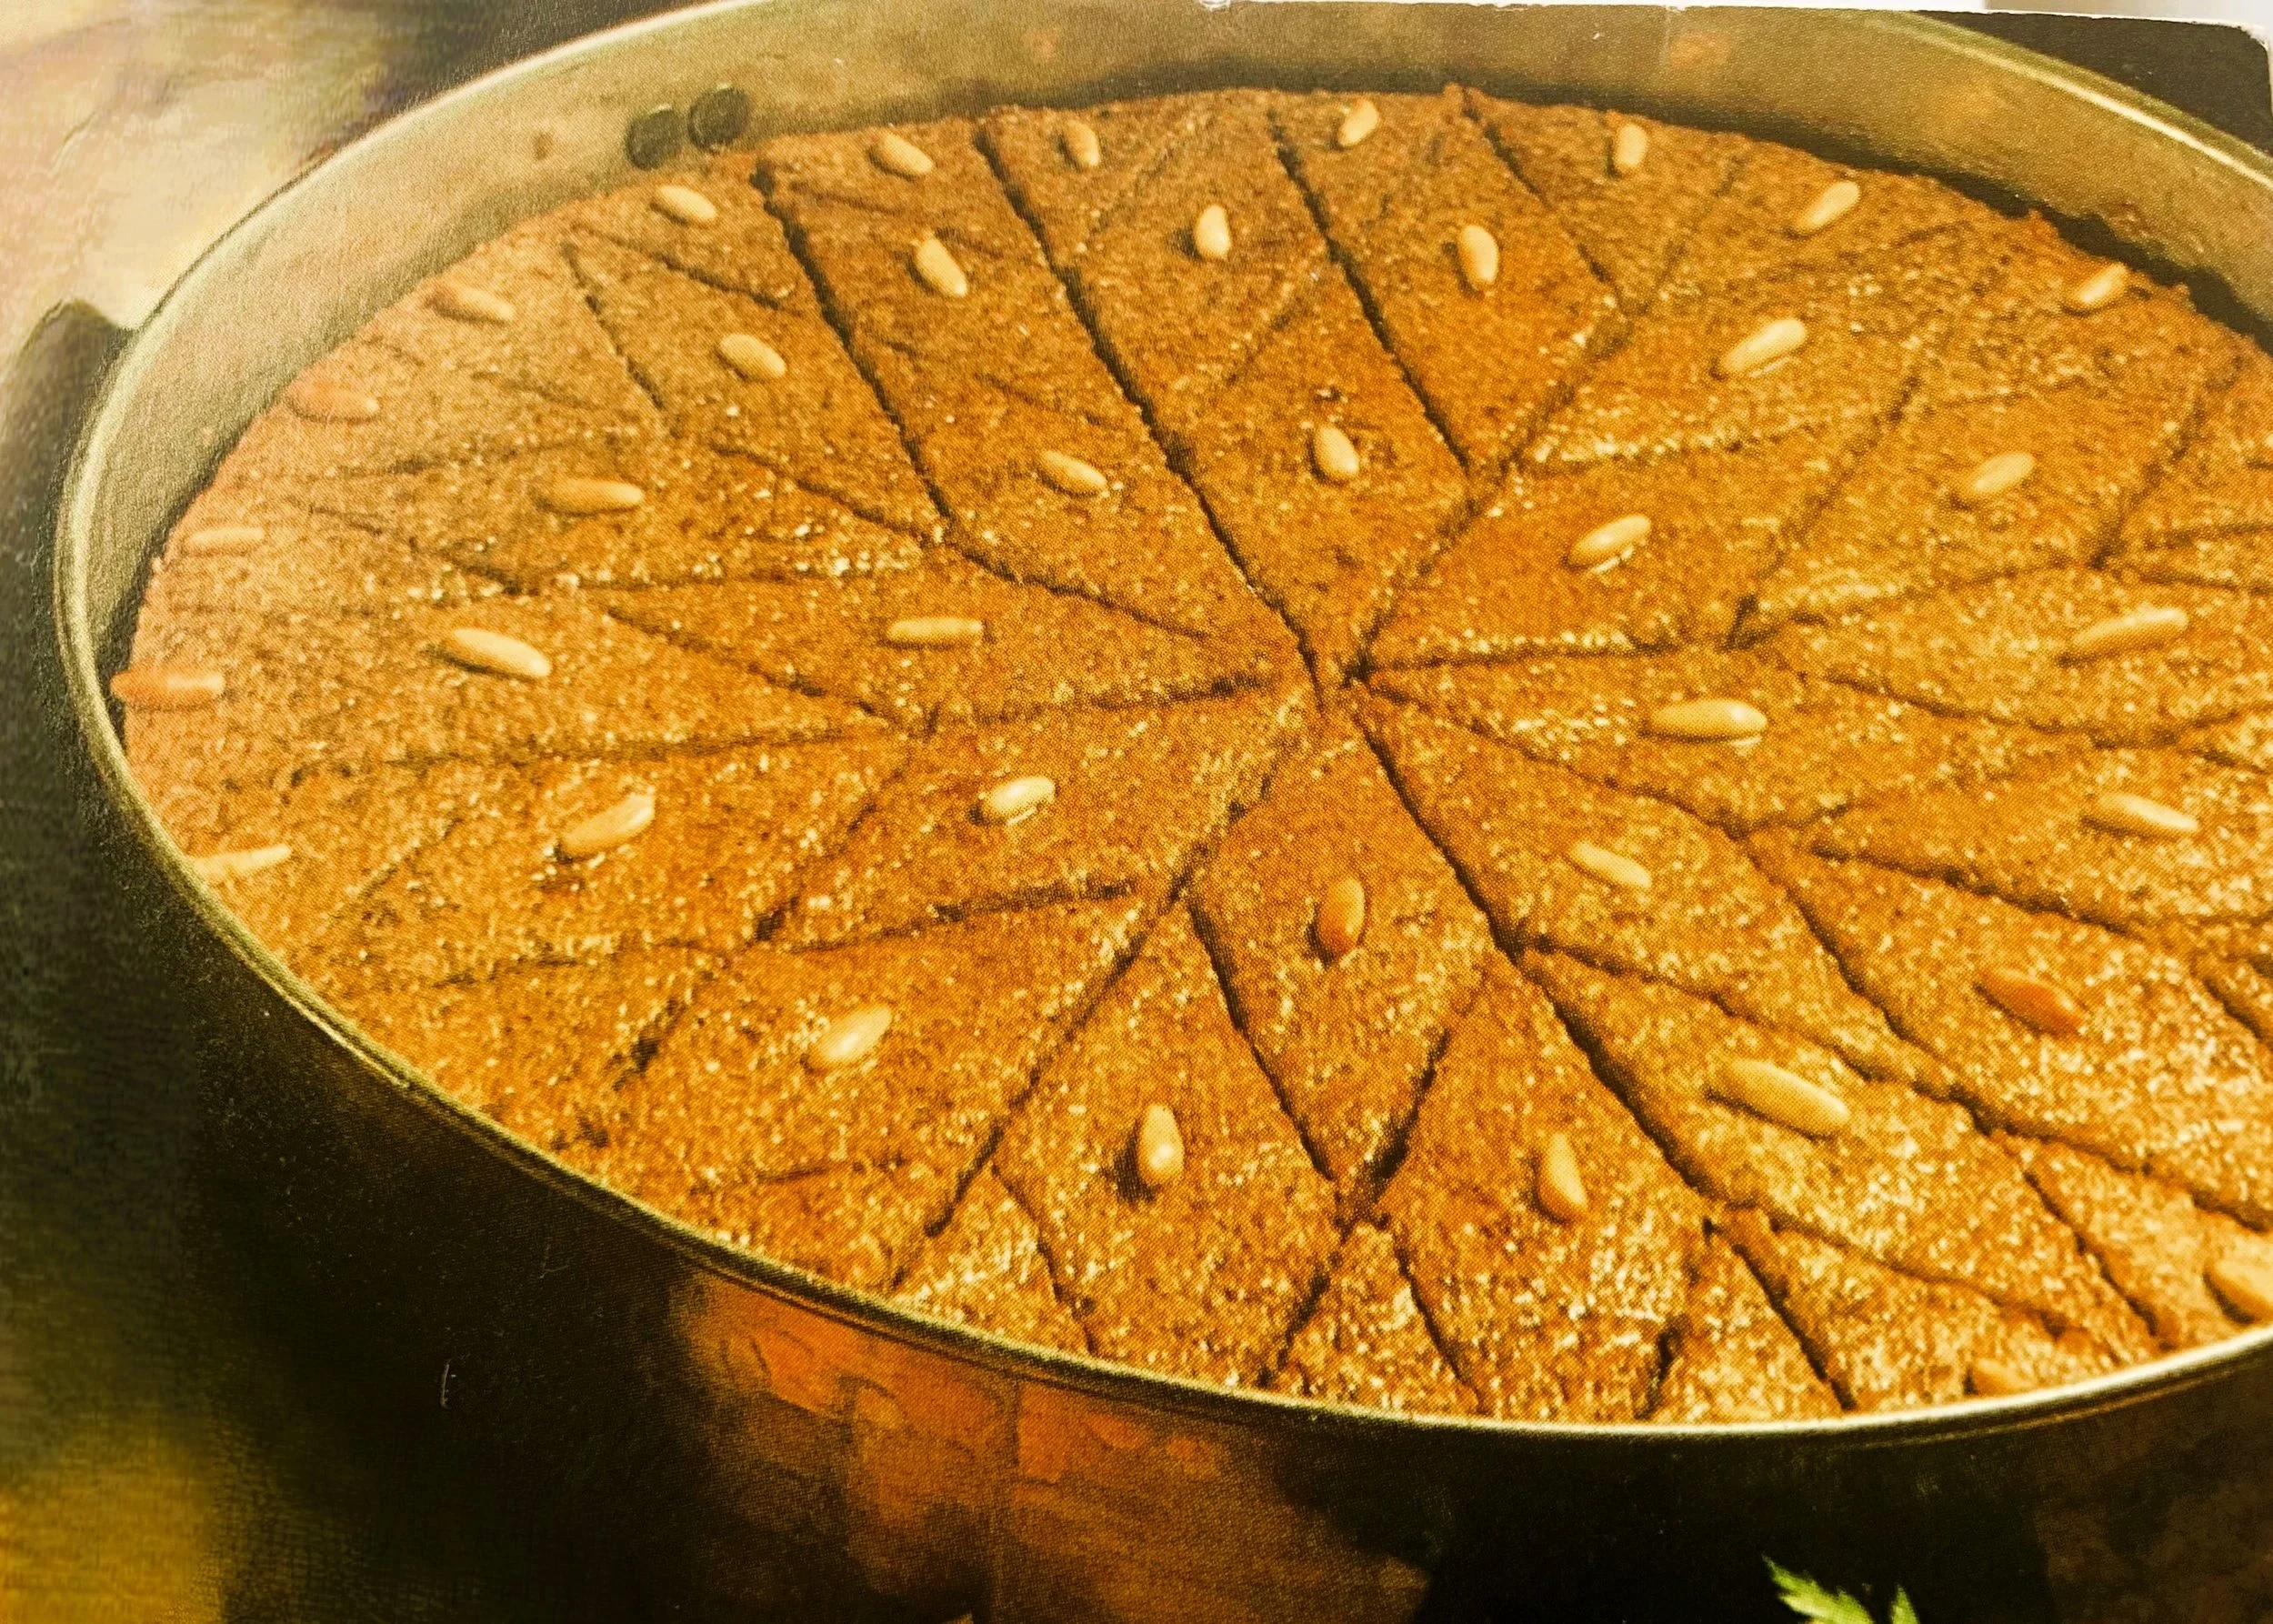
Kibbeh Bil Sanieh (Baked Kibbeh) - the easier version. The diamond star shape is stunning and the dish, perhaps a bit easier to make than the Kibbeh Balls. A great way to try your hand at Kibbeh!
PERSNICKETY NOTES:
**You can also air fry Kibbeh at 390 degrees for 14 minutes. Brush each Kibbeh with oil before frying. Baking is also an option. Once again, brush each thoroughly with oil before baking. Then bake in an oven heated to 390 degrees for 20 minutes, turning them over halfway through the cooking time.
**Kibbeh can be frozen after forming. Chill in the fridge as directed, then freeze them on a cookie sheet in the freezer until well frozen. Remove them to a sealable freezer bag and return to the freezer. Can be kept for up to 2 months in the freezer. To cook, remove them from the freezer and let them sit at room temperature for at least 45 minutes, then fry as described in the recipe above.
**Kibbeh Bil Sayneeye (Baked Kibbeh Recipe)
Brush 2 tablespoons of olive oil over the bottom of a 10 inch round baking pan or baking dish. (Can also be made in a 10 X 8 inch rectangular pan)
Take half of the Kibbeh dough, flatten it evenly into the bottom of the pan using wet hands to press it down and smooth it out.
For the next layer, add the ground beef mixture to the top of the first layer, spreading it out evenly using the back of a large spoon until it covers the dough layer. Leave a small border around the edges of the meat mixture.
Take the remaining half of the dough, flattening it in your hands (or rolling it out to the size of your pan, between 2 pieces of cling film) then place it on the top of the ground beef mixture, working with wet hands to spread it out, smoothing out any cracks or places where the meat filling is peeking through. Make sure the dough is pressed well along the edges, to enclose the meat mixture.
Gently slice through the layers with a sharp knife, to pre-cut diamond shaped or squared portions, as you like.
Brush 2 tablespoons of olive oil over the top.
Bake the Kibbeh in the oven, uncovered for 30 - 40 minutes at 380 degrees, or until the top is evenly browned. (You may broil the Kibbeh the last 5 minutes or so, to give it a crispier finish.) Remove from oven and cool about 15 minutes, then cut through pre-cut lines completely to the bottom of the dish. Serves 8 as a main course dish.